3007 CM4 4G Mini EN
Keywords
Raspberry Pi, Orange Pi, NVIDIA, FriendlyELEC, CM4 4G Mini, CAT4 4G, Qualcomm 4G/GPS, NL668-EU,NL668-EAU,NL668-AM,ZTE CAT4, Driver-free and Dial-up-free, Auto-detection, Plug and play, Raspberry Pi OS, Ubuntu, Debian, Android, OpenWrt
I. Introduction
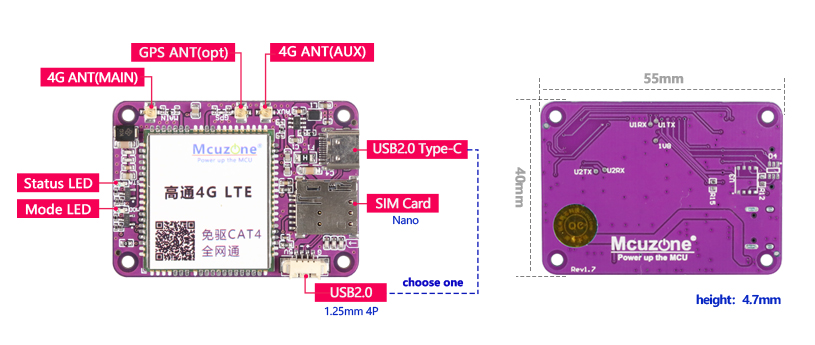
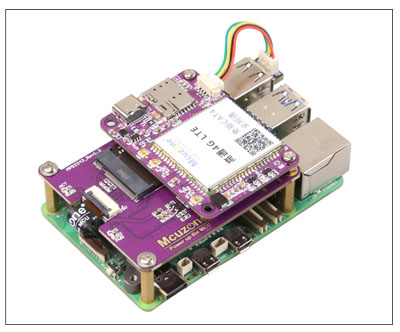
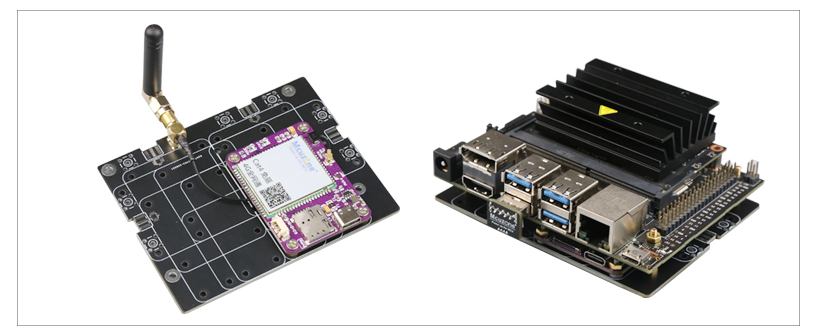
The CM4 4G Mini is a 4G module that matches the size of the Raspberry Pi CM4/CM5 core board. The CM4 4G Mini is compatible with various 4G modules, catering to different system and cost requirements. The CM4 4G Mini uses USB ports for communication, featuring both USB-C and 1.25mm 4Pin dual interfaces (choose one). The USB-C interface is suitable for the vast majority of application scenarios, with a connection method that involves external use, such as on embedded platforms like Raspberry Pi, Orange Pi, and NVIDIA, as well as PCs, various set-top boxes, and more. The 1.25mm 4Pin connector is compatible with the vast majority of our Raspberry Pi expansion boards. The 4G module can be directly mounted on top of the CM4/CM5 core board and connected to the expansion board via the 1.25mm 4Pin connector. The CM4 4G Mini features a self-ejecting Nano SIM card slot. Depending on the module's functionality, it is equipped with 1 to 3 IPEX Gen 1 interfaces, which can be paired with either FPC antennas or SMA antennas for use.
The 4G module is driver-free, auto-recognized, plug-and-play, and requires no additional drivers on the official OS of development boards such as Raspberry Pi, Orange Pi, and NVIDIA. Some 4G modules come with built-in GPS functionality, allowing developers to save space and operate with ease. The GPS feature requires an external passive GPS antenna.
From the perspective of CPU solutions, 4G modules can be divided into domestic solutions and Qualcomm solutions. Among them, CAT4 4G and ZTE CAT4 are domestic solutions, while Qualcomm 4G and Qualcomm 4G-GPS modules are Qualcomm solutions.

II. Hardware Spec
1. Utilizing a high-efficiency imported DC-DC circuit, the standby current is 0.15A, and the operating current during full-speed downloading is less than 0.3A.
2. Onboard 4G LTE module, compatible with official OS of development boards such as Raspberry Pi, Orange Pi, and NVIDIA, driver-free and dial-up free.
3. It features one USB port for 4G communication and power supply. It comes with two onboard package options: one USB-C port and one 1.25mm-4P interface, to be used alternatively.
4. It features a self-ejecting Nano SIM card slot, with a package size of 5*6mm.
5. It features two 1st-generation IPEX connectors, and the antenna only needs to be connected to the MAIN interface; it also reserves one 1st-generation IPEX GPS antenna connector (suitable for 4G modules with GPS functionality).
6. It features two LED lights: one for network registration indication and one for operational status indication (different modules may have varying indication methods).
7. Size: 40*55mm. The module is fully compatible with the dimensions of the Raspberry Pi CM4/CM5, immersion gold process, lead-free production, PCB certified by UL and ROHS, flame retardant rating 94V-0.
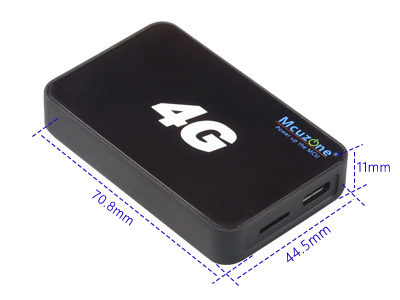
Plastic casing (Opt.):
| LED
Instructions |
Network
registration (mode) |
Operational status (status) |
|---|---|---|
| CAT4 4G | Always on | The blinking status of 1.8 seconds on and 0.2 seconds off (which can also be determined by the on time being longer than the off time) indicates that the 4G module is connected to the network. |
| The blinking status is 1.8 seconds off and 0.2 seconds on, indicating an issue with the SIM card or network. Please check the SIM card and antenna. | ||
| Qualcomm 4G | None | The blinking status is slow with brief rapid flashes in between, indicating that the 4G module is connected to the network; otherwise, it suggests an issue with the SIM card or network. Please check the SIM card and antenna. |
| ZTE CAT4 | None | The fast blinking status indicates that the 4G module is connected to the network; otherwise, it suggests there might be an issue with the SIM card or the network. Please check the SIM card and the antenna. |
III. Work with Raspberry Pi OS
The Raspberry Pi OS (Raspberry Pi OS with desktop): 2024-07-04-raspios-bookworm-arm64.img.xz.
You can download the Raspberry Pi OS in:
https://www.raspberrypi.com/software/operating-systems/#raspberry-pi-os-64-bit
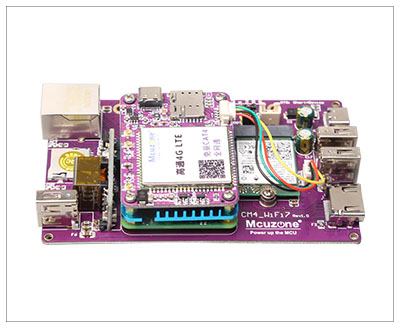
(The figure shows the CM4-WiFi7-POE expansion board) |
1 |
3.1 Connect 4G
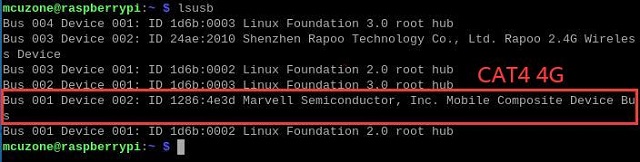
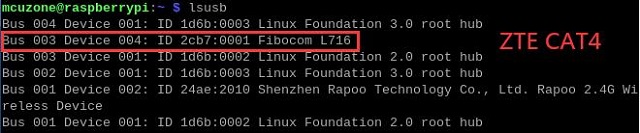
After powering on and running the Raspberry Pi OS, execute the command lsusb in terminal, as shown in the image below:

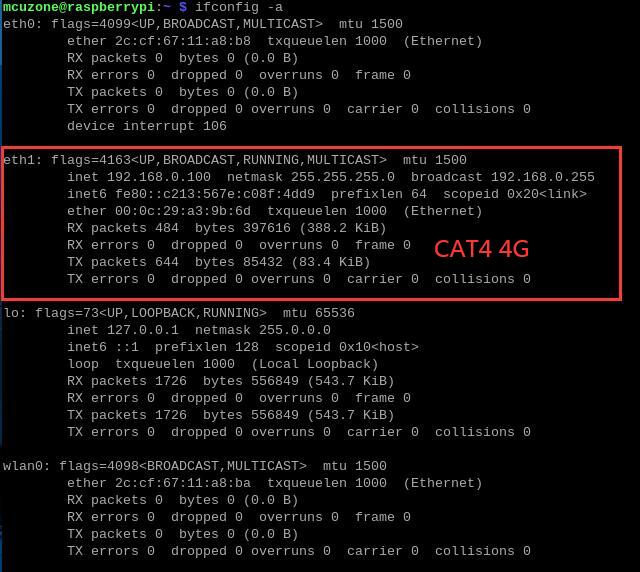
By executing ifconfig -a in terminal, we can see the 4G module (eth1 or usb0) successfully obtains an IP address:

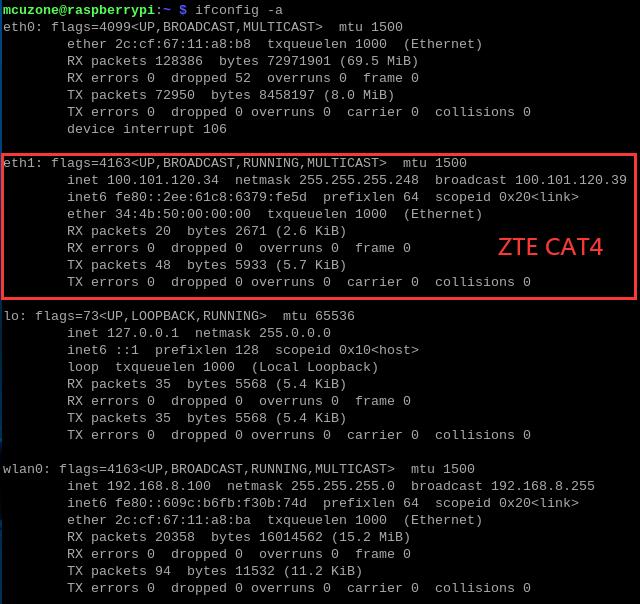
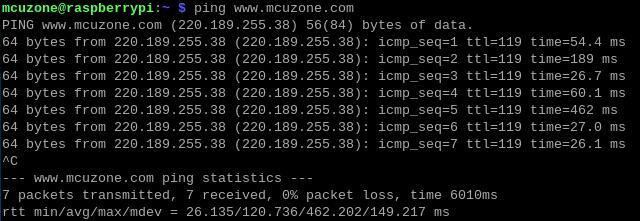
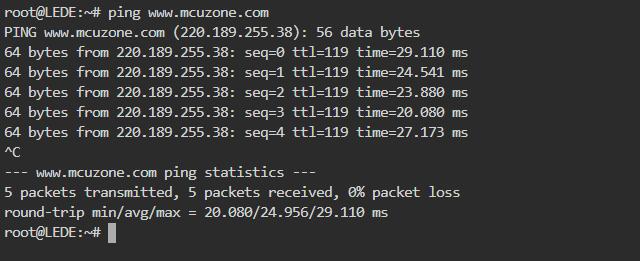
After the 4G module successfully obtains an IP address, we can ping external network addresses, such as:
ping www.mcuzone.com
Connect to Internet via a 4G module, access a speed test website to measure the speed, and the results are as follows:
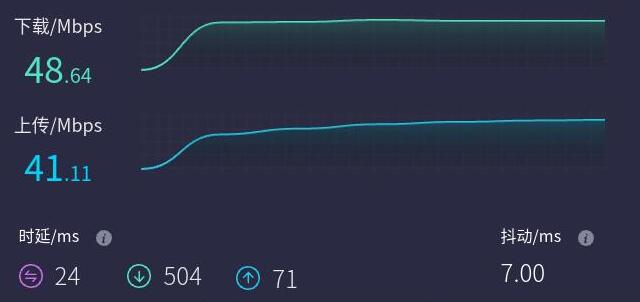
Note: Network speed tests are affected by the network environment and testing methods. Please refer to the actual speed, as this test is for reference only.
3.2 GPS test (for Qualcomm 4G-GPS version)
If you choose the Qualcomm 4G-GPS version, then this 4G module comes with GPS functionality. You need to connect a GPS passive antenna and ensure that the GPS antenna is extended outdoors.
Execute lsusb, as shown in the image below:

Note down the ID value of the 4G module: 05c6 90b6.
Use the following command to open the ttyUSB serial port, where the value after "echo" is the ID value recorded above:
sudo modprobe option
sudo sh -c 'echo 05c6 90b6 > /sys/bus/usb-serial/drivers/option1/new_id'
After executing the above two commands, the system should have three additional devices: ttyUSB0, ttyUSB1, ttyUSB2. You can check them by entering ls /dev.

Run minicom and open the ttyUSB0 serial port.
sudo minicom -D /dev/ttyUSB0
And execute:
at+gtgpsepo=1 //Enable AGPS
at+gtgpspower=1 //Enable GPS
Please wait a moment for the positioning to succeed, then execute:
at+gtgps? //View NMEA messages
Then you can see the GPS information output:

IV. Test Ubuntu OS on Raspberry Pi device
The Ubuntu OS (Ubuntu OS with desktop): ubuntu-24.04-preinstalled-desktop-arm64+raspi.img.xz.
You can download the Ubuntu OS in:
https://ubuntu.com/download/raspberry-pi
The 4G module is also driver-free in the Ubuntu OS and is automatically recognized as a device starting with "enx".
After powering on and running the Ubuntu OS, execute the command lsusb in terminal, as shown in the image below:
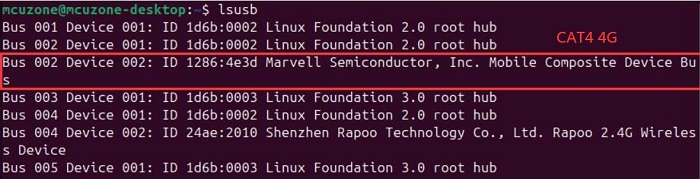

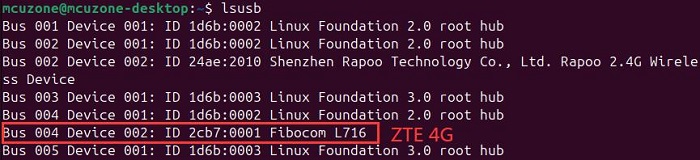
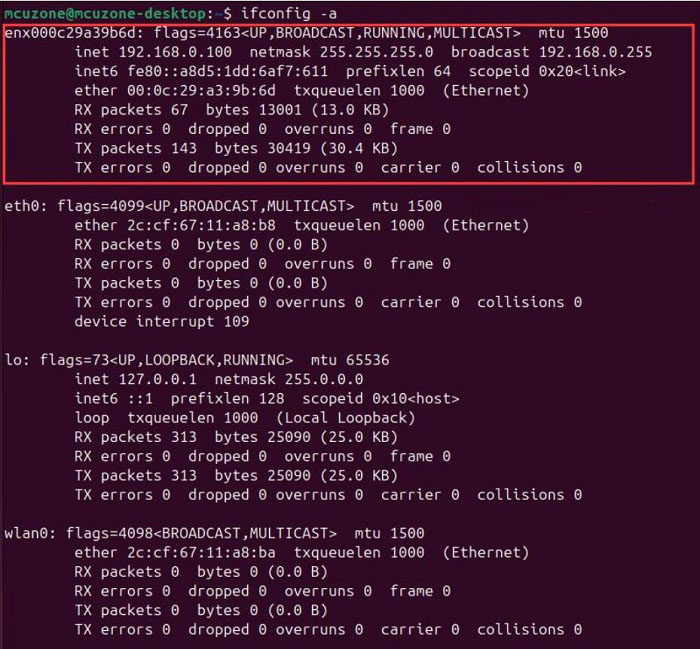
By executing ifconfig -a in terminal, we can see the 4G module (enx...) successfully obtains an IP address:
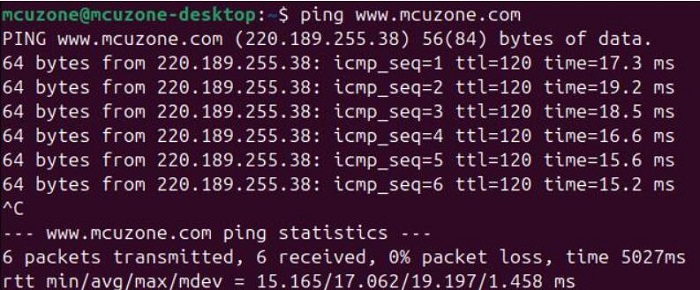
After the 4G module successfully obtains an IP address, we can ping external network addresses, such as:
ping www.mcuzone.com
Connect to Internet via a 4G module, access a speed test website to measure the speed, and the results are as follows:
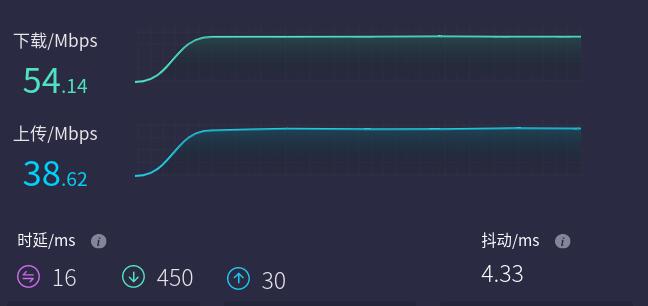
Note: Network speed tests are affected by the network environment and testing methods. Please refer to the actual speed, as this test is for reference only.
V. Test Ubuntu OS on NVIDIA device
The system used for testing is the official NVIDIA Ubuntu OS. The 4G models are all driver-free, supporting plug-and-play functionality. The version is: jetson-nano-jp461-sd-card-image.zip
You can download the Ubuntu OS in:
We are using the JETSON NANO paired with a 4G module for testing. The CAT4 4G and ZTE CAT4 are recognized as eth devices in the system, while the Qualcomm 4G is identified as USB0/1 devices. Additionally, our 4G carrier board is available as an optional accessory, which can be stacked with the NVIDIA board for assembly.
Execute the command lsusb in terminal, as shown in the image below:
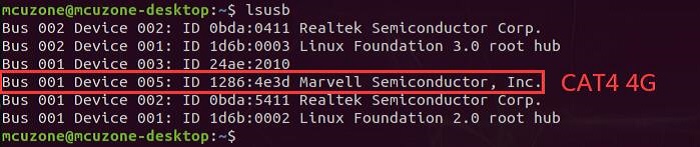


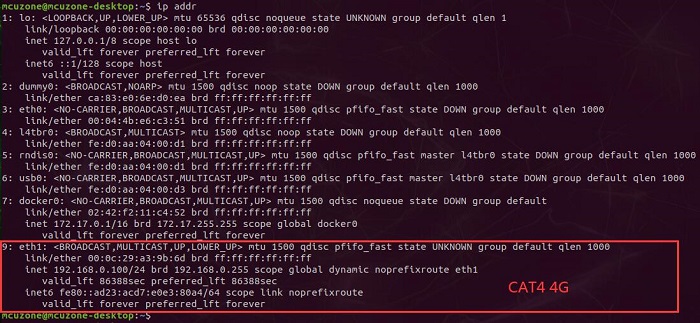
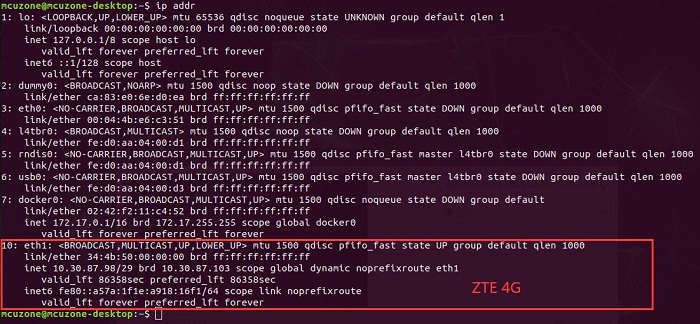
By executing the ip addr command, we can see the 4G module (eth... or usb...):

After the 4G module successfully obtains an IP address, we can ping external network addresses, such as:
ping 220.189.288.38
ping www.mcuzone.com
Taking the CAT4 4G module as an example, connect to the external network, access a speed test website, and the results are as follows:
Note: Network speed tests are affected by the network environment and testing methods. Please refer to the actual speed, as this test is for reference only.
VI. Test Debian OS on Orange Pi device
The OS used for testing is the official Debian OS from Orange Pi: Orangepi3-lts_3.0.8_debian_bullseye_desktop_xfce_linux5.16.17.img
You can download the Debian OS in:
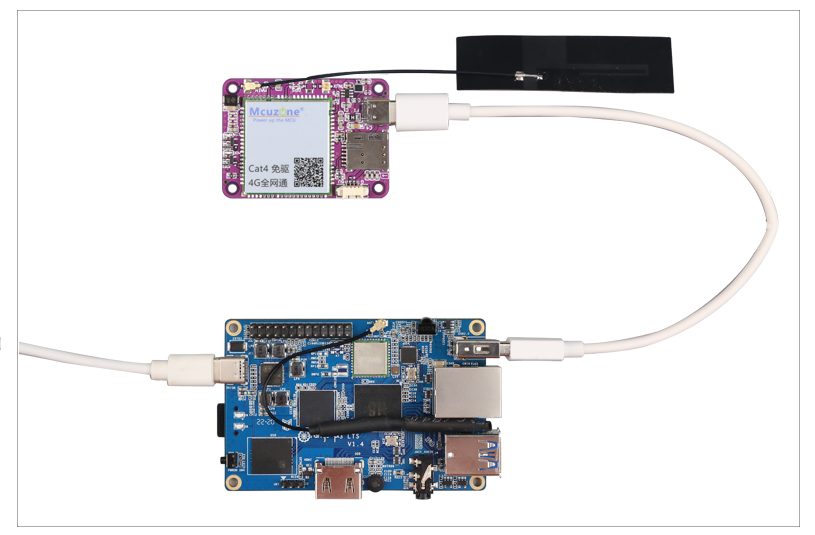
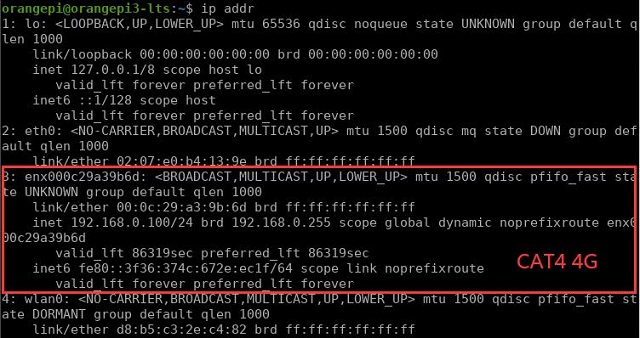
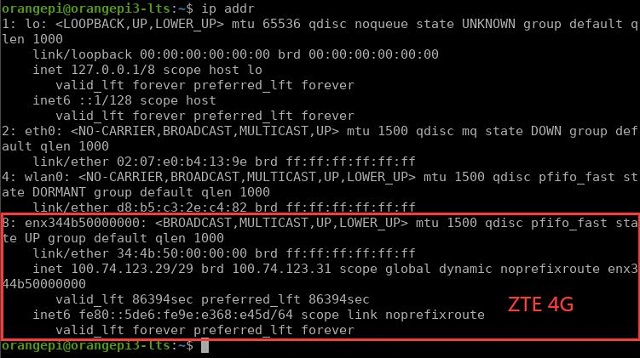
We are using the Orange Pi 3 LTS paired with a 4G module for testing. The official Orange Pi OS supports plug-and-play; both CAT4 4G and ZTE CAT4 are recognized as enx devices, while the Qualcomm 4G is recognized as a usb0 device.
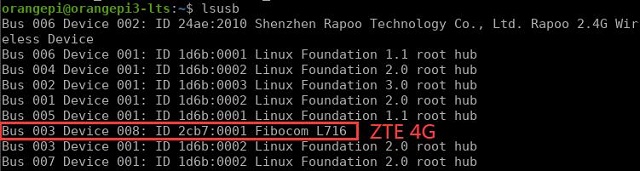
By executing lsusb in the system terminal, you can see that the 4G module has been recognized, as shown in the figure below:
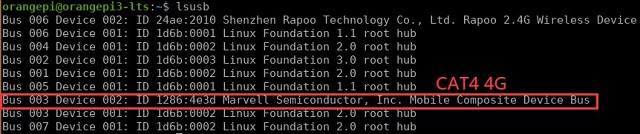

By executing the ip addr command, we can see the 4G module (enx... or usb0):

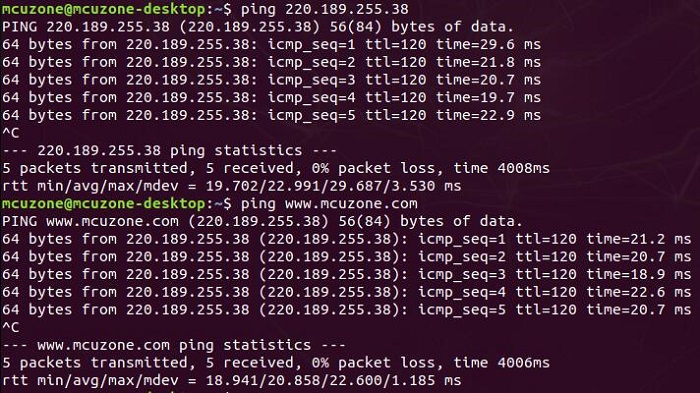
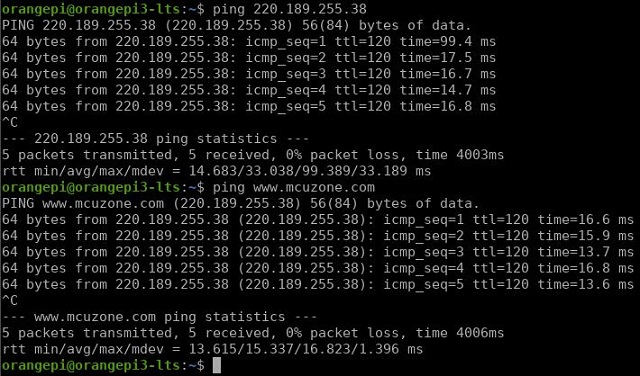
After the 4G module successfully obtains an IP address, we can ping external network addresses, such as:
ping 220.189.288.38
ping www.mcuzone.com
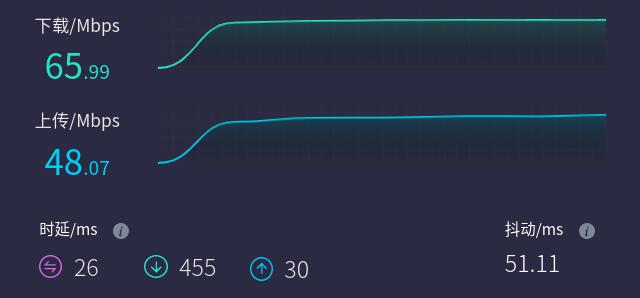
Taking the CAT4 4G module as an example, connect to the external network, access a speed test website, and the results are as follows:
Note: Network speed tests are affected by the network environment and testing methods. Please refer to the actual speed, as this test is for reference only.
VII. Test OpenWrt on Raspberry Pi device
The OS used for testing is OpenWrt: openwrt-bcm27xx-bcm2712-rpi-5-squashfs-sysupgrade-linux-6.6.66-20241219.img.gz
In the OpenWrt, it can be configured in a one-in-one-out switch mode, where the 4G can serve as the WAN port, and the Raspberry Pi 5's own network port can be configured as the LAN port for connecting to a PC.
Qualcomm 4G, CAT4 4G, and ZTE CAT4 4G are all driver-free and dial-up free, recognized as eth1 devices.
7.1 Login the operation interface
Connect the Raspberry Pi 5 to the PC's Ethernet port, boot up the system, and navigate to the Network and Internet settings in Windows. Open the connected network in Ethernet to view the default gateway's IP address. This address is the backend configuration page address for the OpenWrt. As shown in the figure, the address tested in this article is 192.168.1.1.

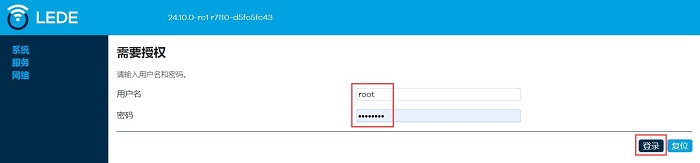
Then open your web browser and enter 192.168.1.1 to access the OpenWrt. The default username is root, and the default password is password.
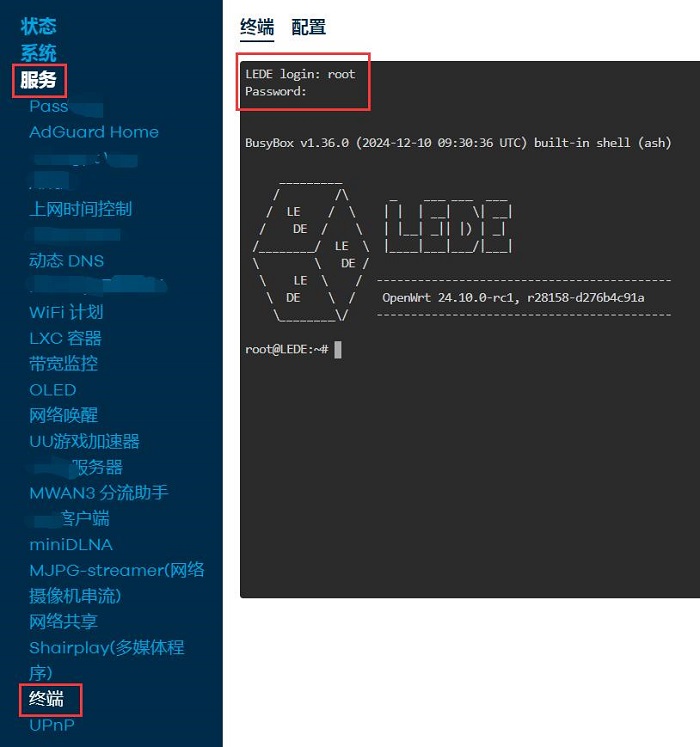
After logging in, navigate to "Services - Terminal", and log in using the username root and the password password.
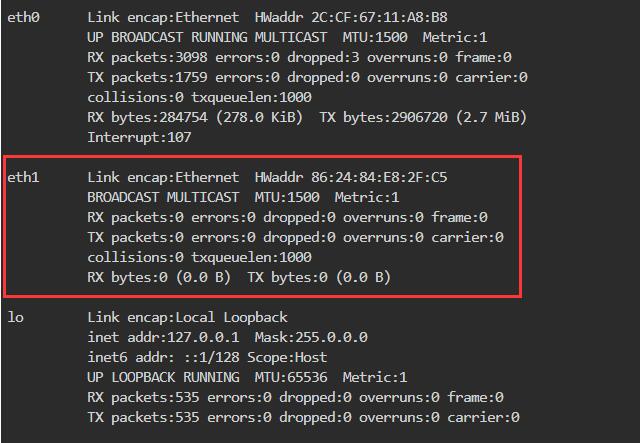
Enter ifconfig -a, and you will see a network card labeled as eth1, which is the Qualcomm 4G module.
7.2 Set the 4G module as the WAN port
After accessing the OpenWrt, navigate to "Network - Interfaces" and click "Add New Interface."
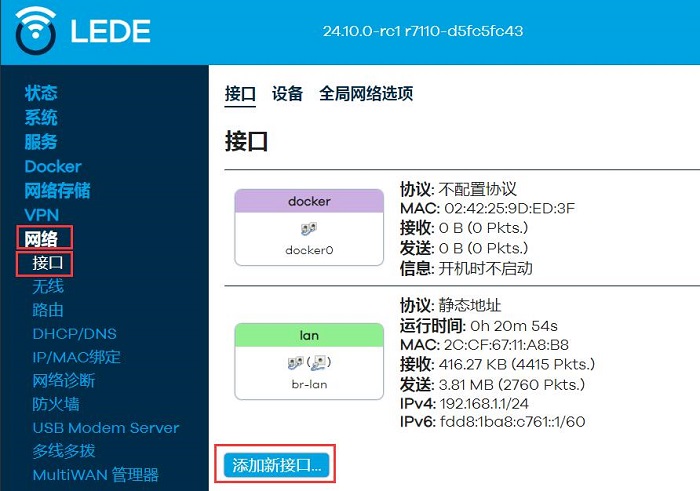
The setup for the new interface is as shown in the figure below, where "eth1" represents the 4G module, and the name can be customized.

Then click "Create Interface".
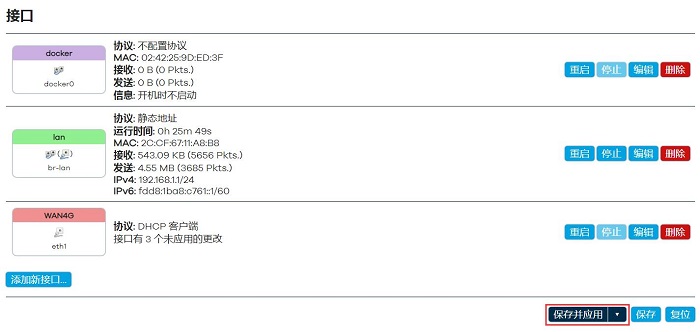
In the "Firewall Settings", select "Create/Assign Firewall Zone" and choose "WAN", then click "Save".

Automatically return to the "Interfaces" and click "Save & Apply":
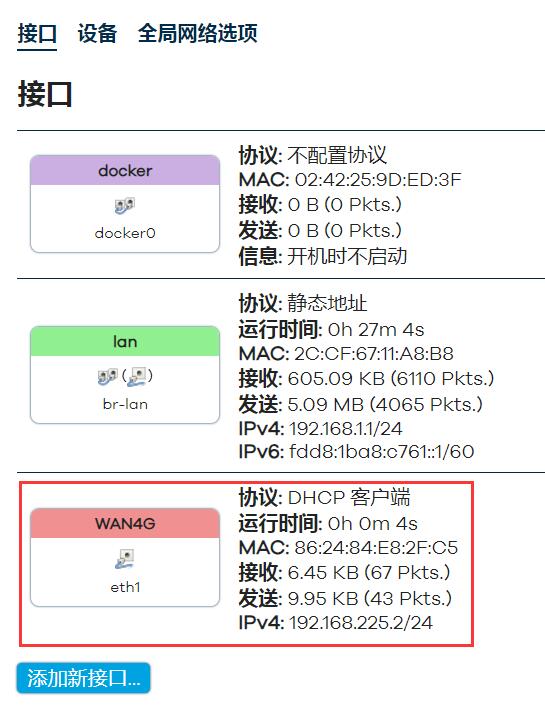
Wait a moment, and we will see in the "Network - Interfaces" that the WAN port we just configured has obtained an IP address through the 4G module.
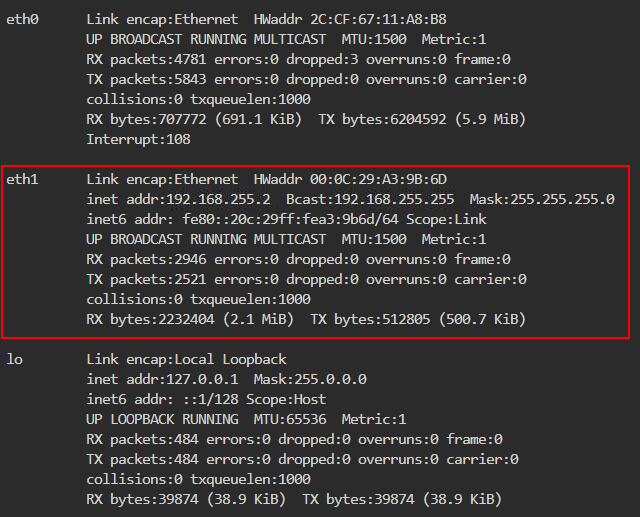
Now we are in the "Services - Terminal" section. By executing ifconfig -a, we can see that eth1 has successfully obtained an IP address. and pinging a public IP address is successful, indicating that internet access is now available through the 4G module.
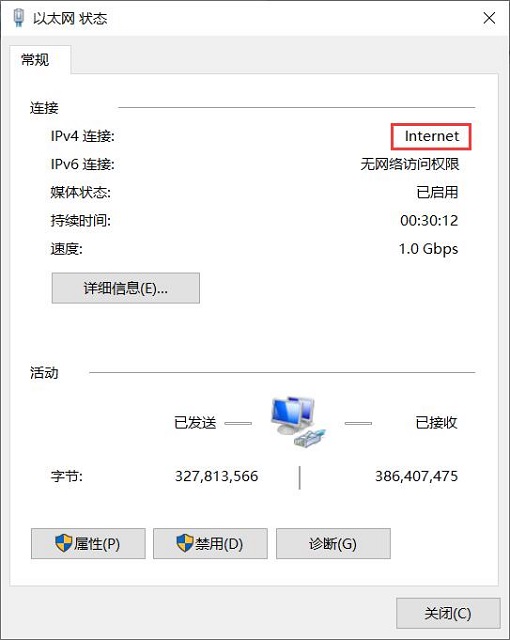
Meanwhile, we can observe in the network card connection of the PC connected to the Raspberry Pi that the Ethernet connection status is "Internet", indicating that the PC can also access the internet through this 4G module at this time.
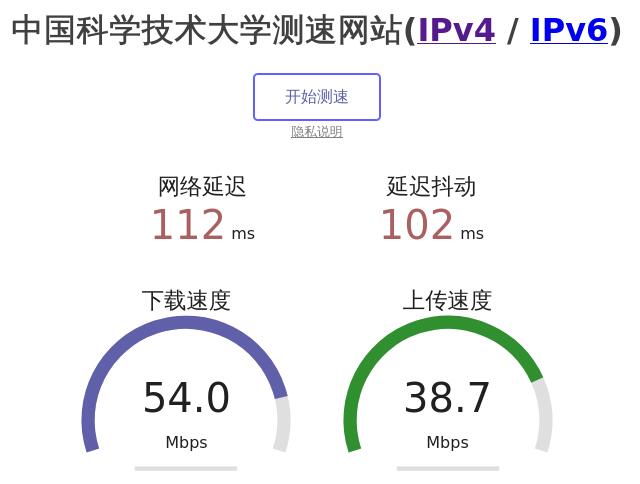
Open https://www.speedtest.cn/ on your PC to conduct a speed test. At this point, the traffic is routed through the 4G module, and the test results are as follows:
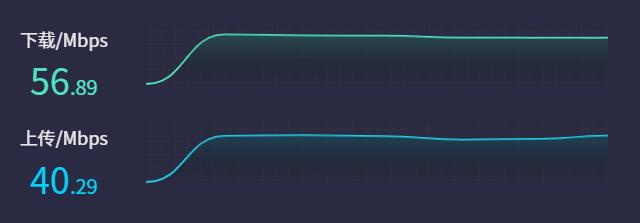
Note: Network speed tests are affected by the network environment and testing methods. Please refer to the actual speed, as this test is for reference only.
VIII. Test Android OS on NanoPi M6
The Friendly NanoPi M6 is paired with a 4G module for Android OS testing. The 4G module is plug-and-play and does not require additional drivers. A Nano SIM card that supports 4G or higher is needed. The model of the 4G module is CM4 4G mini (ZTE CAT4 4G).
The OS we use is the official Friendly Android system: rk3588-sd-android12-20240821.img.gz.
You can download the Android OS in:
https://download.friendlyelec.com/NanoPiM6
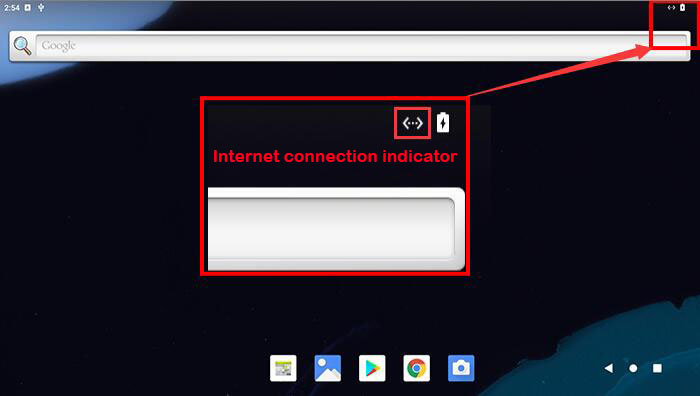
Flash the OS onto the TF card, and after booting the OS from the TF card, you can directly access the internet via ZTE CAT4. A successful Internet connection indicator will appear in the status bar at the top right corner of the desktop, as shown in the figure below:
Open Chrome, connect to Internet, visit a speed test website to conduct a speed test, and the results are as follows:
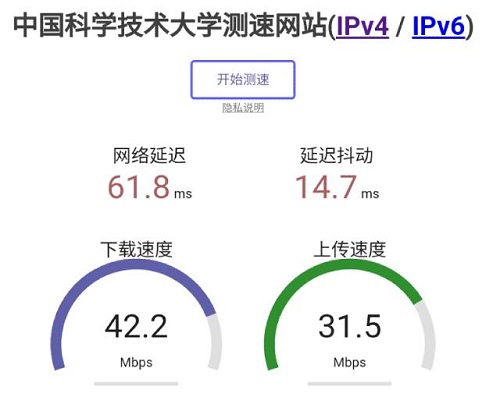
Note: Network speed tests are affected by the network environment and testing methods. Please refer to the actual speed, as this test is for reference only.
If you need to check the detailed status of the network, you can download and install the terminal software Termux for viewing. The download link is:
http://www.mcuzone.com/wiki/3007_CM4_4G_Mini/termux_1020.apk
After installing Termux, open the software and execute ifconfig -a in terminal, as shown in the image:
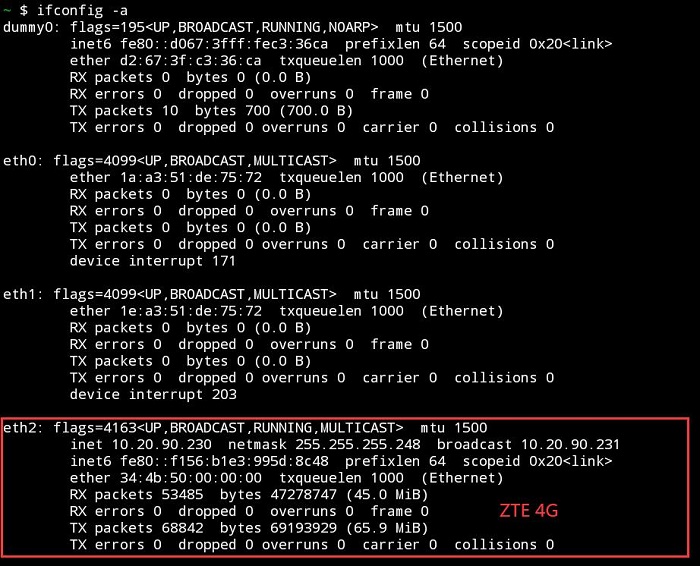
eth2 is the ZTE CAT4.
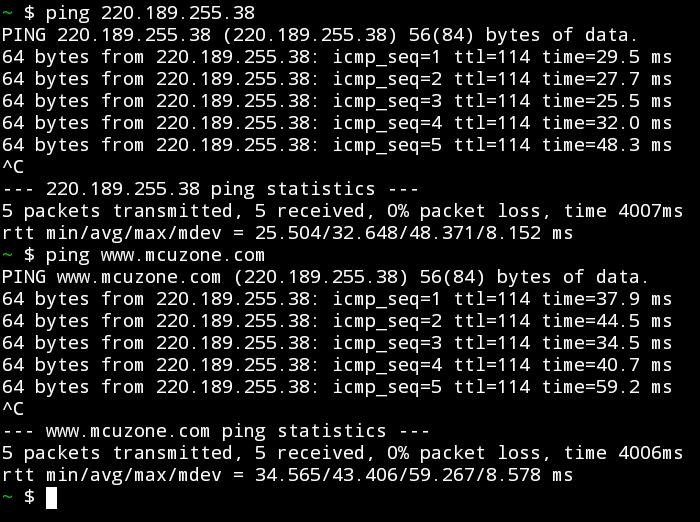
Connect to Internet via a 4G module, access a speed test website to measure the speed, and the results are as follows:
ping 220.189.288.38
ping www.mcuzone.com
IX. AT command operation
9.1 AT command operation
Taking CAT4 4G as an example, execute lsusb in terminal:
Record the ID value of the 4G module: 05c6 90b6 (The ID number for each type of module varies; please refer to the actual details for accurate information.)
Use the following command to open the ttyUSB serial port, where the value after echo is the ID recorded above:
sudo modprobe option
sudo sh -c 'echo 1286 4e3d > /sys/bus/usb-serial/drivers/option1/new_id'
After executing the above three commands, proceed with ls /dev/ttyUSB*:

Install minicom:
sudo apt-get install minicom
Then open the AT command serial port using minicom:
sudo minicom -D /dev/ttyUSB0
(Note: The choice of which serial port to use should be based on the ability to input and run AT commands after entering this port, ensuring that the display is not garbled and the results do not jump erratically.)
The first time you enter an AT command, there may be no echo. If you then input the command at and press Enter, and it returns "OK," it indicates that everything is working properly. If you need to check the echo, please type the command: ate1, then press Enter. After that, you can continue to type other commands and press Enter to see the results.
Common AT commands:
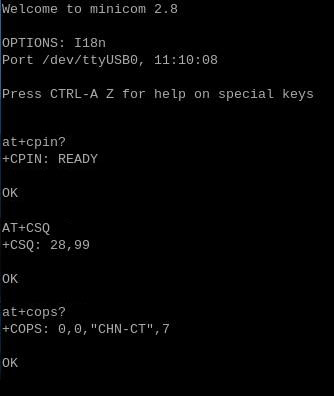
1. Check if the SIM card is detected:
at+cpin?
Return ready to indicate the card has been recognized, if return error, you need to check the hardware.
2. Check antenna signal quality:
at+csq
Return values between 26 and 31 indicate a good signal, with 31 representing a full signal strength; return values between 20 and 25 indicate a barely acceptable signal; return values below 20 indicate a poor signal or that the antenna might not be connected.
3. Check network registration status:
at+cops?
Normally, it should return the network supporter's code: 7, where 7 represents 4G.
Note: The above command at+csq should not include a question mark, while the other two commands require a question mark.
4. View the SIM card's IMEI code:
at+cgsn
5. Reset 4G module (Sometimes, if you reinsert the SIM card, hot swapping may not work; in such cases, you can use this reset command to reset the module.):
at+reset
6. Disable radio frequency:
at+cfun=0
Enable radio frequency:
at+cfun=1
The two commands mentioned above can be used in pairs to allow the module to re-register with the network without restarting the 4G module.
9.2 Modify the IP address of the 4G module
1. CAT4 4G:
Execute the AT command:
AT+ROUTEIP=<newip>
Note: only addresses in the format of 192.168.x.1 are supported. If you set AT+ROUTEIP=192.168.3.1, the final IP address obtained will be 192.168.3.100. After making the changes, you need to power off and restart the OS.
Query current IP: AT+ROUTEIP?, it returns two values, the first one is the old IP, and the second one is the new IP.
Test command: AT+ROUTEIP=?
2. Qualcomm 4G, ZTE CAT4 4G:
Set the 4G module's IP to directly obtain a public IP. Please execute the AT command:
Set the IP to public: AT+GTIPPASS=1
Set the IP to private: AT+GTIPPASS=0
Check whether the current IP is a public or private IP: AT+GTIPPASS?
After modifying the IP, a power cycle reboot is required for the changes to take effect.
X. Power consumption test of 4G modules
Note: The test data in this section are obtained from actual measurements by our company and represent only the results of that particular test. They are for reference purposes only and do not represent the final product data.
Connect the 4G module to the USB port of the Raspberry Pi 5, disable the WiFi on the Raspberry Pi 5, do not connect an Ethernet cable, and use only the 4G module for internet access. The power consumption of the 4G module is as follows:
| Without downloading files | Power | Continuously downloading
files at full speed |
Power | Continuously uploading
files at full speed |
Power | |
|---|---|---|---|---|---|---|
| CAT4 4G | 0.13A | 0.65W | 0.19A | 0.95W | 0.38A | 1.9W |
| Qualcomm 4G | 0.15A | 0.75W | 0.29A | 1.45W | 0.4A | 2W |
| ZTE CAT4 | 0.14A | 0.7W | 0.21A | 1.05W | 0.51A | 2.55W |
Contact Us


 QQ:8204136
Email: mcuzone@vip.qq.com
Tel: +86(0)13957118045
If there are any omissions, errors, or infringements on this page, please contact us through the above methods. Thank you!
Copyright 2004-2025 Wildchip