4003 NEO3 CAT1 EN
Keywords
FriendlyElec NanoPi NEO3, CAT1 4G LTE, RK3328, Debian, Ubuntu, IoT
I. Introduction
The NEO3 CAT1 is a 4G LTE product that we have designed based on the FriendlyElec NanoPi NEO3 development board. The 4G module is a USB device that uses the USB IO pins of the NEO3 development board for communication and power supply, thereby providing 4G network connectivity to the NEO3 development board.
4G Cat1 is a high-cost-performance module aimed at low-speed IoT applications with speeds around 10Mbps. The rates of 10Mbps downlink and 5Mbps uplink can meet the majority of connectivity and transmission requirements. On FriendlyElec's Ubuntu and Debian systems, the 4G module is automatically recognized, requiring no additional driver installation.
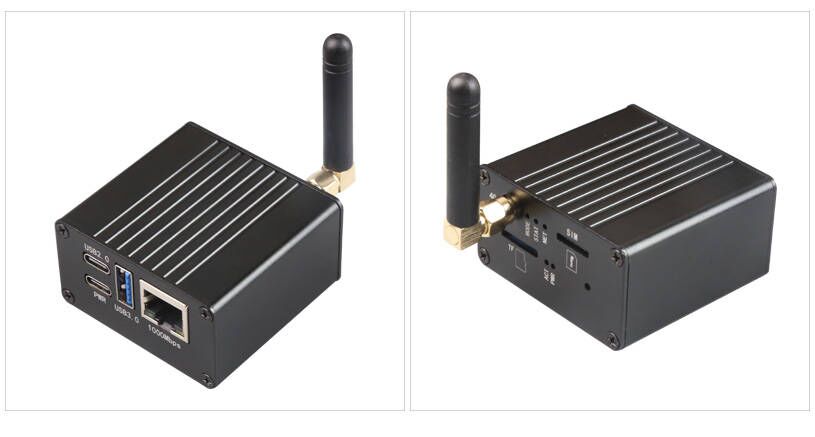
The NEO3 is equipped with a Gigabit Ethernet port and a USB 3.0 interface. When paired with the NEO3 development board, the NEO3 CAT1 can function as a high-performance IoT device.
II. Hardware Spec
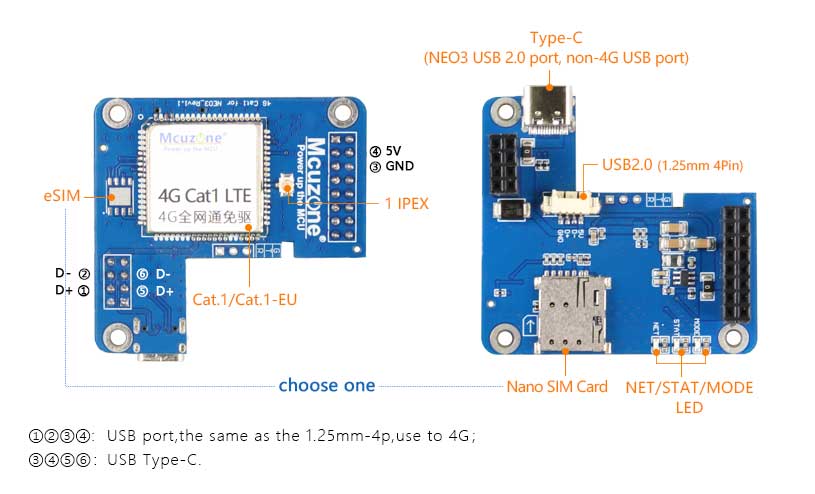
1. One USB 2.0 port, used for powering and communication with the 4G module. The module comes in two packaging options: one is a female header connector, designed for connecting to the NEO3 development board. The other is a 1.25mm-4P interface, intended for connecting to other development boards that are not NEO3. You may choose to use one of the two packaging interfaces.
2. One USB-C port is the NEO3's own USB 2.0 port, which is derived from the NEO3's IO pins.
3. One 4G CAT1 LTE.
4. One IPEX Gen 1 antenna port.
5. One Nano SIM slot.
6. Three LEDs: STS, MODE, and NET.
7. Three M2.5 mounting holes.
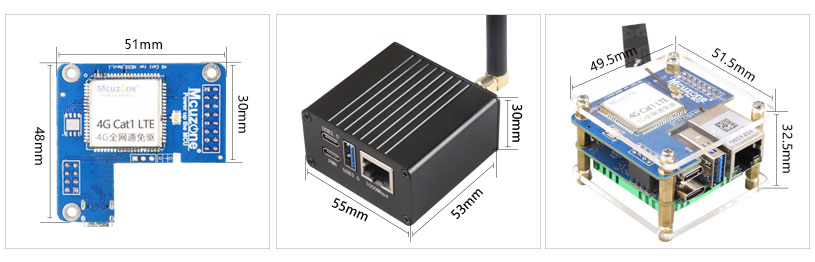
8. Size: The maximum size is 51*52mm.
9. PCB board: 2-layer, with gold plating process, lead-free production; the material is UL and RoHS certified, with a fire rating of 94V-0.
| model | CAT1 | CAT1-EU |
|---|---|---|
| Band | FDD:B1/B3/B5/B8 | FDD:B1/B3/B5/B7/B8/B20/28 |
| TDD:B34/B38/B39/B40/B41 | TDD:B38/B40/B41 | |
| DATA | FDD: Max 10Mbps(DL)/Max 5Mbps(UL)
TDD:Max 8Mbps(DL)/Max 2Mbps(UL) Max 6Mbps(DL)/Max 4Mbps(UL) | |
III. Work with Ubuntu OS
3.1 Ubuntu Noble
The version of the FriendlyElec system we tested: rk3328-sd-ubuntu-noble-core-6.1-arm64-20240818.img.gz
There are two methods for operation: one is to connect to a computer via a USB-to-TTL serial module, and the other is to connect to a router using the Ethernet port and access it through SSH.
3.1.1 Operate through TTL serial connection to PC
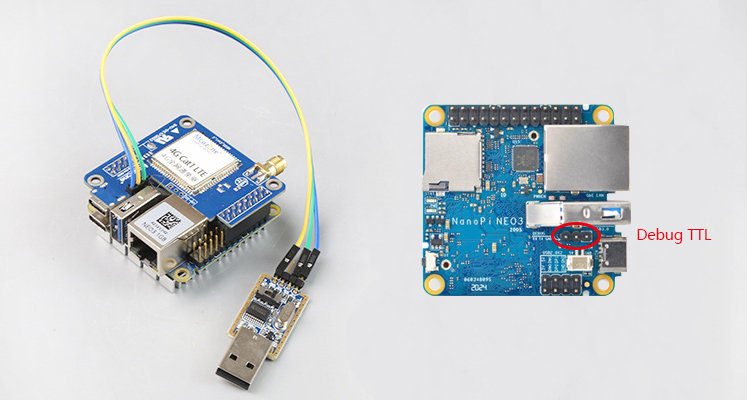
Connect the NEO3 to a computer using a USB-to-TTL module (connect TXD to RXD, RXD to TXD, and GND to GND), as shown in the figure below:
Then download and install the terminal software MobaXterm on your PC. The download link for MobaXterm is:
https://mobaxterm.mobatek.net/download-home-edition.html
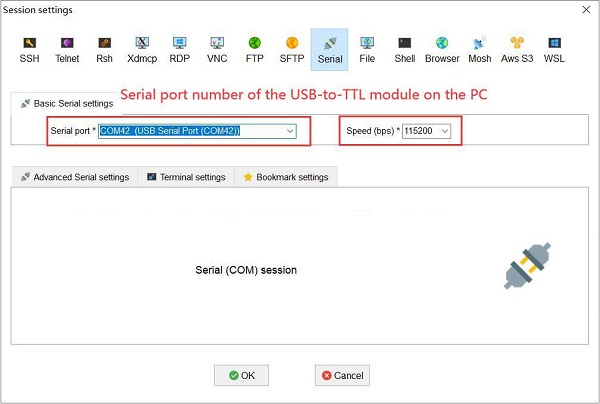
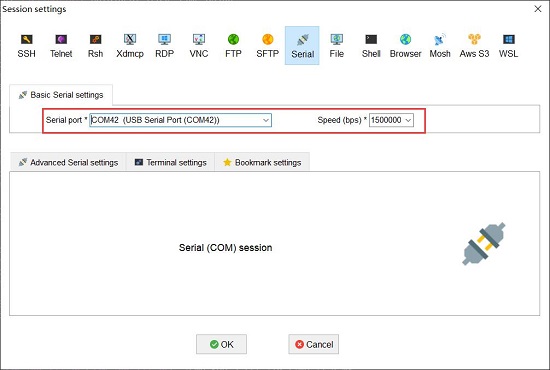
Open MobaXterm and configure the TTL serial port as shown in the figure below:
Note: Use a baud rate of 115200.
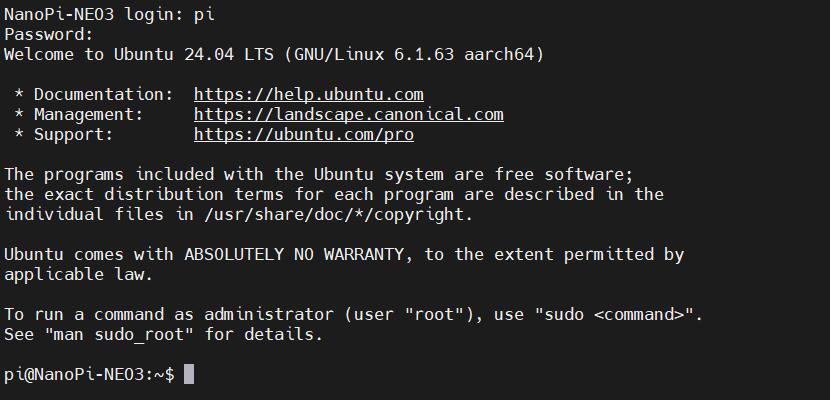
Then open this serial port and log in to the Ubuntu system (username: pi, password: pi):
Excecute ifconfig -a to view the following network parameters:
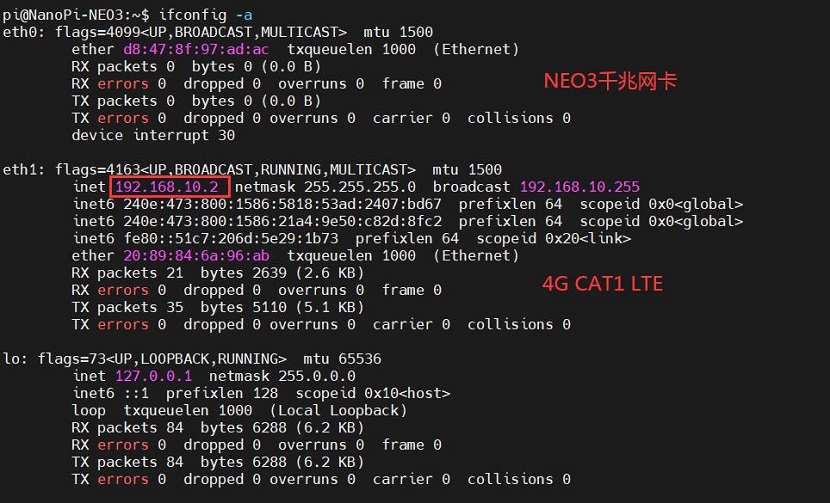
It can be seen that the 4G module is identified as eth1, and it has already obtained an IP address.
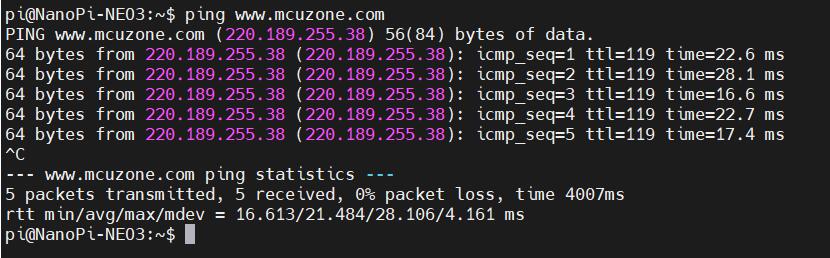
Pinging an IP address is successful, indicating that the 4G network can be used to connect to the Internet.
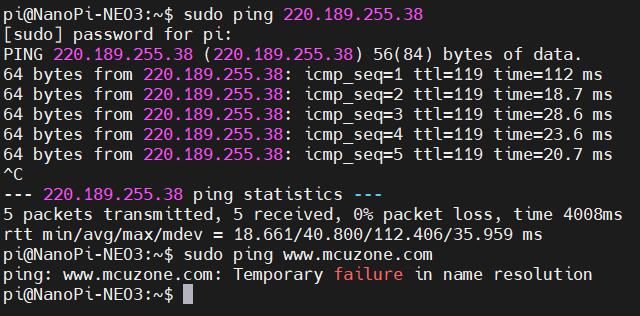
But pinging a domain name results in an error, indicating that the system needs to have its DNS addresses configured. The setup method is as follows:
Edit the resolv.conf file:
sudo vi /etc/resolv.conf
Change the address in the yellow box in the image below to a general DNS server address (such as 114.114.114.114, or any other general DNS address):

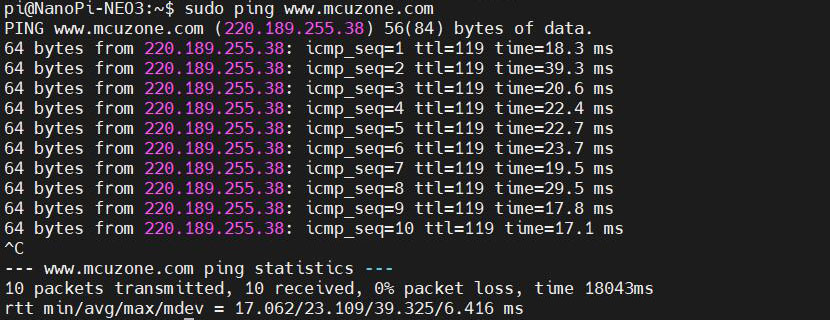
Save and exit. At this point, pinging the domain name and pinging the IP address both succeed:
However, after making these changes, if the system restarts, the DNS entries in the resolv.conf file will be reset to their default addresses. Therefore, if you need the 4G internet connection to start automatically upon boot, you will also need to modify the permissions of the resolv.conf file. Since /etc/resolv.conf is actually a symbolic link, you need to regenerate the resolv.conf file in order to modify its permissions. The method to do so is as follows:
sudo mv /etc/resolv.conf /etc/resolv.conf.link
sudo vi /etc/resolv.conf
This recreates the resolv.conf file. In this newly created file, enter the following:
nameserver 114.114.114.114
Save and exit, then execute:
sudo chattr +i /etc/resolv.conf
After completing the above steps, restart the system, and the contents of the resolv.conf file will remain unchanged.
★If the NEO3's Gigabit Ethernet port is connected to a wired network at the same time, it will still prioritize the 4G connection for internet access by default. If you want to prioritize the wired network connection for internet access, you need to run the following command:
sudo ip route del default && sudo route add -net default netmask 0.0.0.0 gw 192.168.8.1
Explanation of these two commands (separated by '&&'):
sudo ip route del default: Remove the default route from the routing table.
sudo route add -net default netmask 0.0.0.0 gw 192.168.8.1: Add the gateway of the wired or wireless network as a new default route (ensure to use the actual gateway address).
After completing the execution, execute the route command to view the routing table. The current default route is the gateway of the wired or wireless network:

Note: After a reboot, the routing table resets. To ensure the network continues to use the wired or wireless connection as the default route post-restart, you'll need to execute sudo ip route del default && sudo route add -net default netmask 0.0.0.0 gw 192.168.8.1 again.
3.1.2 Operate through SSH over Ethernet
Connect NanoPi NEO3's Ethernet port to the upstream router using an Ethernet cable, then connect the PC to the same upstream router. Insert the SIM card and the TF card with the system. After the system starts, check NanoPi NEO3's IP address through the router's backend:

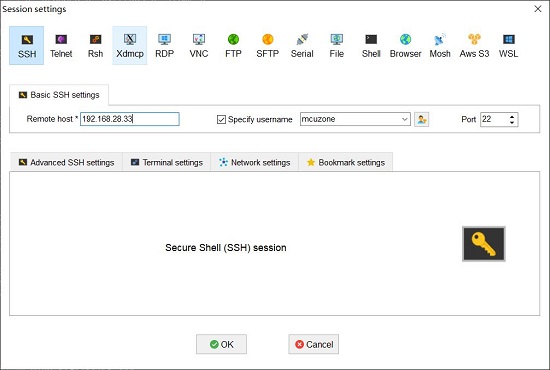
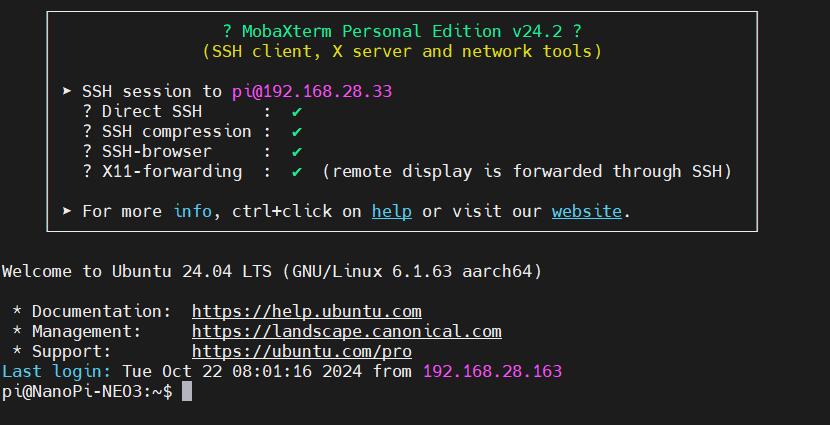
Then use MobaXterm to connect to the system via SSH:
Then open this serial port and log in to the Ubuntu system (username: pi, password: pi):
The remaining test steps are the same as when using a TTL connection.
3.2 Ubuntu focal
The version of the FriendlyElec system we tested: rk3328-sd-friendlycore-focal-4.19-arm64-20240818.img.gz
3.2.1 Operate through TTL serial connection to PC
Connect the NEO3 to a computer using a USB-to-TTL module. Open MobaXterm and configure the TTL serial port as shown in the figure below:
Note: Use a baud rate of 1500000.
Then open this serial port and log in to the Ubuntu system (username: pi, password: pi):
Excecute ifconfig -a to view the following network parameters:
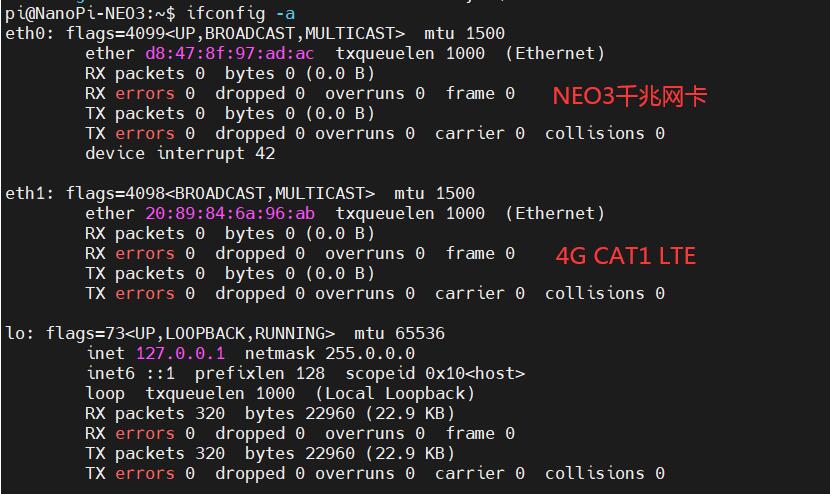
The system automatically recognizes the 4G interface as eth1, but it cannot obtain an IP address directly, indicating that the 4G functionality is not enabled. Configuration is required. The configuration method is as follows:
Connect the NEO3 to the upstream router with an Ethernet cable to enable internet access, and install the DNS switching software udhcpc:
sudo apt-get update
sudo apt install udhcpc
After installation, unplug the network cable from the NEO3 and execute the following commands:
sudo udhcpc -i eth1
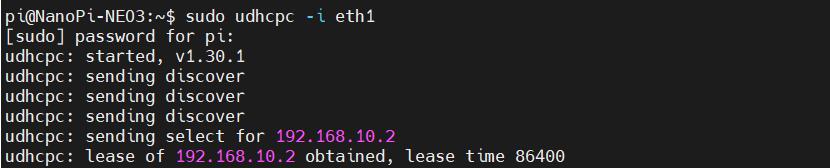
After execution, run ifconfig -a again to view the network parameters as follows:
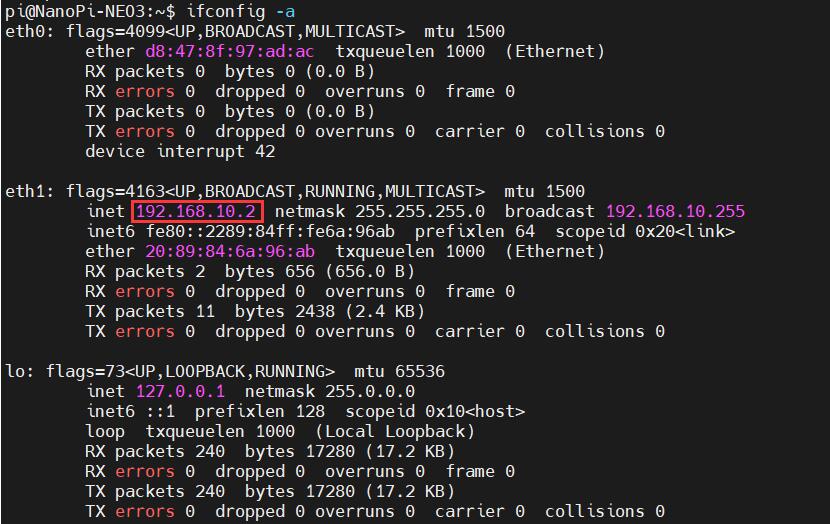
It can be seen that the 4G module has already obtained an IP address.
The result of pinging a domain name through the 4G module is as follows:
The above settings are temporary; after the system restarts, it will revert to its default state (although the udhcpc software will not be removed upon system reboot). If you need to enable 4G internet access directly after each reboot, edit the startup file rc.local:
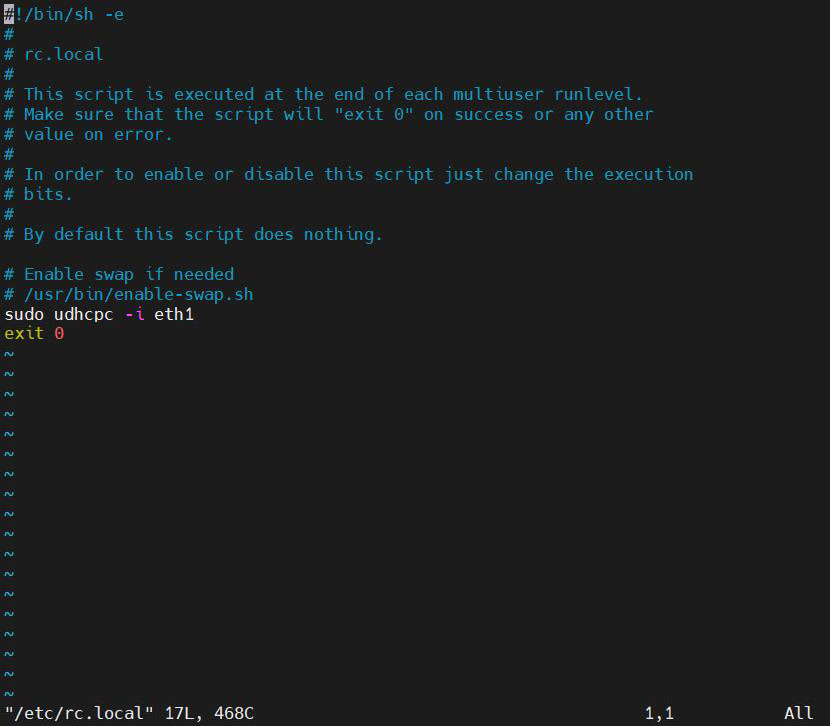
sudo vi /etc/rc.local
Add the commands that need to be executed on startup above the "exit 0" line:
sudo udhcpc -i eth1
After saving and exiting, restart the system. Upon startup, execute ifconfig -a, and you will see that the 4G module (eth1) has obtained an IP address.
Note: The above steps are for the procedure when connecting only the 4G. If the NEO3's Ethernet port is connected to a wired network at the same time, the system will default to using the wired network for internet access. If you want to use the 4G connection for internet access instead, you need to change the command to:
sudo udhcpc -i eth1 && sudo ip route del default && sudo route add -net default netmask 0.0.0.0 gw 192.168.10.1
Explanation of these three commands (separated by '&&'):
sudo udhcpc -i eth1: Execute udhcpc to obtain an IP address for the 4G module.
sudo ip route del default: Remove the default route from the routing table.
sudo route add -net default netmask 0.0.0.0 gw 192.168.10.1: Add the gateway of the 4G module network as a new default route (ensure to use the actual gateway address).
After completing the execution, execute the route command to view the routing table. The current default route is the gateway of the 4G module network:

It is able to successfully ping the domain:
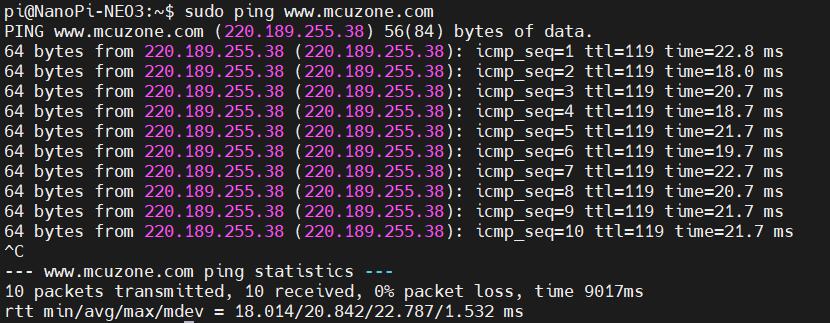
If you need to enable 4G internet access directly after each reboot, you should modify the command added in rc.local to the one mentioned above.
3.2.2 Operate through SSH over Ethernet
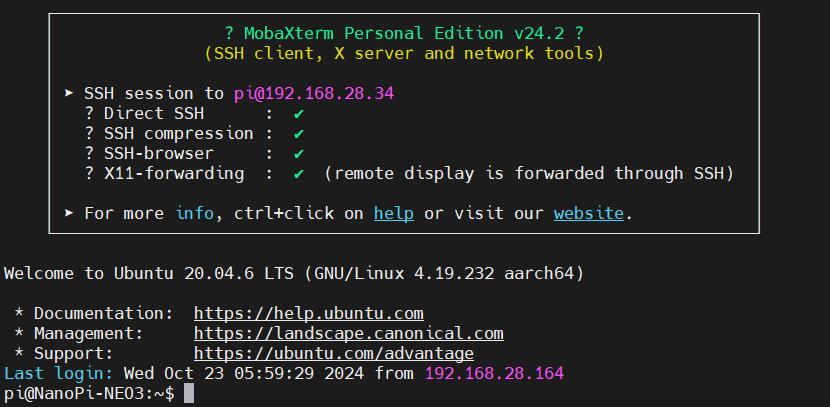
Connect NanoPi NEO3's Ethernet port to the upstream router using an Ethernet cable, then connect the PC to the same upstream router. Insert the SIM card and the TF card with the system. After the system starts, check NanoPi NEO3's IP address through the router's backend:

Then use MobaXterm to connect to the system via SSH (username: pi, password: pi):
The remaining test steps are the same as when using a TTL connection.
IV. Work with Debian OS
The version of the FriendlyElec system we tested: rk3328-sd-debian-bookworm-core-6.1-arm64-20241112.img.gz
Consistent with the Ubuntu system, there are two methods for operation: one is to connect to a computer via a USB-to-TTL serial module (Note: Use a baud rate of 1500000.), and the other is to connect to a router using the Ethernet port and access it through SSH. This will not be repeated here.
Open MobaXterm and log in to the Debian system via the TTL serial port(username: pi, password: pi).
4.1 4G module operations
This system does not support the ifconfig, so we use the ip addr as an alternative:
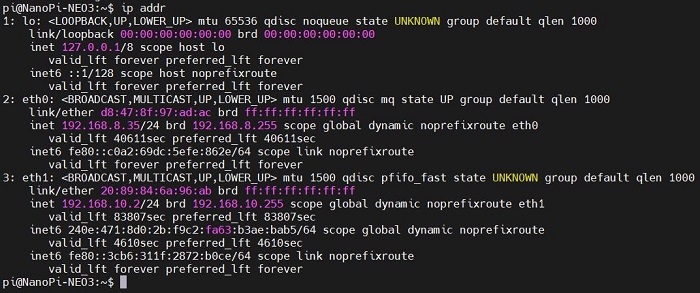
The IP addresses for the internal network used in testing follow the format 192.168.8.x. Therefore, interface 2 (eth0) is the Gigabit Ethernet card, while interface 3 (eth1) is the 4G CAT1 module, which correctly obtained an IP address upon startup.
We unplugged the Ethernet cable, leaving only the 4G module connected to the network. By pinging an external IP address, we found that it was reachable, indicating that Internet connectivity is possible through the 4G network.
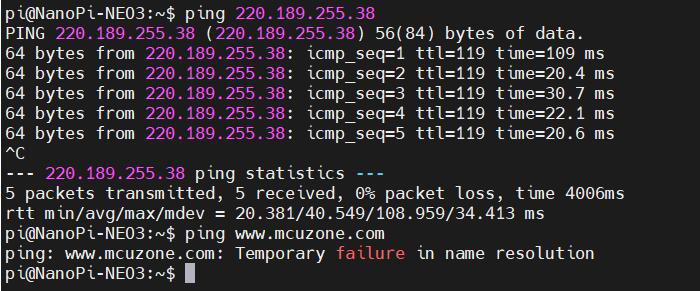
However, if pinging a domain name results in an error, it indicates that we need to modify the system's DNS settings. The procedure is as follows:
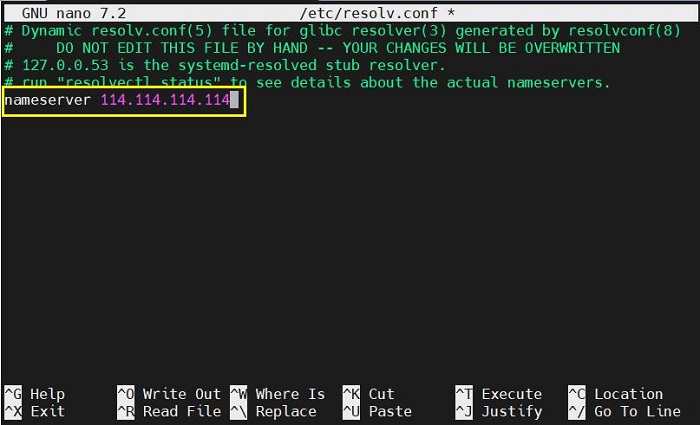
Edit the resolv.conf file:
sudo nano /etc/resolv.conf
Add a general DNS server address (such as 114.114.114.114, or any other general DNS address):
nameserver 114.114.114.114
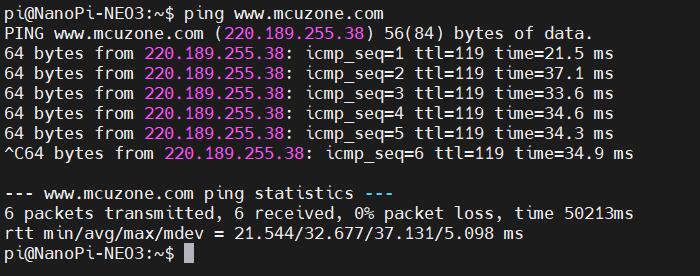
Save and exit. At this point, pinging the domain name succeed:
However, after making these changes, if the system restarts, the DNS entries in the resolv.conf file will be reset to their default addresses. So you will also need to modify the permissions of the resolv.conf file. Since /etc/resolv.conf is actually a symbolic link, you need to regenerate the resolv.conf file in order to modify its permissions. The method to do so is as follows:
sudo mv /etc/resolv.conf /etc/resolv.conf.link
sudo nano /etc/resolv.conf
This recreates the resolv.conf file. In this newly created file, enter the following:
nameserver 114.114.114.114
Save and exit, then execute:
sudo chattr +i /etc/resolv.conf
After completing the above steps, restart the system, and the contents of the resolv.conf file will remain unchanged.
4.2 Modification of network priority
If the NEO3 is inserted with a 4G module and simultaneously connected to a network cable through its Ethernet port, which network will it use by default? At this point, it's necessary to consider the network priority. The operations are as follows:
Execute the command ip route, and the result is as follows:

It can be seen, the metric value for eth1 (4G CAT1) is 100, while the metric value for eth0 (Gigabit Ethernet card) is 101. Since the metric value of eth1 is lower than that of eth0, the network defaults to using the 4G connection.
If you need to set the network to default through the Gigabit Ethernet card, you will need to install the ifmetric software:
sudo apt install ifmetric
After installation, you can modify the metric value of the network interface. For example, to change the metric value of eth1 to 102, you can execute the following command:
sudo ifmetric eth1 102
After making the changes, use the ip route command to check, and we can see that the metric value for eth1 has been changed to 102:

The metric value for eth0 is lower than that of eth1 now, so the network defaults to using the Gigabit Ethernet card.
Note: If the system restarts, the 4G connection's priority will still be higher than that of the wired network. Therefore, to ensure that the system defaults to using the wired network connection upon startup, you need to run the command sudo ifmetric eth1 102 again (there is no need to reinstall the ifmetric software).
V. AT command operation
Regardless of which operating system is used, the method for using 4G AT commands remains the same.
5.1 Enable AT command operations
If you are unable to execute lsusb, please install usbutils first:
sudo apt install usbutils
Use lsusb to view USB devices, the red-boxed entry indicates the 4G module:
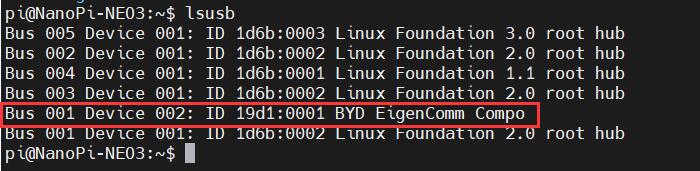
Note down the ID value of the 4G module: 19d1 0001
Use the following command to enable the ttyACM serial port of the 4G module, where the value after echo is the ID value recorded earlier:
sudo modprobe option
sudo sh -c 'echo 19d1 0001 > /sys/bus/usb-serial/drivers/option1/new_id'
After executing the above two commands, the system should have three additional devices: ttyACM0, ttyACM1, and ttyACM2. You can check this by entering ls /dev:

Then, use a serial port tool to open the specific serial port (AT command serial port):
Install the serial port software minicom:
sudo apt-get install minicom
Open the AT command serial port using minicom:
sudo minicom -D /dev/ttyACM0
(Note: Which serial port to use should be determined by the ability to enter and execute AT commands without garbled or erratic output after accessing that serial port.)
If you need to view echo responses, type the command: ATE1, then press Enter. You can continue to type other commands, and after pressing Enter, you will see the results.
Common AT commands:
1) Check if the SIM card is detected:
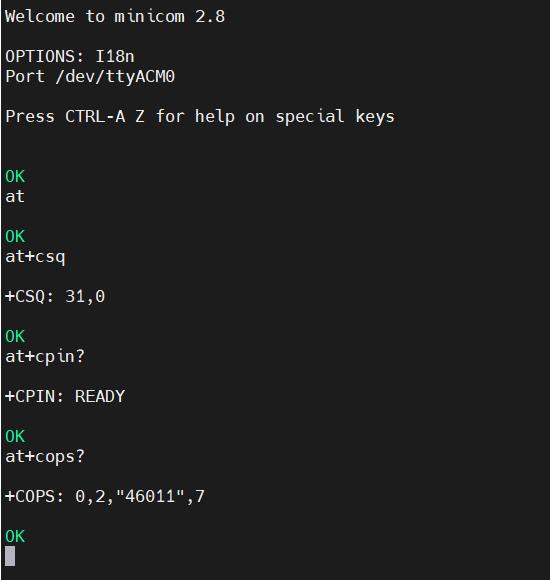
at+cpin?
Return ready to indicate the card has been recognized, if return error, you need to check the hardware.
2) Check antenna signal quality:
at+csq
eturn values between 26 and 31 indicate a good signal, with 31 representing a full signal strength; return values between 20 and 25 indicate a barely acceptable signal; return values below 20 indicate a poor signal or that the antenna might not be connected.
3) Check network registration status:
at+cops?
Normally, it should return the network supporter's code: 7, where 7 represents 4G.
Note: The above command at+csq should not include a question mark, while the other two commands require a question mark.
4) View the SIM card's IMEI code:
at+cgsn
5) Reset 4G module (Sometimes, if you reinsert the SIM card, hot swapping may not work; in such cases, you can use this reset command to reset the module.):
at+reset
6) Disable radio frequency:
at+cfun=0
Enable radio frequency:
at+cfun=1
The two commands mentioned above can be used in pairs to allow the module to re-register with the network without restarting the 4G module.
5.2 Modify the IP address of the 4G module
Execute the AT command:
AT+ROUTEIP=<newip>
Note: Only addresses in the format of 192.168.x.2 are supported. After completing the settings, you need to power off and restart the system.
Check the current IP: AT+ROUTEIP?
Verify whether the IP address is active: AT+ROUTEIP=?
VII. Summary
We only introduce the usage and operations for CAT1 based on NEO3, without covering the operations and software system specific to the NanoPi development board itself. For information about the NanoPi NEO3 boards, please visit the FriendlyElec official website:
https://wiki.friendlyelec.com/wiki/index.php/NanoPi_NEO3/zh
Contact Us


 QQ:8204136
Email: mcuzone@vip.qq.com
Tel: +86(0)13957118045
If there are any omissions, errors, or infringements on this page, please contact us through the above methods. Thank you!
Copyright 2004-2025 Wildchip