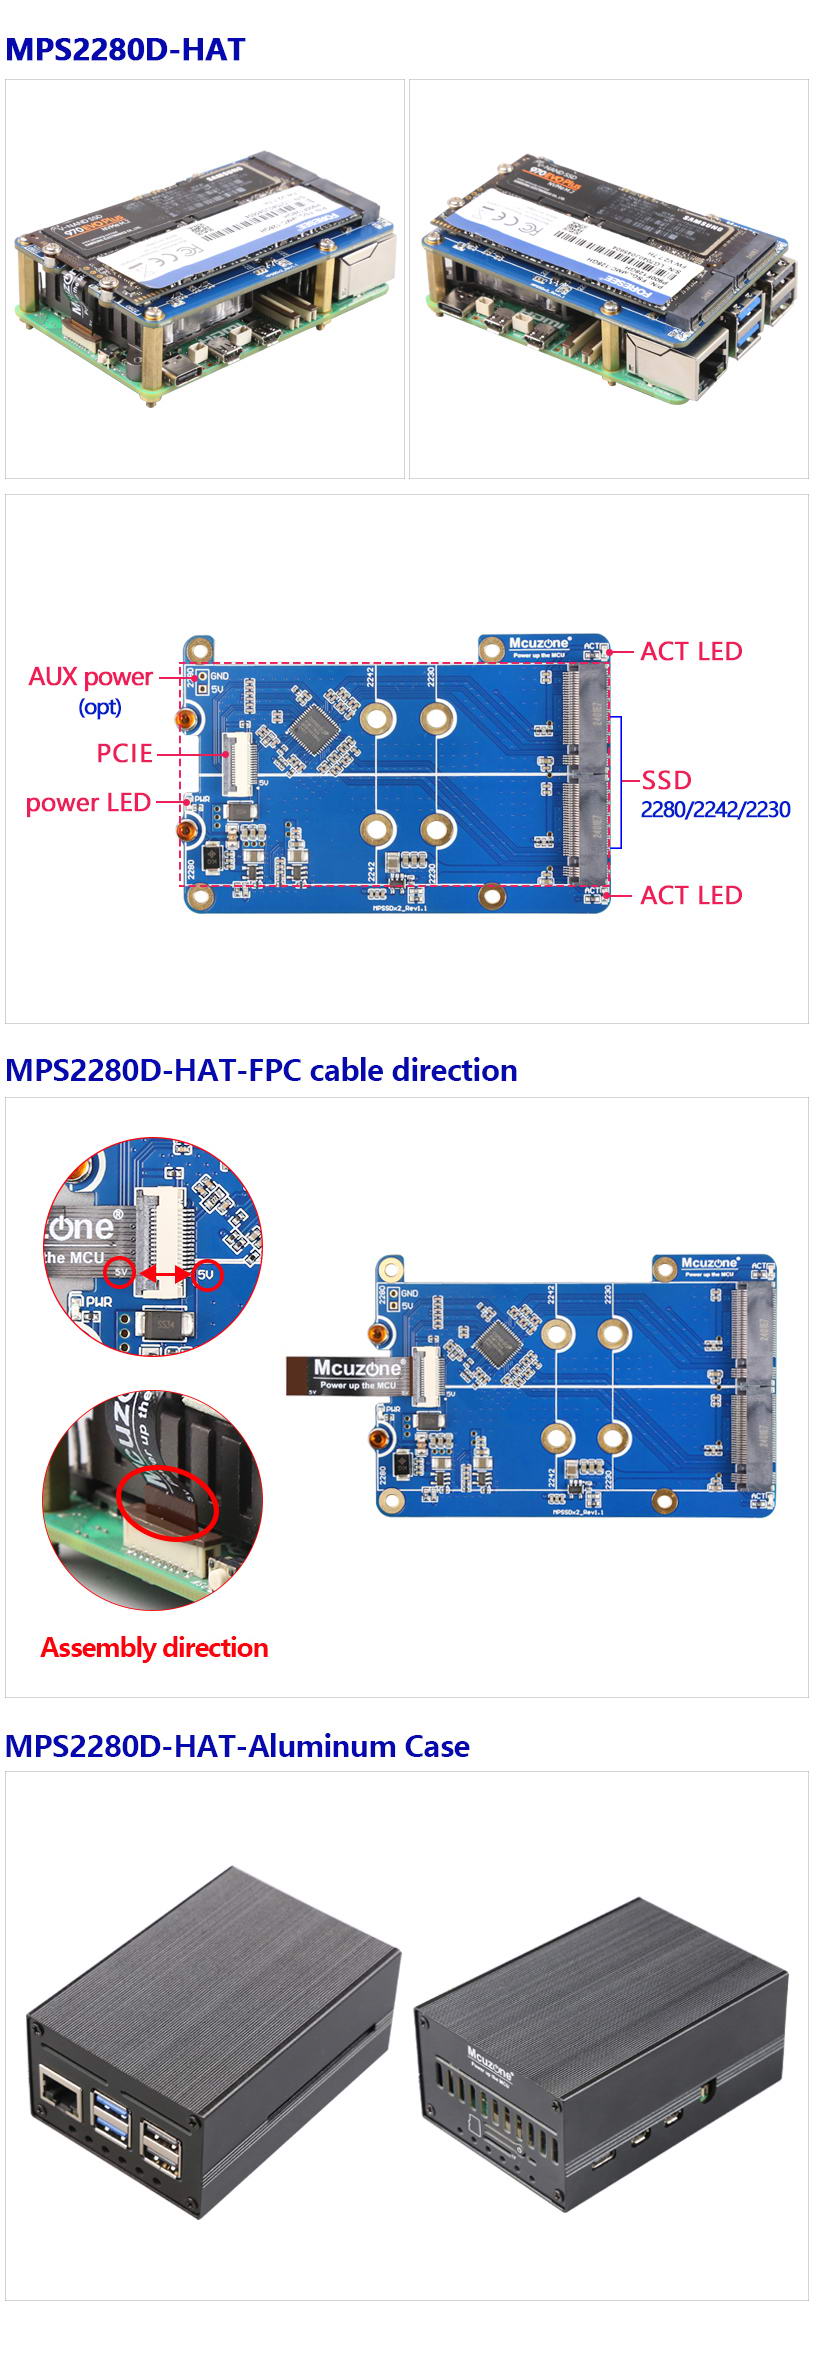
0003 MPS2280D(Dual SSD Expansion Board)
Keywords
Raspberry Pi 5, PCIe Expansion, boot on SSD, NAS, speed test, OpenMediaVault, OMV
I. Introduction
After updating the Raspberry Pi firmware to May 2024, the RPi5 supports booting the system from an SSD via a PCIe switch chip. This article will demonstrate how to change the settings to enable booting from an SSD by using our MPS2280D expansion board. Moreover, the MPS2280D supports dual SSDs, making it suitable for creating large-capacity storage applications with the Raspberry Pi 5. You can connect existing storage devices (NVMe protocol-supported SSD, including external portable hard drives and USB flash drives) to create secure backups of all important files accessible from anywhere in the world. This Network Attached Storage (NAS), allowing you to save files from computers and mobile devices to external hard drives through your home or office wireless network.
II. Hardware Spec
2.1 Support for 2230/2242/2280 sized NVMe SSDs (only soldered with 2280 copper standoffs in default);
2.2. The hard drive can be used for storage expansion. Note: Only supports PCIe 1x Gen2.
2.3 The hard drive supports booting from SSD and requires updating the official Raspberry Pi firmware to a version later than 2024.5.13;
2.4 Reserve a power interface for the hard drive, 2.54mm-2P socket. If concerned about insufficient power supply, an auxiliary 5V power source can be externally connected via this interface. In practice, since the RPi5's PCIe is only 1x and only supports Gen2 mode after expansion, the power consumption will drop to 1/3 of the rated parameters. For instance, if the SSD is marked 3.3V 2.5A, the actual peak measured from the 5V side is only a little over 500mA. In our tests, the peak total current for two SSDs was 0.75A.
2.5 Slotting at the 40-pin position, it does not affect the Dupont line connection;
2.6 Board size: 86*56mm;
2.7 Immersion gold process, lead-free production, PCB board certified by UL and ROHS.
III. Work with Raspberry Pi OS
3.1 Using SSD as storage expansion
3.1.1 Download system
The Raspberry Pi OS used in this article is:2024-07-04-raspios-bookworm-armhf.img.xz,You can download it in:
https://www.raspberrypi.com/software/operating-systems/#raspberry-pi-os-32-bit
3.1.2 Flash the system to TF card
Use Imager or balenaEtcher to flash the OS image in TF card.


3.1.3 Update Raspberry Pi Firmware and Kernel
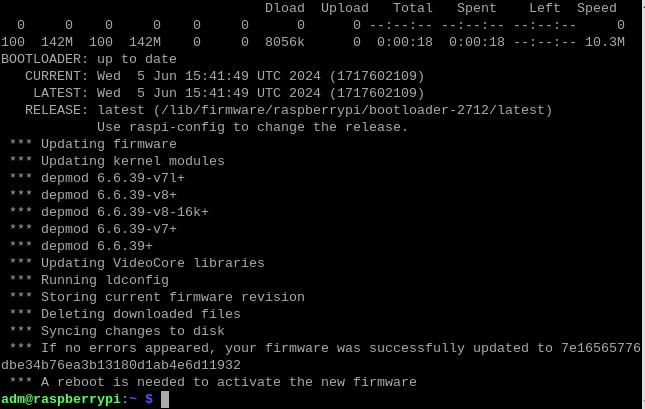
Boot the Raspberry Pi OS from the TF card and entersudo rpi-updatein the terminal to update the latest firmware and kernel.
Note: Runningsudo rpi-updatemay take 3-10 minutes and might require an internet connection to foreign country(please prepare your own method).
After upgrading, enter sudo rpi-eeprom-config --edit in the terminal to edit the boot.conf file in the kernel. Add NVME_CONTROLLER=1 to the last line, save and exit. The BOOT_ORDER=0XF461 means the boot order is SD (TF) card, NVMe (SSD), and USB drive. Click here to go to the boot order settings instructions. After setting successfully, reboot the system. This way, SSD (including storage and boot) will be supported.
3.1.4 Enable SSD storage and boot
After upgrading, enter sudo rpi-eeprom-config --edit in the terminal to edit the boot.conf file in the kernel. Add NVME_CONTROLLER=1 to the last line, save and exit. The BOOT_ORDER=0XF461 means the boot order is SD (TF) card, NVMe (SSD), and USB drive. Click here to go to the boot order settings instructions.After setting successfully, reboot the system. This way, SSD (including storage and boot) will be supported.


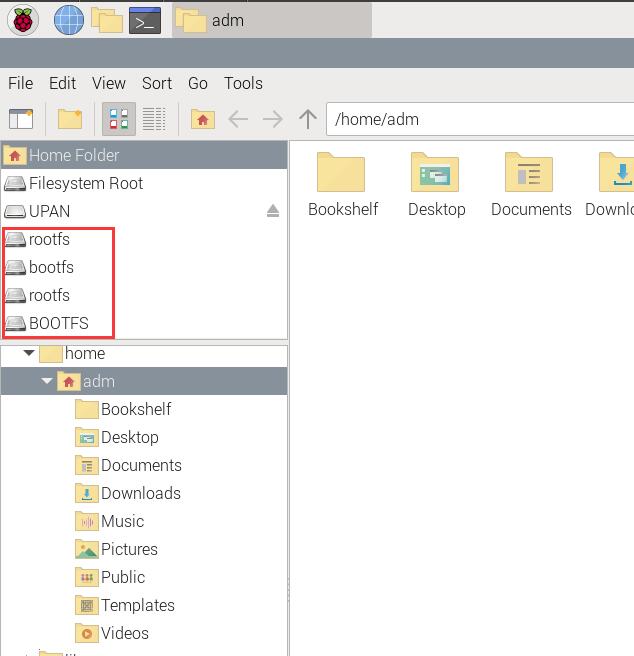
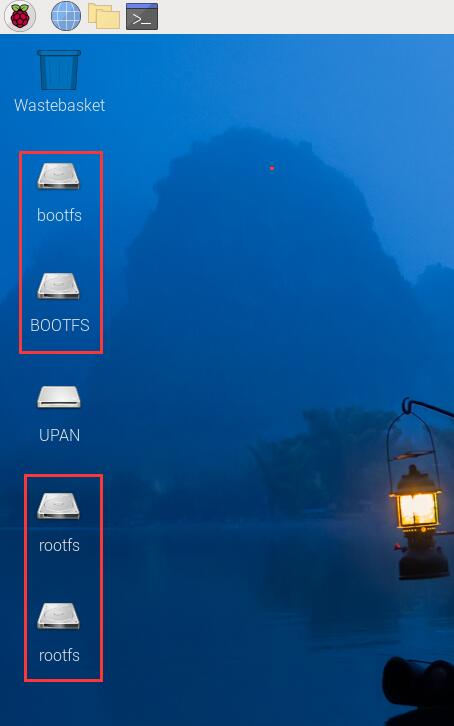
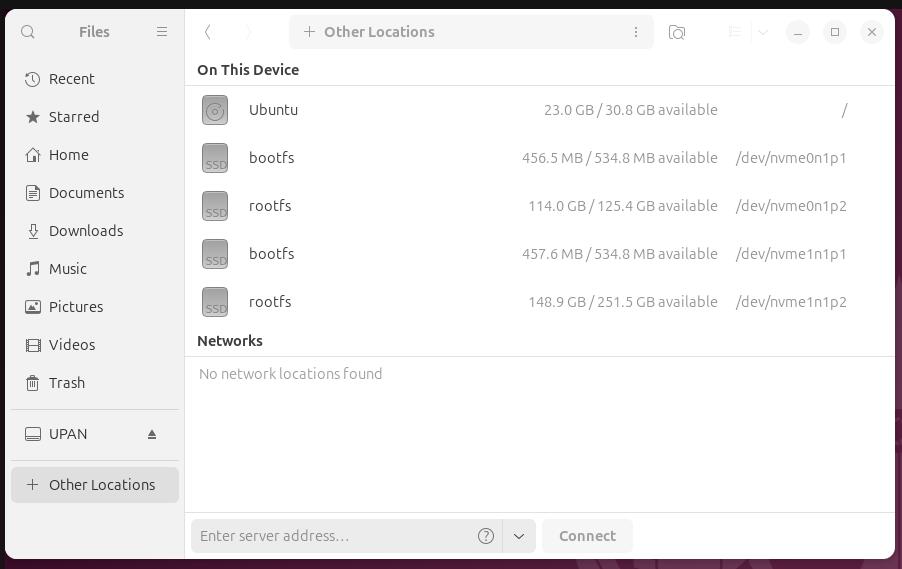
3.1.5 After the system starts, we can see two SSDs in the File Manager of Raspberry Pi OS, as shown in the figure below:
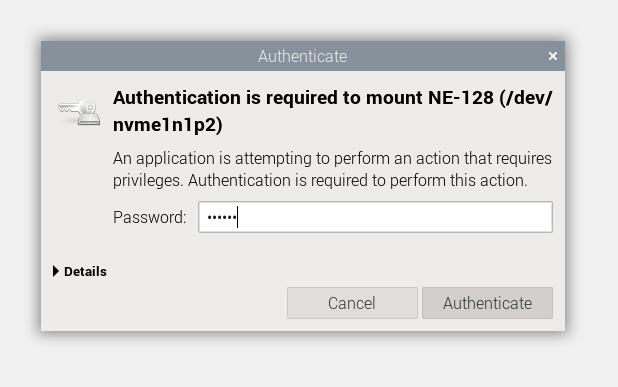
If you need to operate on the SSD, please click on any of the partitions. At this point, you will need to enter the system password. Once the verification is successful, you can operate on the SSD.
At this point, returning to the desktop, you can see the shortcut icons for each partition of the two SSDs:
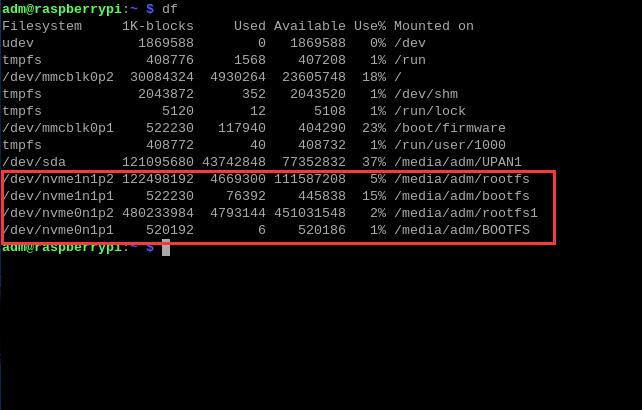
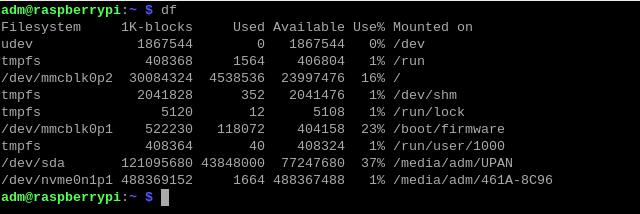
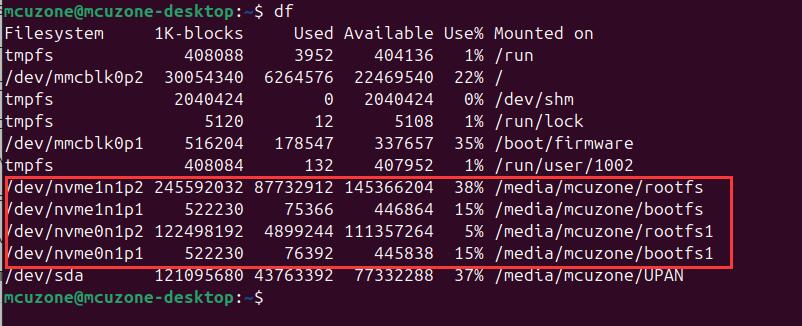
By entering df in the terminal, you can see two SSDs, which we can use as storage devices.
3.2 Using SSD as system boot
3.2.1 Flash Raspberry Pi OS to SSD, Click here to go to the burning method instructions. (Firmware of the Raspberry Pi needs to be updated to a version later than 2024.5.13. For the upgrade method, please refer to Section 3.1.3 of this document) Then remove the TF card, or set booting from NVMe (SSD) as the first option in the boot order settings.
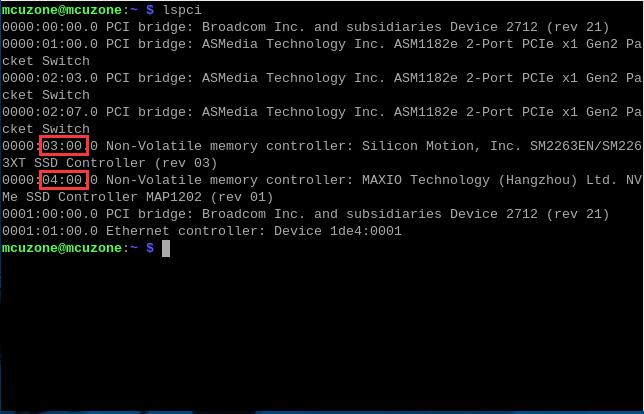
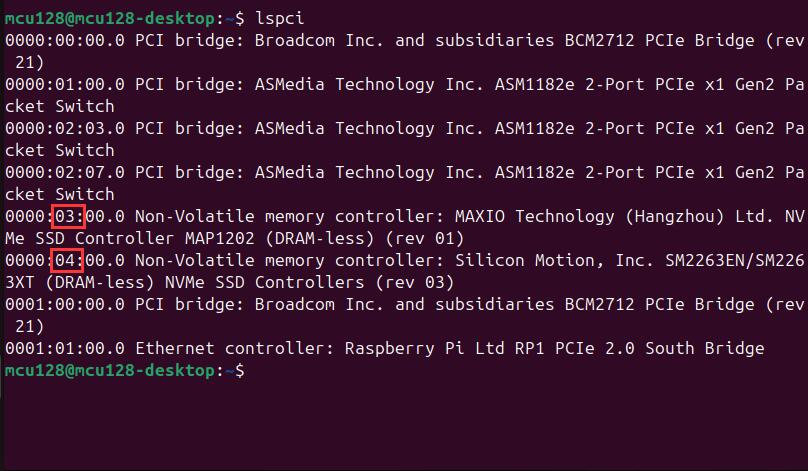
3.2.2 After our testing, a single SSD inserted into any SSD slot can boot the system (the slot near the Mcuzone logo is Slot 03, and the slot away from the Mcuzone logo is Slot 04). If two slots have SSDs inserted and only one SSD has the system , the OS will boot from the SSD with the system. If both SSDs have the system, the OS will prioritize booting from Slot 04. The positions of the slots on the expansion board are shown in the diagram below.

Specific information about two slots can be viewed by entering lspci in the terminal.
Note: Kingston NV2 series SSD cannot boot directly from a pure PCIe SSD expansion board, but can boot from an expansion board with a PCIe switch chip.
3.3 Speed test of SSD
3.3.1 Test the interface speed of SSD
Note: The MPS2280D+ SSD operates under PCIe Gen2 and cannot operate under PCIe Gen3.
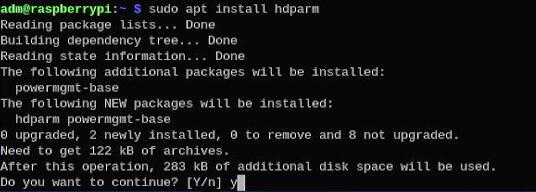
Install the hard drive speed testing software hdparm. Run the following command in the terminal:
sudo apt install hdparm
The testing method is as follows:
Run df in the terminal, for example, to check the SSD partition name as "nvme0n1":
Execute the following command, which can be executed multiple times to test the hard drive speed repeatedly.
sudo hdparm -t /dev/nvme0n1
The following are the test results:
Single SSD, Slot 03:
| No. | Speed: MB/s |
| 1 | 430.73 |
| 2 | 430.73 |
| 3 | 430.72 |
| 4 | 430.84 |
| 5 | 430.74 |
| Ave. | 430.75 |
Single SSD, Slot 04:
| No. | Speed: MB/s |
| 1 | 430.85 |
| 2 | 430.81 |
| 3 | 430.76 |
| 4 | 430.76 |
| 5 | 430.75 |
| Ave. | 430.79 |
Two SSDs, the SSD in slot 03:
| No. | Speed: MB/s |
| 1 | 430.38 |
| 2 | 430.40 |
| 3 | 430.43 |
| 4 | 430.45 |
| 5 | 430.45 |
| Ave. | 430.42 |
Two SSDs, the SSD in slot 04:
| No. | Speed: MB/s |
| 1 | 430.80 |
| 2 | 430.80 |
| 3 | 430.77 |
| 4 | 430.77 |
| 5 | 430.78 |
| Ave. | 430.78 |
3.3.2 Test the R/W speed of SSD
Insert a Samsung NVMe SSD 128G into slot 03 and a WD PC SN730 NVMe SSD 256G into slot 04, then test the R/W speeds between the two drives. The results are as follows:
| Data Transmission Direction | Time: s | Speed: MB/s | Package Size: MB |
| Samsung->WD | 4.76 | 430.25 | 2048.00 |
| WD->Samsung | 5.64 | 363.12 | 2048.00 |
| Samsung->WD | 29.83 | 343.28 | 10240.00 |
| WD->Samsung | 37.86 | 270.47 | 10240.00 |
IV. Work with Ubuntu OS
4.1 Using SSD as storage expansion
4.1.1 The Ubuntu OS used in this article is: ubuntu-24.04-preinstalled-desktop-arm64+raspi.img.xz. You can download it in:
https://ubuntu.com/download/raspberry-pi
4.1.2 Use Imager or balenaEtcher to flash the OS image in TF card. The operation method is the same as in the previous chapter on flashing the Raspberry Pi OS. (Ⅲ 3.1.2)
4.1.3 Boot the Ubuntu OS from the TF card. Since the previous chapter has already updated the Raspberry Pi kernel and enabled support for SSDs (including storage and boot), there is no need to repeat these steps here. If you have not done this before, please follow the steps in the previous chapter. (Ⅲ 3.1.3、3.1.4)
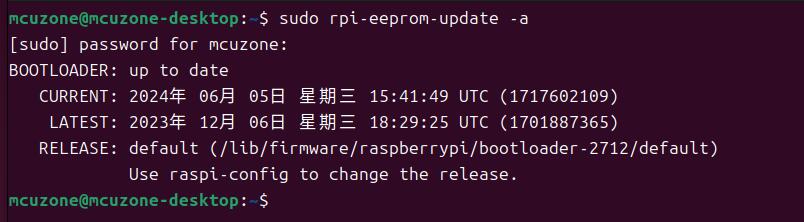
Note, on the Ubuntu OS, the command to update the Raspberry Pi firmware is sudo rpi-eeprom-update -a,, while the command to edit the boot.conf file is still sudo rpi-eeprom-config --edit.
4.1.4 Shut down the system, insert two SSDs, then start the Ubuntu OS. We can see the two SSDs and their respective two partitions. Unlike the Raspberry Pi OS, we can operate the SSDs without enter the system password.

By entering df in the terminal, you can see two SSDs, which we can use as storage devices.
4.2.Using SSD as system boot
4.2.1 Flash Ubuntu OS to SSD, Then remove the TF card, or set booting from NVMe (SSD) as the first option in the boot order settings.
4.2.2 After our testing, a single SSD inserted into any SSD slot can boot the system (the slot near the Mcuzone logo is Slot 03, and the slot away from the Mcuzone logo is Slot 04). If two slots have SSDs inserted and only one SSD has the system , the OS will boot from the SSD with the system. If both SSDs have the system, the OS will prioritize booting from Slot 04. The positions of the slots on the expansion board are shown in the diagram below. Specific information about two slots can be viewed by entering lspci in the terminal.
V. Operations such as partitioning on the SSD
5.1 Overview
This chapter uses Raspberry Pi OS as an example to introduce operations such as partitioning and mounting the SSD.
5.2 Partitioning an SSD using GParted
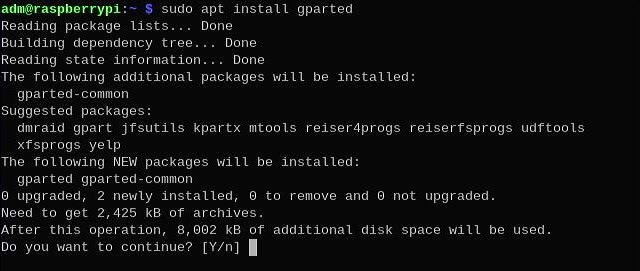
5.2.1 Download the GParted. Open the Raspberry Pi OS terminal and enter the following command to install the GParted.
sudo apt install gparted
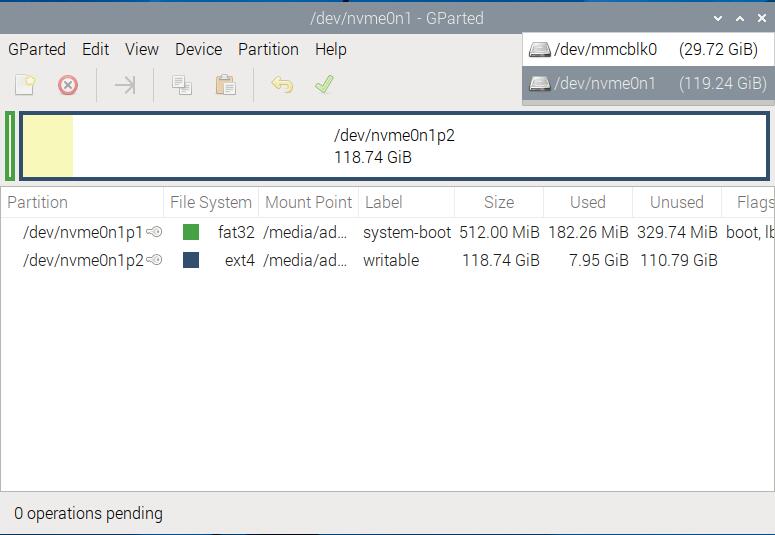
5.2.2 Open the GParted and select the corresponding SSD.
The command to open GParted issudo gparted. After opening it, you'll see a GUI. In the upper right corner, select the SSD from the dropdown menu.

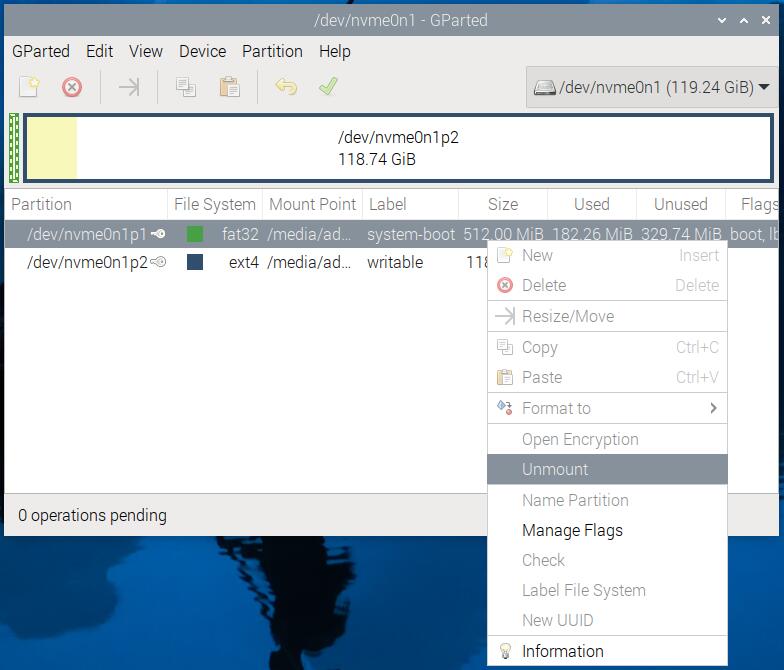
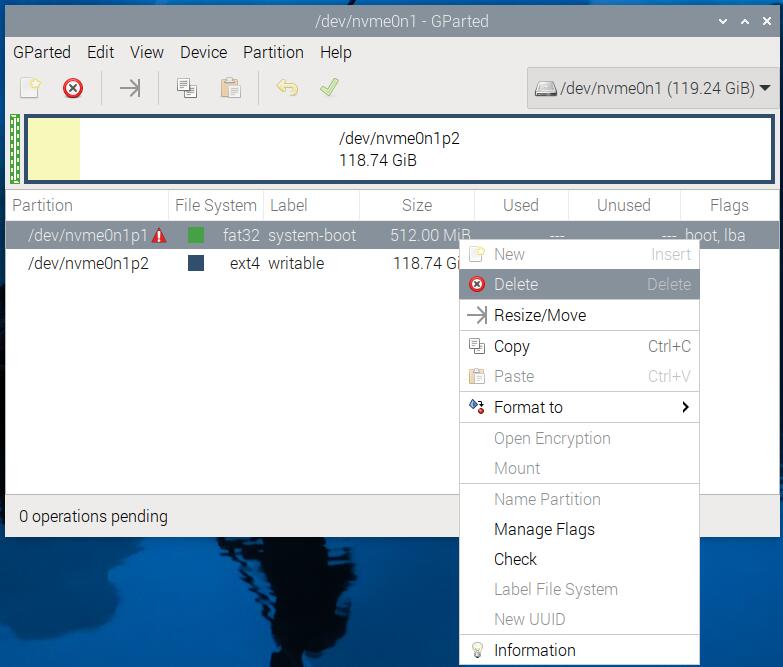
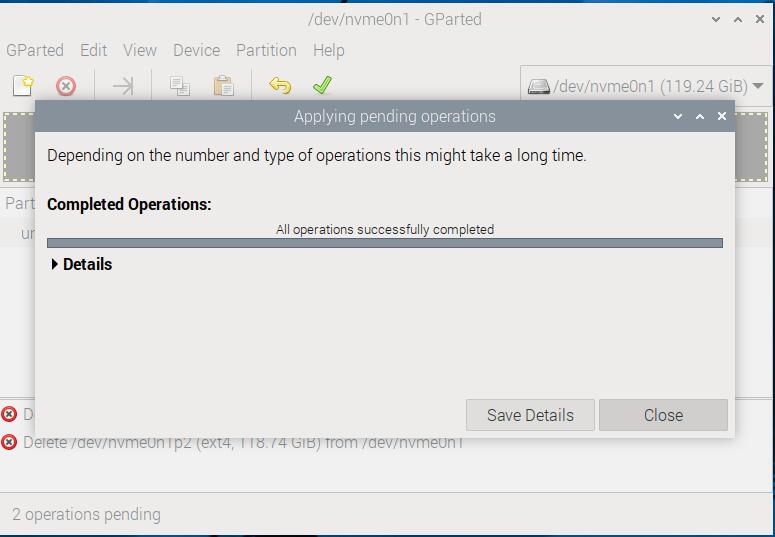
5.2.3 Before partitioning the SSD, you need to unmount the existing partition. Right-click on the partition and select "Unmount". After unmounting, right-click on the partition again and select "Delete" to remove the partition. There are two partitions on this SSD, perform the same steps for the other partition as well.
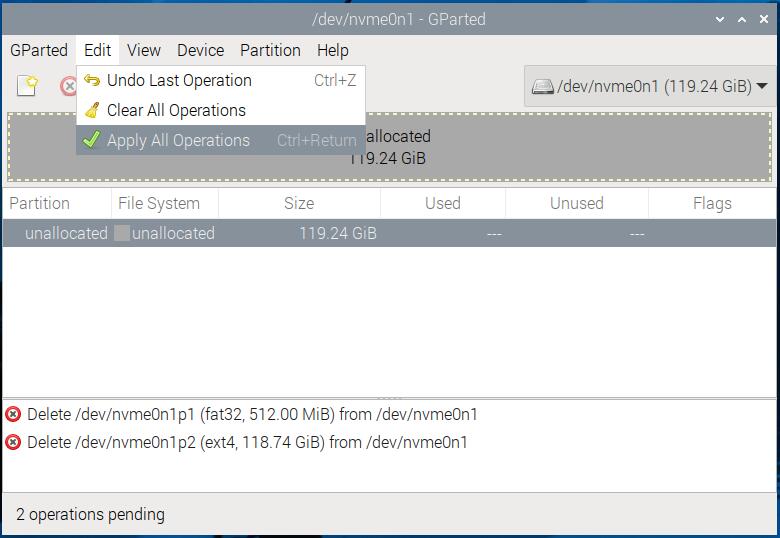
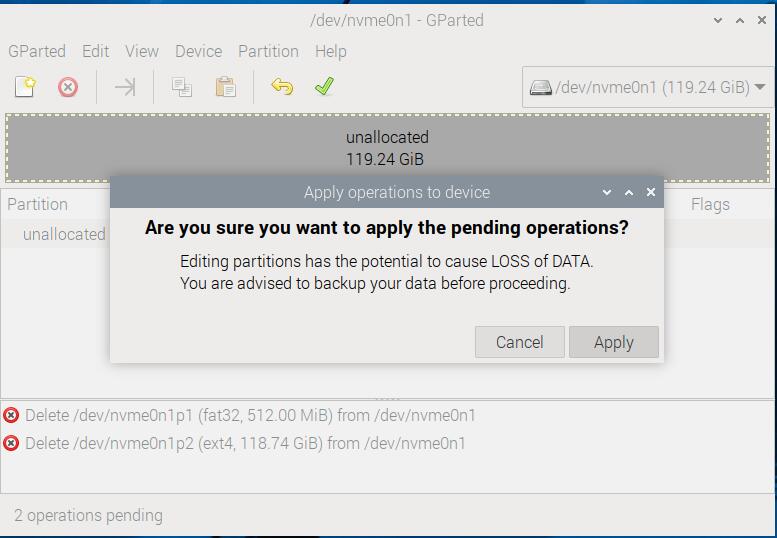
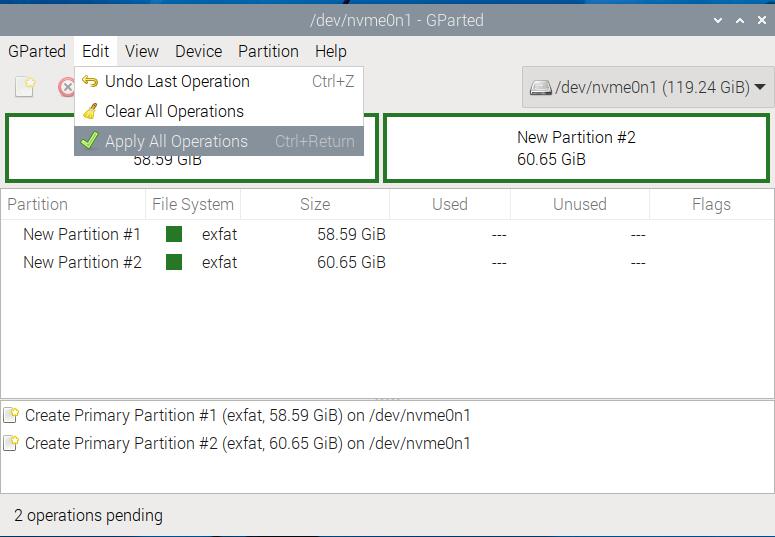
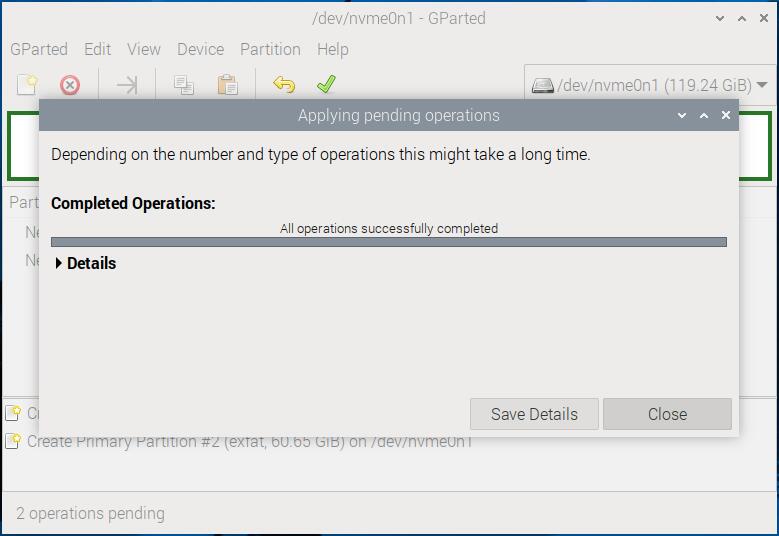
5.2.4 After completing the partition deletion, we select "Edit - Apply All Operations" from the menu to accept all the above operations. GParted is similar to DiskGenius in that it does not perform any real operations on the partitions until "Apply" is clicked.
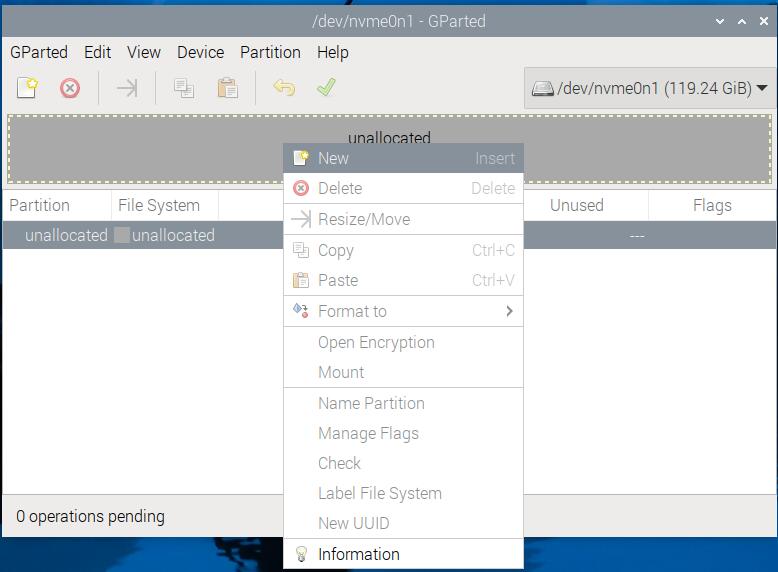
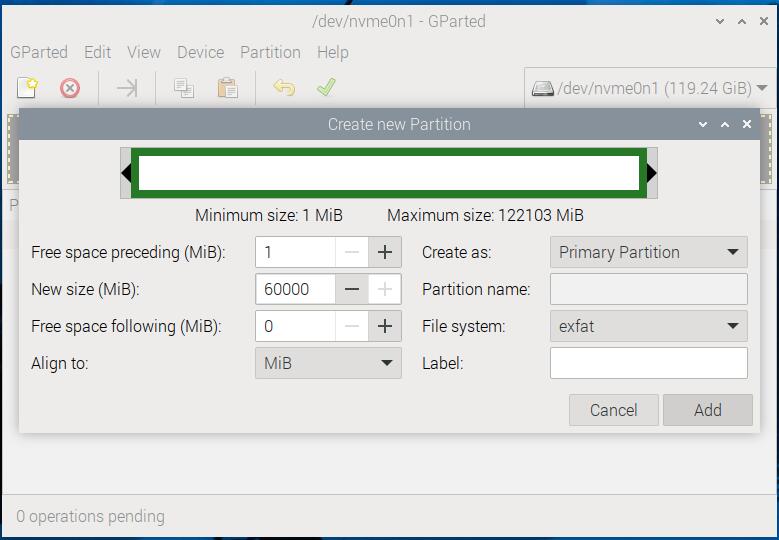
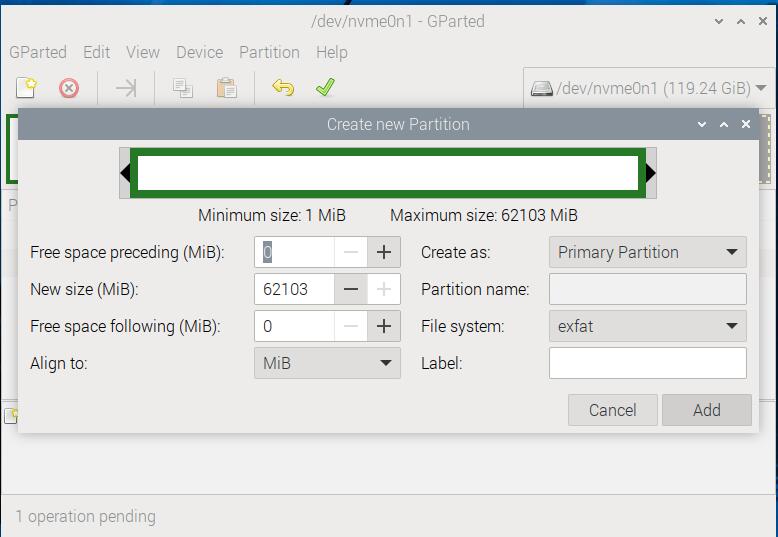
5.2.5 Right-click on the empty SSD and select "New" to create a new partition. We created two partitions in the exFAT format. The steps are shown below.
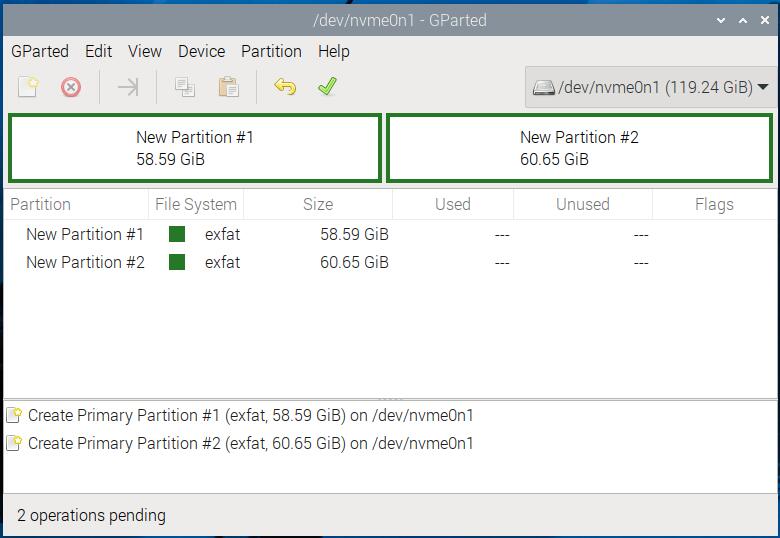

Thus, we have completed the partitioning of the SSD.
5.3 Mount partition
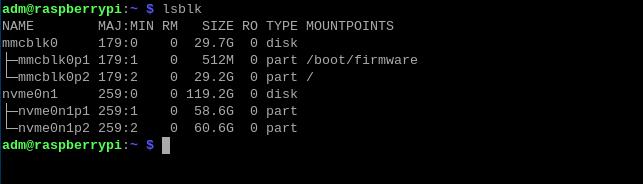
5.3.1 Now, the SSD has been divided into two partitions. These partitions can be managed in Windows, but Linux is different. You need to mount the partitions before you operate on them. First, use the lsblk command to view the partition information. You will see the two new partitions named nvme0n1p1 and nvme0n1p2.
Then we input the following commands in sequence to create the mount point:
sudo mkdir /ssd1
sudo mkdir /ssd2
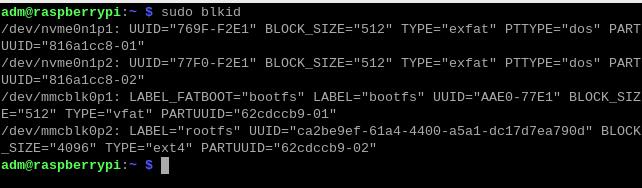
5.3.2 To check the partition UUIDs, enter the command sudo blkid in the Raspberry Pi terminal. The UUIDs of the two SSD partitions are 769F-F2E1 and 77F0-F2E1, respectively. Record these two values.
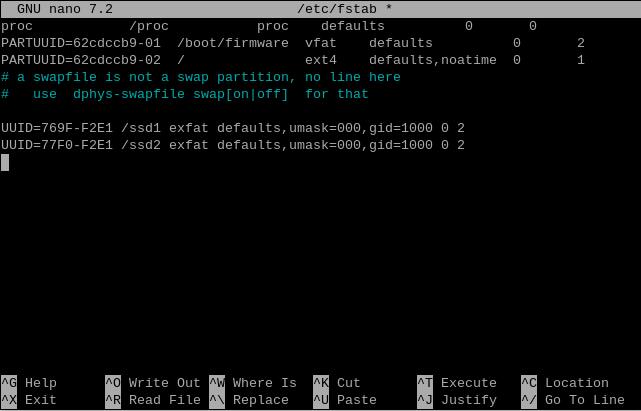
5.3.3 Enter the command sudo nano /etc/fstab in the Raspberry Pi terminal, and add the following two lines of code at the end of the file:
UUID=769F-F2E1 /ssd1 exfat defaults,umask=000,gid=1000 0 2
UUID=77F0-F2E1 /ssd2 exfat defaults,umask=000,gid=1000 0 2

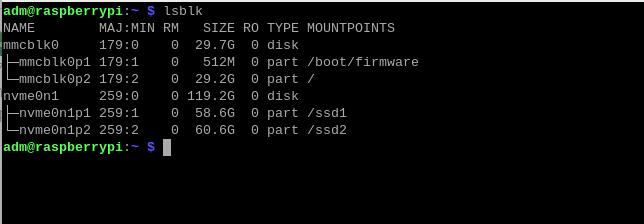
After saving and exiting, restarting the system, enter lsblk in the Raspberry Pi terminal. You can see that nvme0n1p1 and nvme0n1p2 are mounted under ssd1 and ssd2.
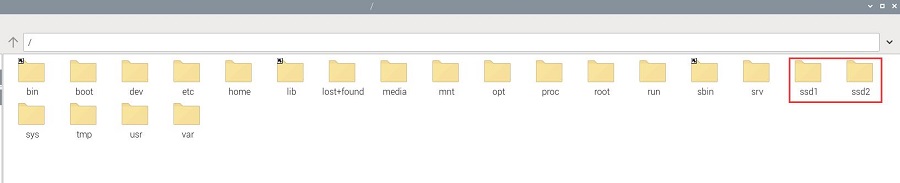
Now, we can see two directories: ssd1 and ssd2, at the root of the file directory, representing the two partitions on the SSD. We can perform operations on these two folders. We complete the mounting of the partitions now.
VI. Application demonstration of NAS server
6.1 Choose the correct OS
To correctly install the NAS server, please select the 32-bit Lite version of the software platform (i.e., the 32-bit command-line version without GUI). Other versions will not be able to install OpenMediaVault properly. You can download it in:
https://www.raspberrypi.com/software/operating-systems/#raspberry-pi-os-32-bit
The version of Raspberry Pi OS which we use is 2024-07-04-raspios-bookworm-armhf-lite.img.xz
6.2 Flashing the Raspberry Pi OS
Use Imager to flash the OS image.
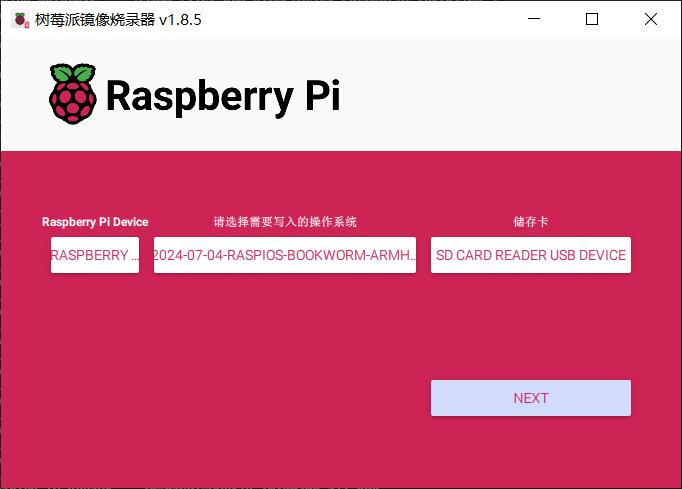
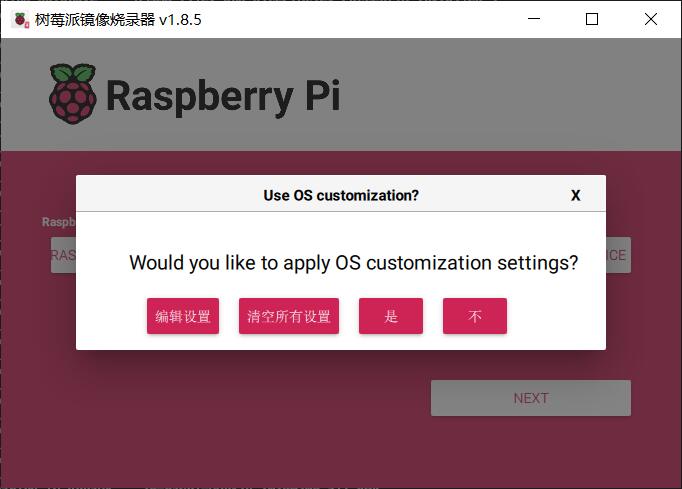
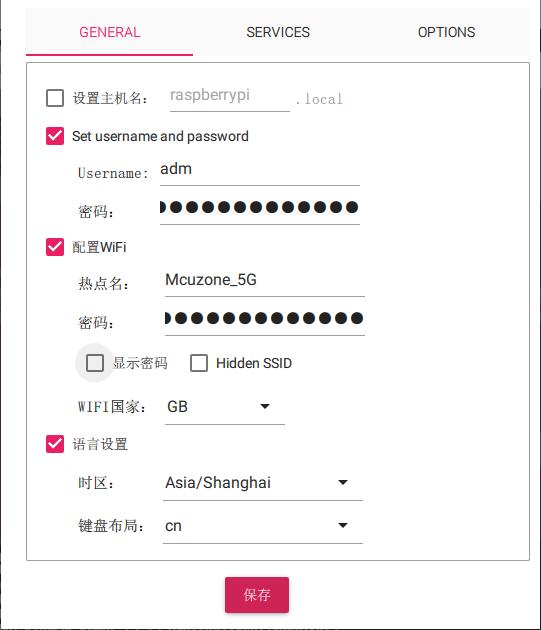
Since the system will come up with a command line interface, go to "Use OS customization" and click "Edit Settings" to set the login username and password. If you need to use WiFi, also set the WiFi parameters here. This will avoid the need to configure these settings in the command line interface, making it easier to use.
6.3 Install OpenMediaVault
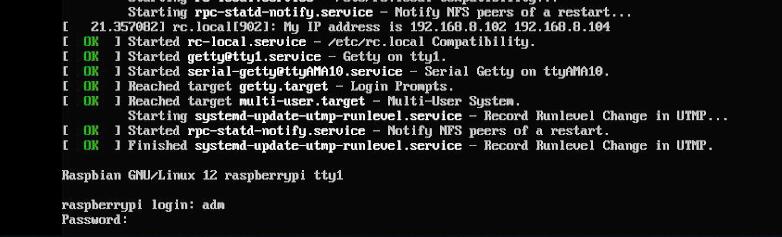
6.3.1 After the system has been flashed, connect the network cable and start the system (if WiFi was set up previously, you can also use WiFi). Enter the username and password that were set during the flashing process to log into the system.
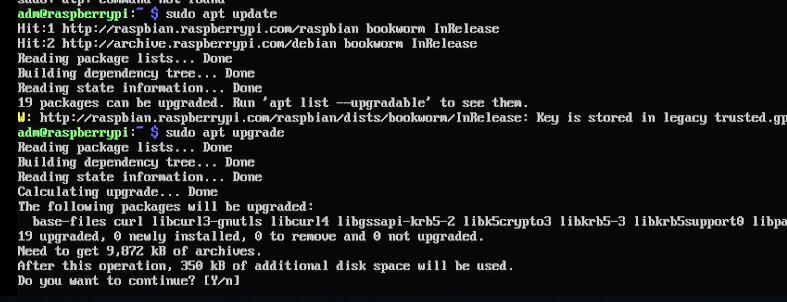
6.3.2 After logging into the system, enter the following commands to update the system and header files:
sudo apt update
sudo apt upgrade
Then enter the following command to install the OpenMediaVault:
wget https://github.com/OpenMediaVault-Plugin-Developers/installScript/raw/master/install
chmod +x install
sudo ./install -n
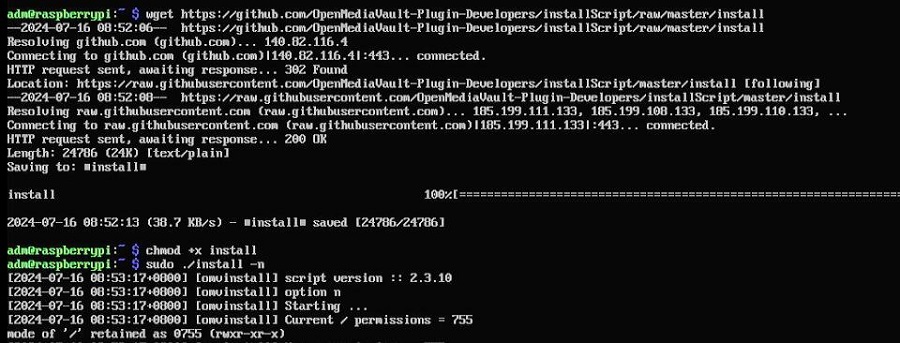
Note: Downloading OpenMediaVault software may require an internet connection to foreign country(please prepare your own method), and the installation process can take a long time. Please be patient.
6.4 Configuring OpenMediaVault for the NAS server
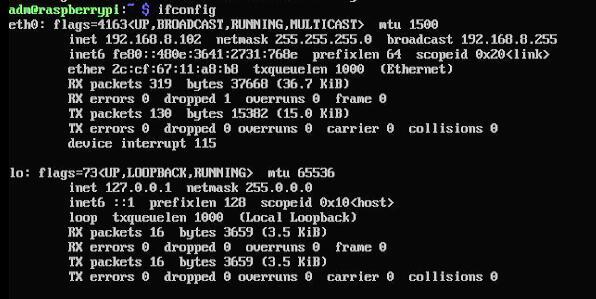
6.4.1 Use ifconfig to check the system IP of the Raspberry Pi. As shown, the IP of the Raspberry Pi used in this article is 192.168.8.102.
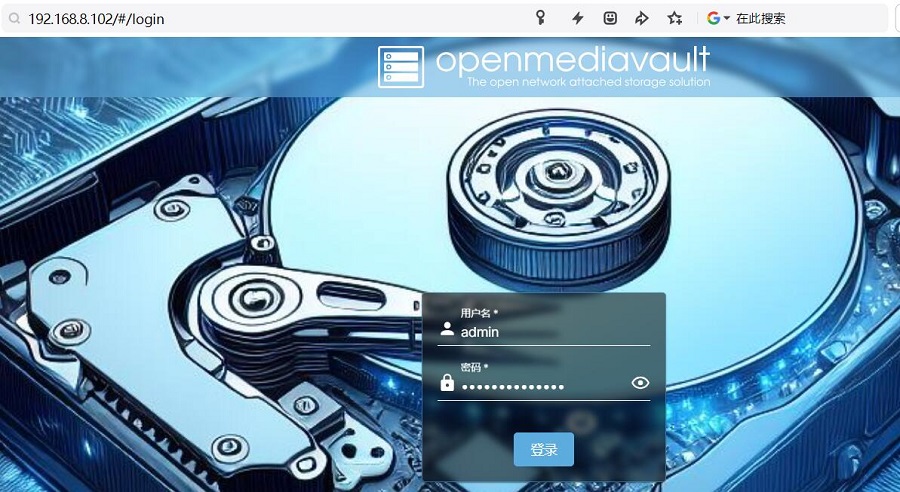
In the same local network, open a browser on your PC and enter 192.168.8.102 to access OpenMediaVault. The default login name and password are "admin" and :openmediavault".
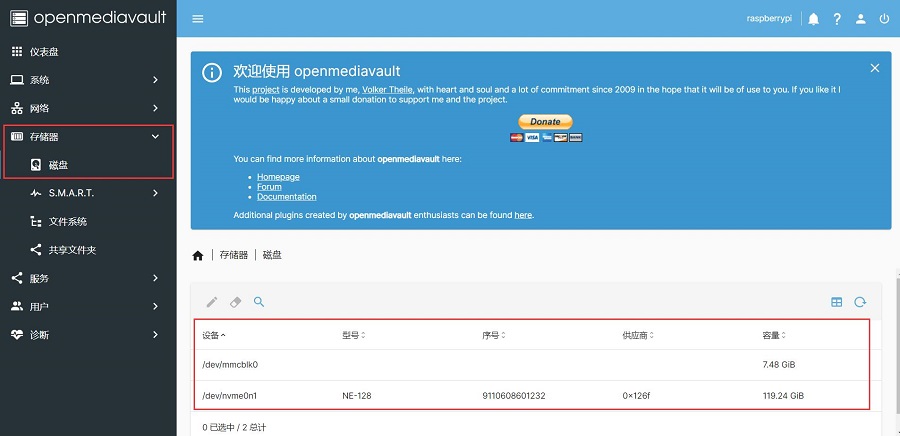
6.4.2 Before configuring the NAS server, please ensure that the storage devices are correctly installed. Only after installation, you can proceed with the next steps. Select "Storage", then click "Disk". At this point, all connected storage devices, including SD (TF) cards and SSD hard drives, should be displayed. If not, please carefully check if everything is properly inserted and restart the system.
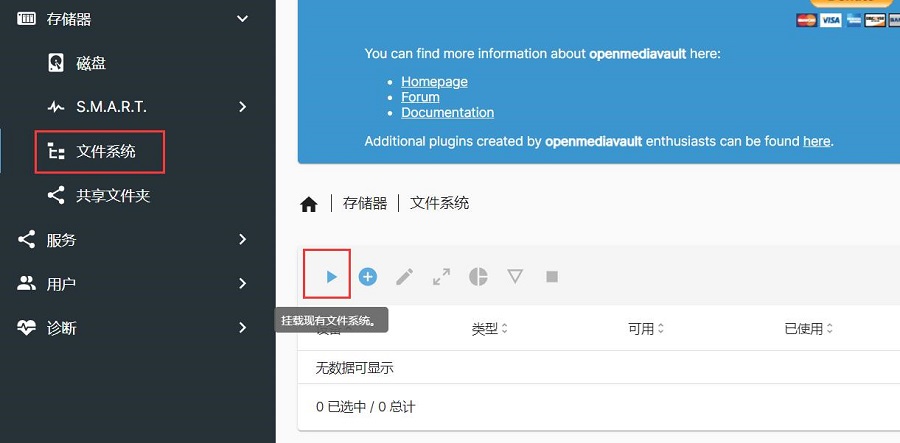
6.4.3 Click on "File System" under "Storage", then click on "Mount Existing File System" as shown in the image below. Select the currently installed storage device; in this article, we have chosen a 120GB SSD hard drive. For the partition format, we recommend choosing the EXT4 format.
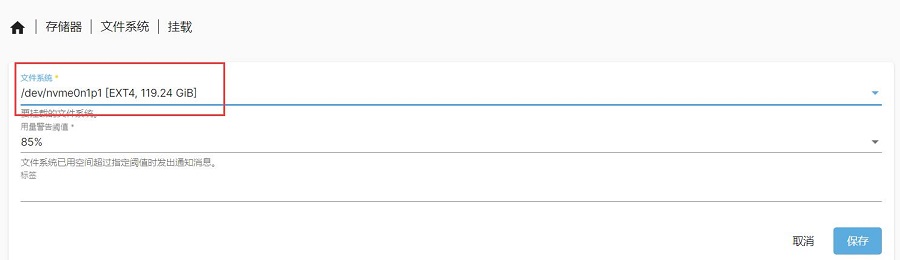
After making your selection, click "Save". Once saved, click on 'Change' in the "Pending Configuration Changes" that appears next. This will complete the mounting settings.

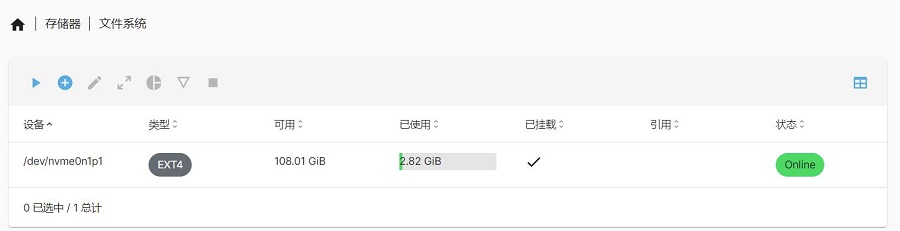
We can repeat the above steps to mount multiple storage devices.
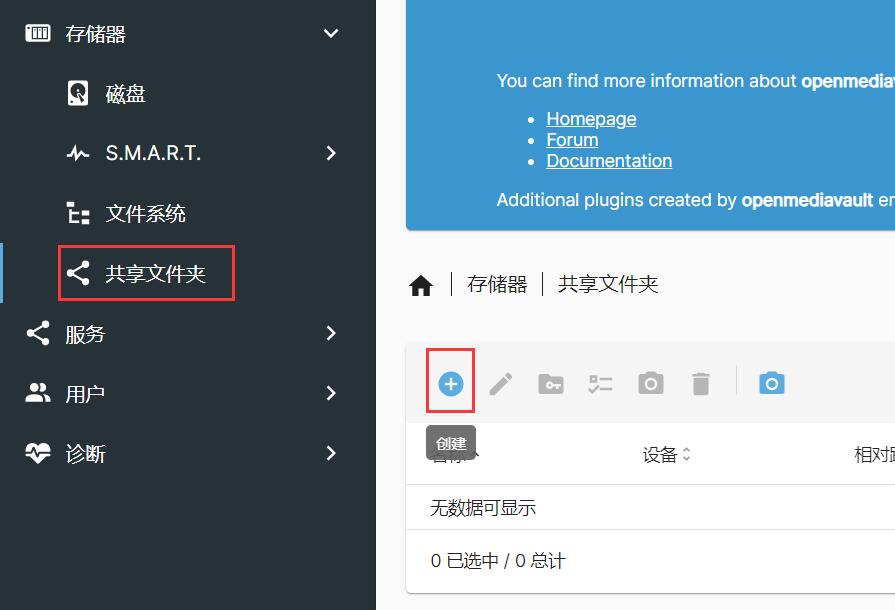
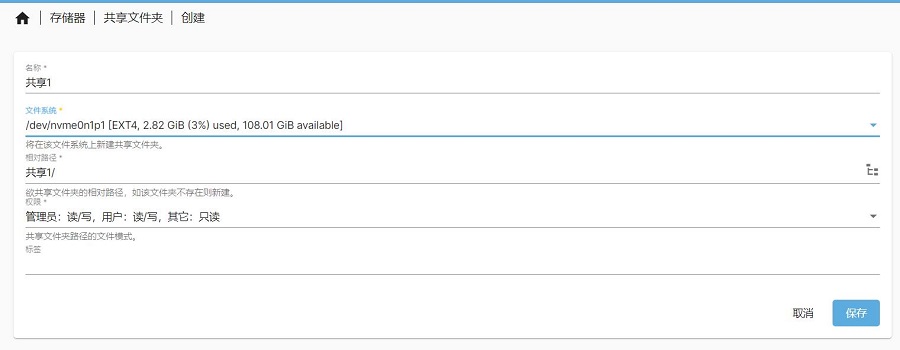
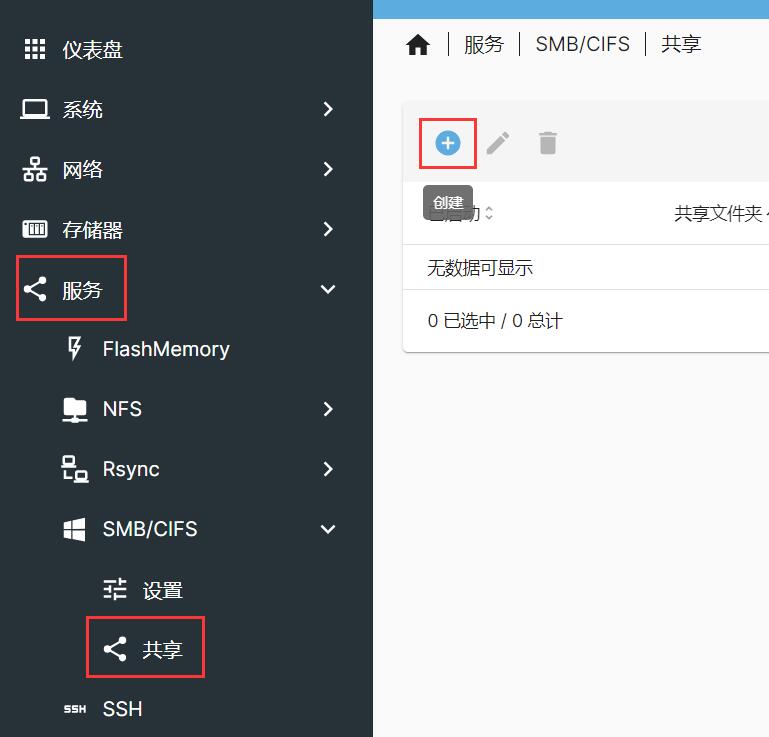
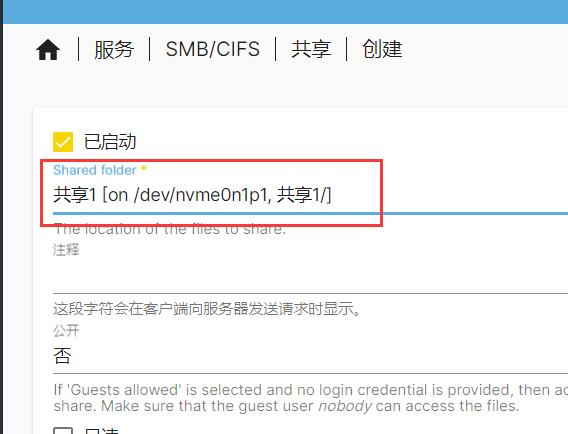
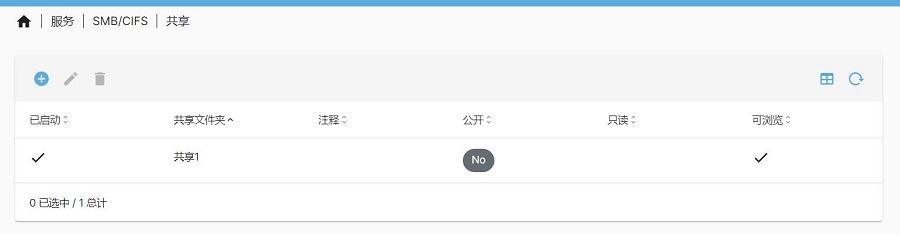
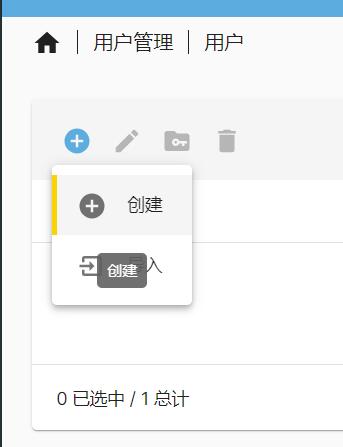
6.4.4 Click on "Shared Folders" under "Storage", then click 'Create'.
You can name the folder here, choose which drive it should be on, and grant permissions to users. By default, the permissions should be correct, but if you prefer different options for network preferences, you can adjust them. Save and apply the changes.
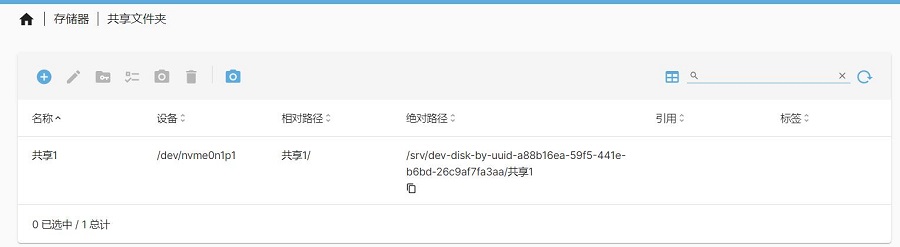
Multiple devices can be added here according to needs.
6.4.5 Next, we need to ensure that computers on the network can find the shared folder. Click on "Services', then "SMB/CIFS" and click "Settings". Select "Enabled" then save and apply the changes.
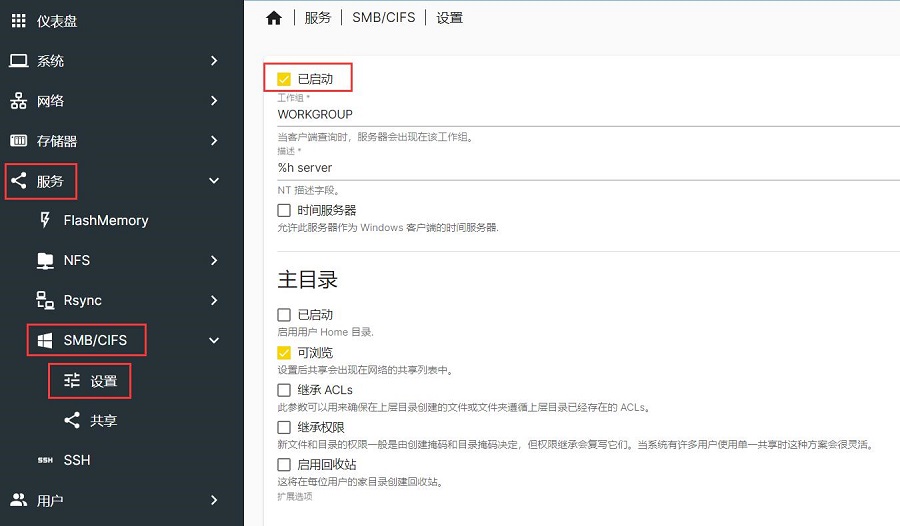
Next, we need to ensure that computers on the network can find the shared folder. Click on "Services", then "SMB/CIFS", and click "Settings". Select "Enabled", then save and apply the changes.
If you need to configure multiple shared folders, please repeat the above steps.
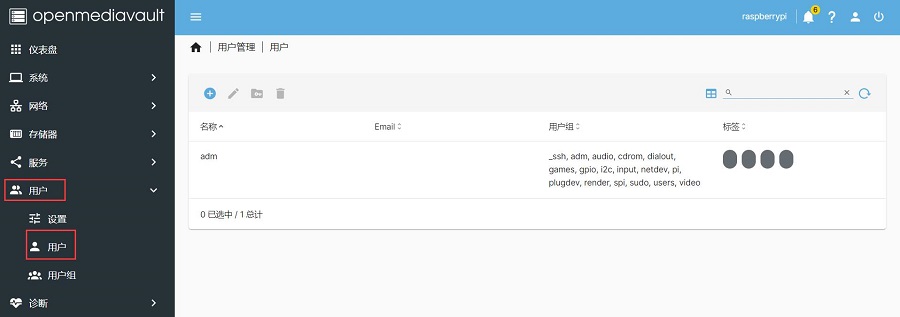
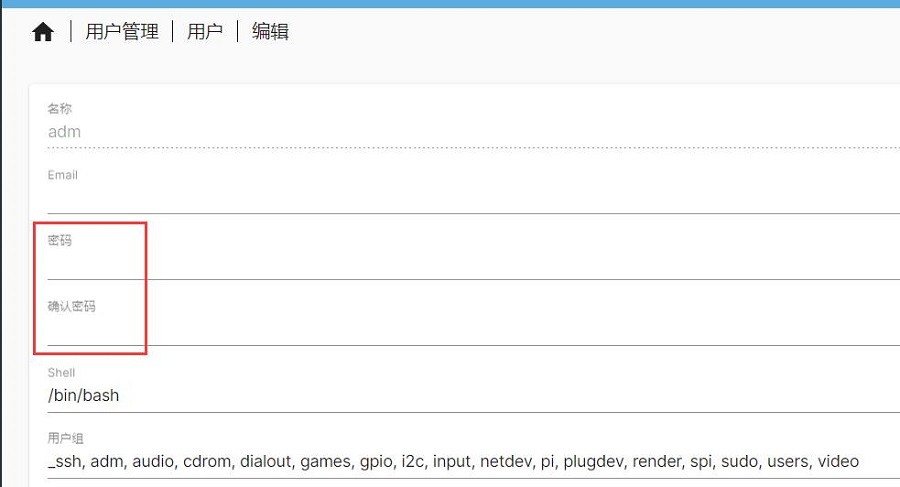
6.4.5 Finally, Click on "User - User" to set up a user for subsequent logins to the NAS server. If you do not wish to create a new user, you can use the default user (in this article, the default user is "adm"). If you do not know the default user's login password, you can edit the user to change the password.
Note: The default user refers to the login user of the Raspberry Pi OS (in this article, it is the "adm" user). If you change this password, you will need to use the new password the next time you log into the Raspberry Pi OS.

6.5 Test NAS server
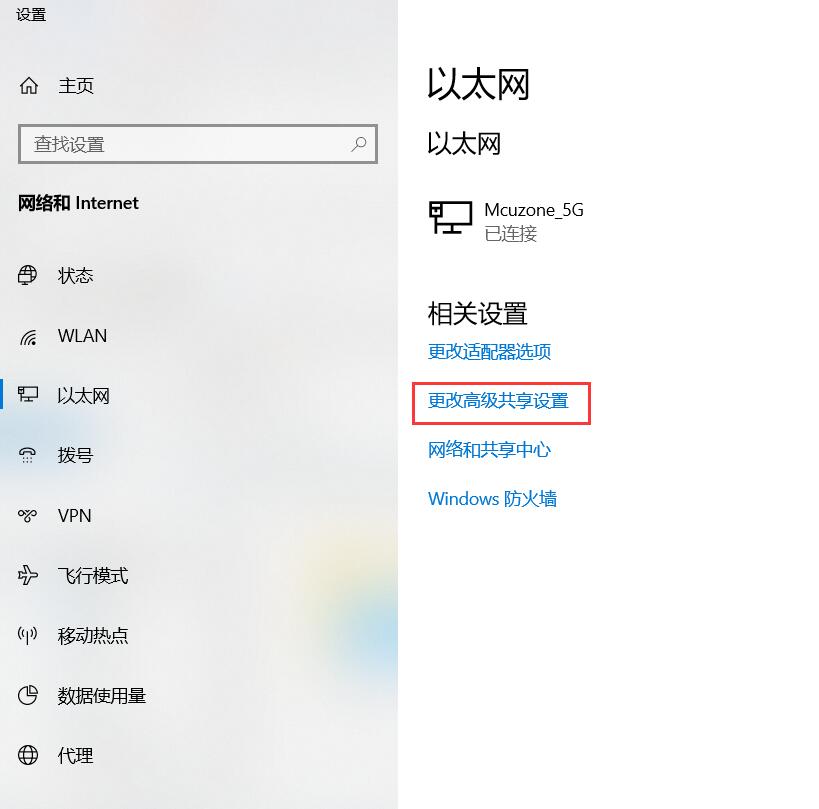
6.5.1 Check "Network discovery and file sharing" is enabled. Go to the Ethernet settings, click on "Change advanced sharing options", and see if "Turn on network discovery" and "Turn on file and printer sharing" are enabled. If they are not, please enable them.

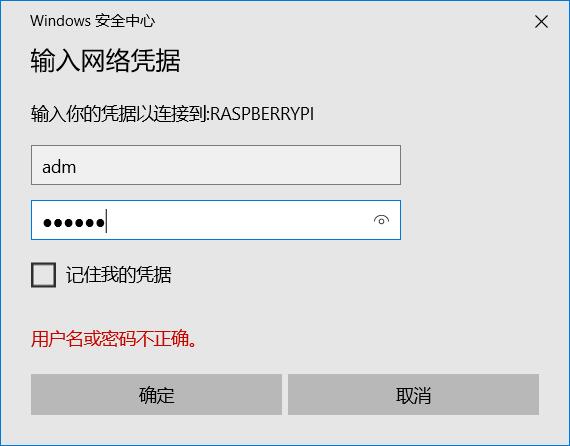
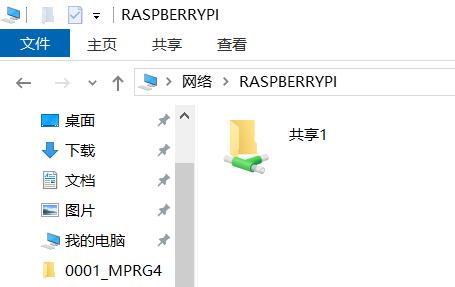
6.5.2 On the same local area network (LAN), click on "Network" and find the NAS server, which in this article is shown as "RASPBERRYPI". Double-click on this NAS server, then enter the username and password you set up earlier to open the shared folder.

6.5.3 Next, we will test the NAS speed by copying a large file. Here are demonstrations of writing and reading, with speeds varying depending on the network conditions.
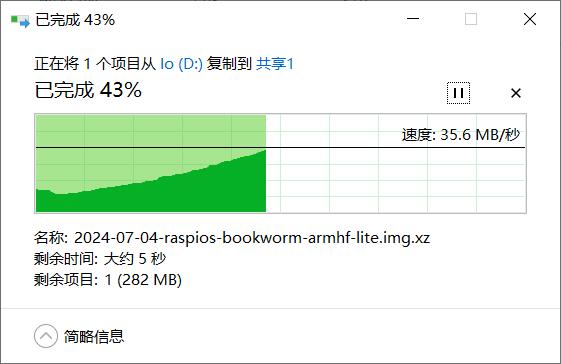
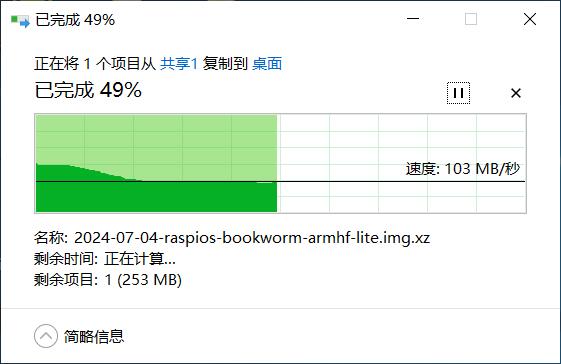
Note: Test speed is affected by various factors such as network conditions, hard drive quality, and the file storage situation on the hard drive. The above test results are for reference only and do not represent the final parameters of the actual product.
Contact Us


 QQ:8204136
Email: mcuzone@vip.qq.com
Tel: +86(0)13957118045
If there are any omissions, errors, or infringements on this page, please contact us through the above methods. Thank you!
Copyright 2004-2025 Wildchip