4006 NEO CAT1 EN
Keywords
FriendlyElec NanoPi, NEO, NEO Air, NEO Core, Allwinner H3, Cortex-A7, NEO CAT1, 4G LTE, Ubuntu, Debian, IoT
I. Introduction
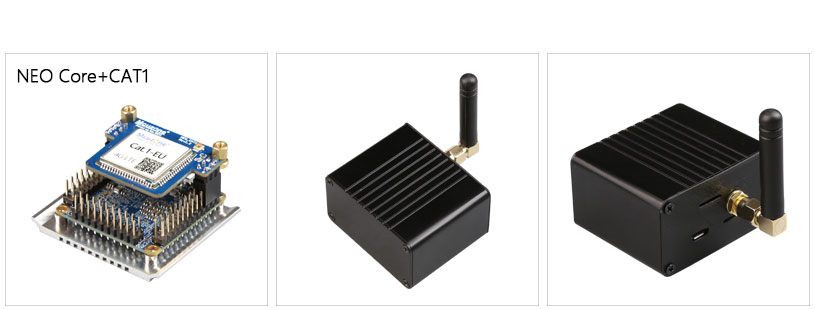
NEO CAT1 is a 4G LTE product which we designed based on the FriendlyElec NanoPi series featuring the H3 CPU motherboard (including models such as NEO, NEO CORE, and NEO AIR). The 4G module is a USB device that utilizes the USB IO pins on the NEO development board for communication and power supply, thereby providing 4G network connectivity to the NEO series boards.
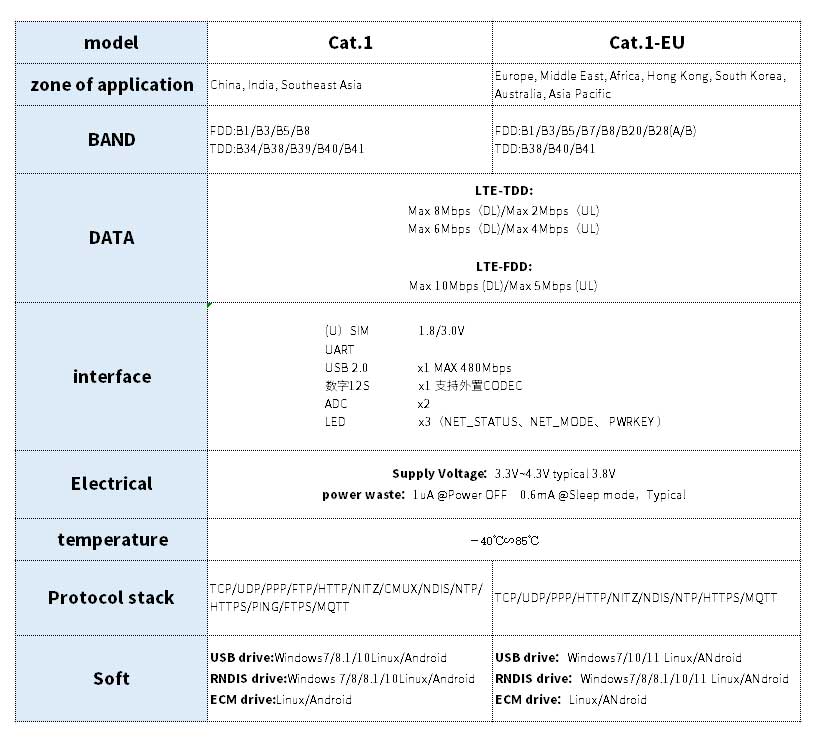
4G Cat1 is a high-cost-performance module aimed at low-speed IoT applications with speeds around 10Mbps. The rates of 10Mbps downlink and 5Mbps uplink can meet the majority of connectivity and transmission requirements.
NEO CAT1, in conjunction with NEO series, enables the creation of a low-cost IoT device. The 4G module is driver-free, on FriendlyElec's official Ubuntu and Debian systems, the device is automatically recognized, requiring no additional driver installation.
II. Hardware Spec
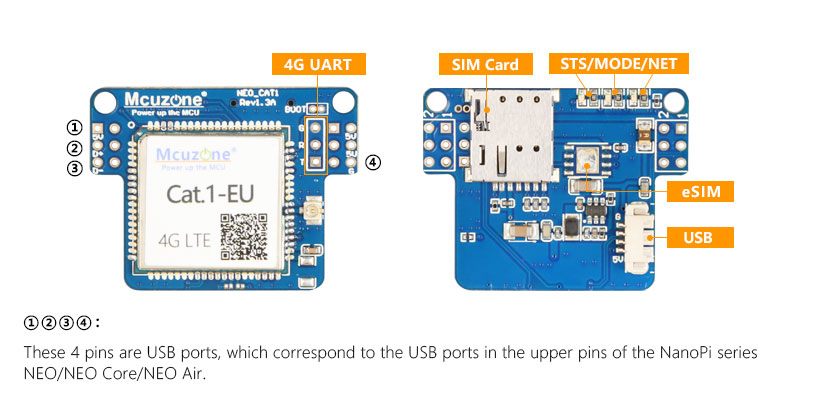
1. One USB 2.0 port, used for powering and communication with the 4G module. The module comes in two packaging options: one is a female header connector, designed for connecting to the NEO development board. The other is a 1.25mm-4P interface, intended for connecting to other development boards that are not NEO Core, NEO, or NEO Air. You may choose to use one of the two packaging interfaces.
2. One 4G CAT1 LTE.
3. One IPEX Gen 1 antenna port.
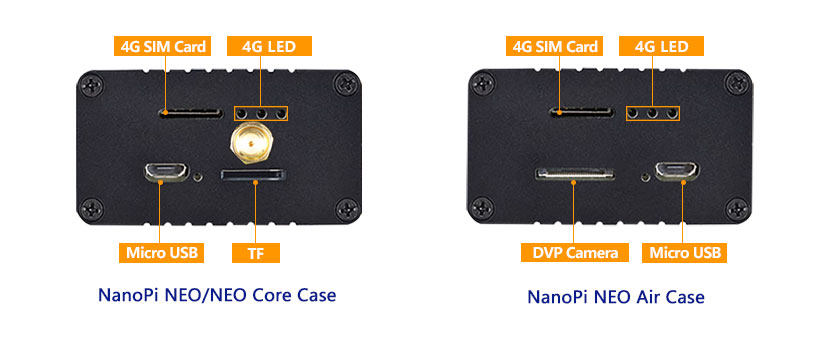
4. Dual SIM Paths: One path is a Nano SIM card slot, the other path is an eSIM chip with a 5x6mm package (which needs to be procured and soldered by the user). The two SIM paths are used alternatively, with the Nano SIM being the default option.
5. Three LEDs: STS, MODE, and NET.
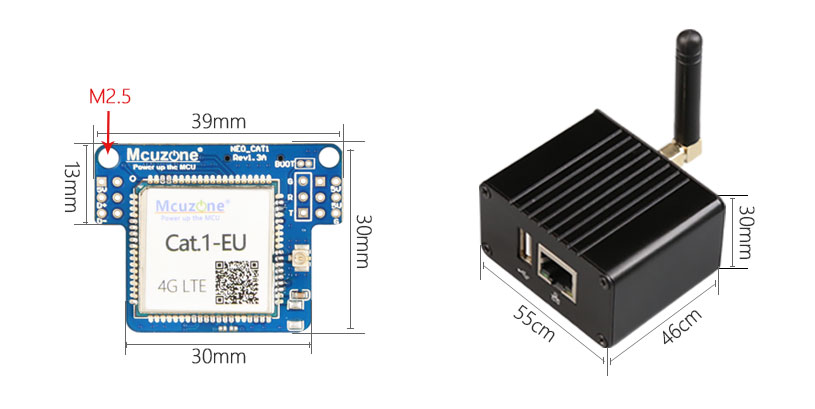
6. Two M2.5 mounting holes.
7. Size: The maximum size is 40x30mm.
8. PCB board: Two-layer board, with gold plating process, lead-free production; the material is UL and RoHS certified, with a fire rating of 94V-0.
III. Operations for NEO with CAT1
3.1 Based on Debian system
Flash the Debian system (command-line version, without a GUI) to the TF card.
The version of the official FriendlyElec system we tested: h3-sd-debian-bookworm-core-4.14-armhf-20240818.img.gz
NEO has an Ethernet port, so there are two methods for operation: one is to connect to a computer via a USB-to-TTL serial module, and the other is to connect to a router using the Ethernet port and access it through SSH.
3.1.1 Operate through TTL serial connection to PC
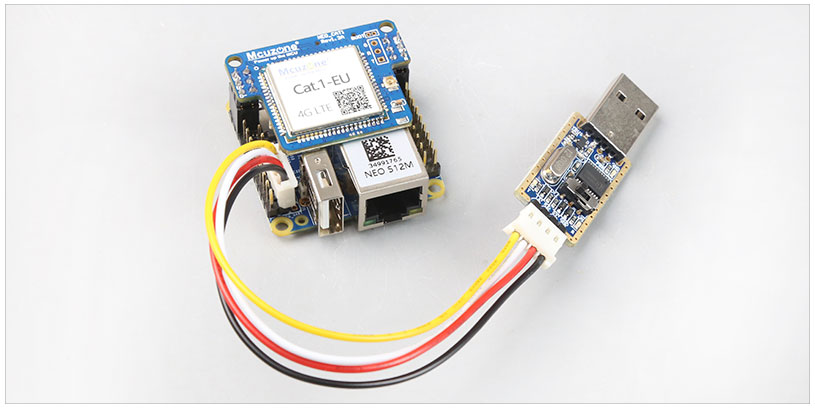
Insert the SIM card and the TF card with the system. The Debug interface of NEO, located next to the USB-A port, is a TTL serial port. The pinout from top to bottom is as follows: GND, 5V, TXD, RXD. Connect the USB-to-TTL serial module to it (connect TXD to RXD, RXD to TXD, and GND to GND; the 5V pin is not used), and connect the USB port of the USB-to-TTL serial module to the PC, as shown in the figure below:

Then download and install the terminal software MobaXterm on your PC. The download link for MobaXterm is:
https://mobaxterm.mobatek.net/download-home-edition.html
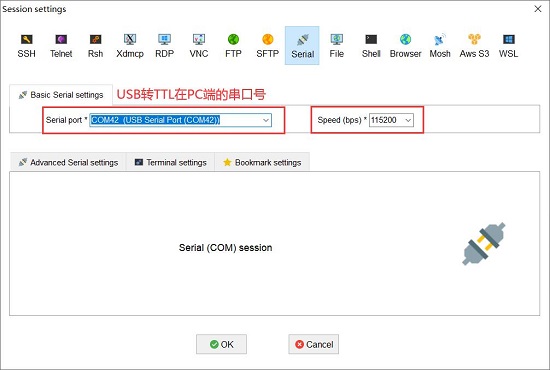
Open MobaXterm and configure the TTL serial port as shown in the figure below:
Note: Use a baud rate of 115200.
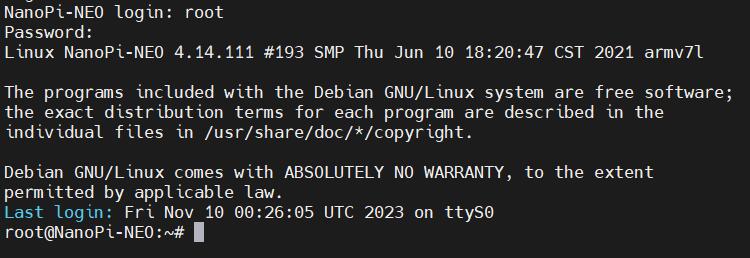
Then open this serial port and log in to the Debian system (username: root, password: fa):
Excecute ifconfig -a to view the following network parameters:
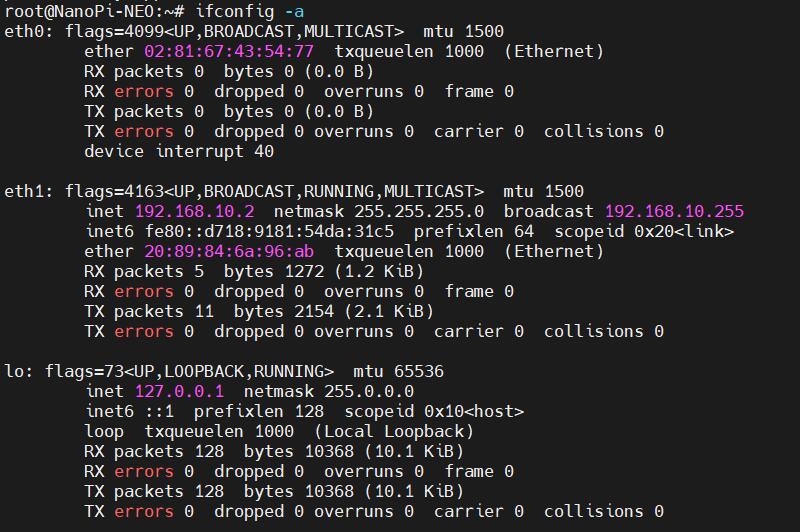
eth0 is the NEO's own Ethernet port, which does not have an IP address since it is not connected to a network cable. eth1 is the 4G CAT1 module, which has correctly obtained an IP address. We performed a ping test, and the results are as follows:
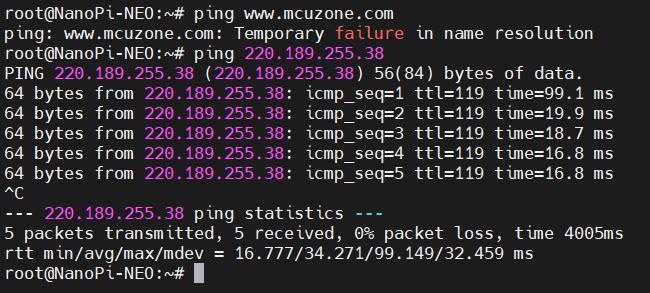
Pinging the IP address succeeds, but pinging a domain name results in an error, indicating that the system needs to have its DNS addresses configured. The setup method is as follows:
Edit the resolv.conf file:
sudo nano /etc/resolv.conf
Change the address in the red box in the image below to a general DNS server address (such as 114.114.114.114, or any other general DNS address):

If the DNS addresses are not set in the file, please enter:
nameserver 114.114.114.114
Save and exit.
At this point, pinging the domain name and pinging the IP address both succeed:
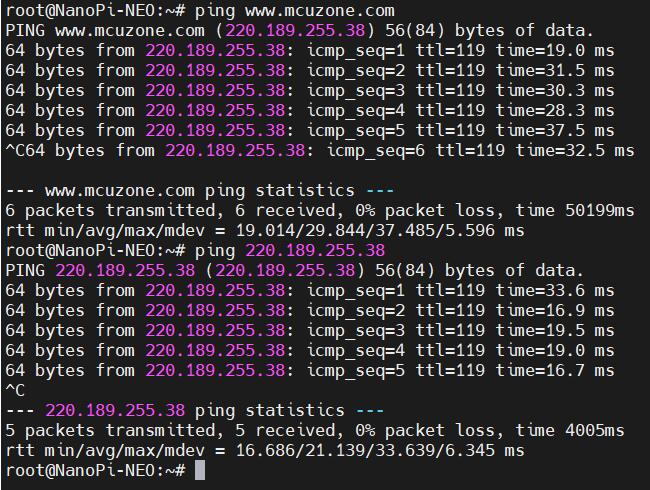
However, after making these changes, if the system restarts, the DNS entries in the resolv.conf file will be reset to their default addresses. Therefore, if you need the 4G internet connection to start automatically upon boot, you will also need to modify the permissions of the resolv.conf file. Since /etc/resolv.conf is actually a symbolic link, you need to regenerate the resolv.conf file in order to modify its permissions. The method to do so is as follows:
sudo mv /etc/resolv.conf /etc/resolv.conf.link
sudo nano /etc/resolv.conf
This recreates the resolv.conf file. In this newly created file, enter the following:
nameserver 114.114.114.114
Save and exit, then execute:
sudo chattr +i /etc/resolv.conf
After completing the above steps, restart the system, and the contents of the resolv.conf file will remain unchanged.
3.1.2 Operate through SSH over Ethernet
Connect NEO's Ethernet port to the upstream router using an Ethernet cable, then connect the PC to the same upstream router. Insert the SIM card and the TF card with the system. After the system starts, check NEO's IP address through the router's backend. In this document, the address obtained by the system is: 192.168.8.110.
Then use MobaXterm to connect to the system via SSH (username: root, password: fa):
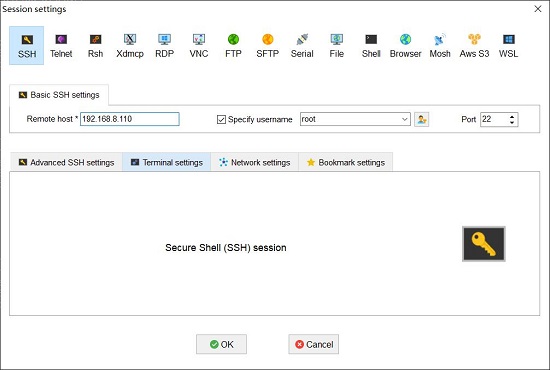
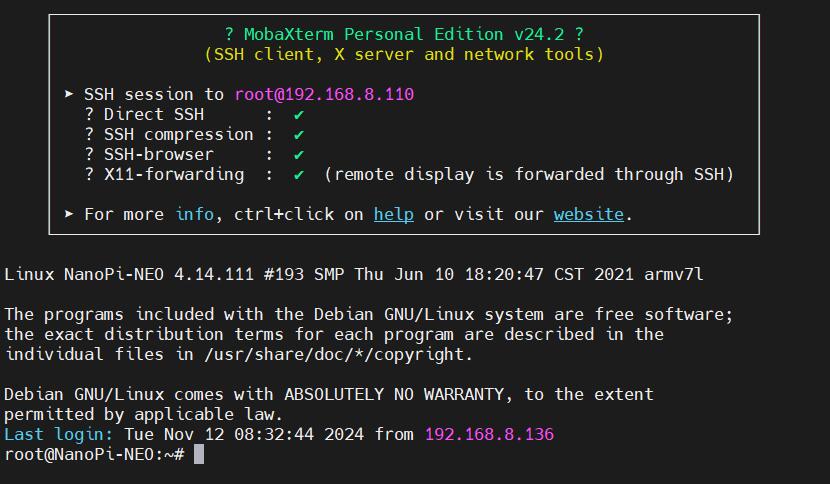
Excecute ifconfig -a to view the following network parameters:
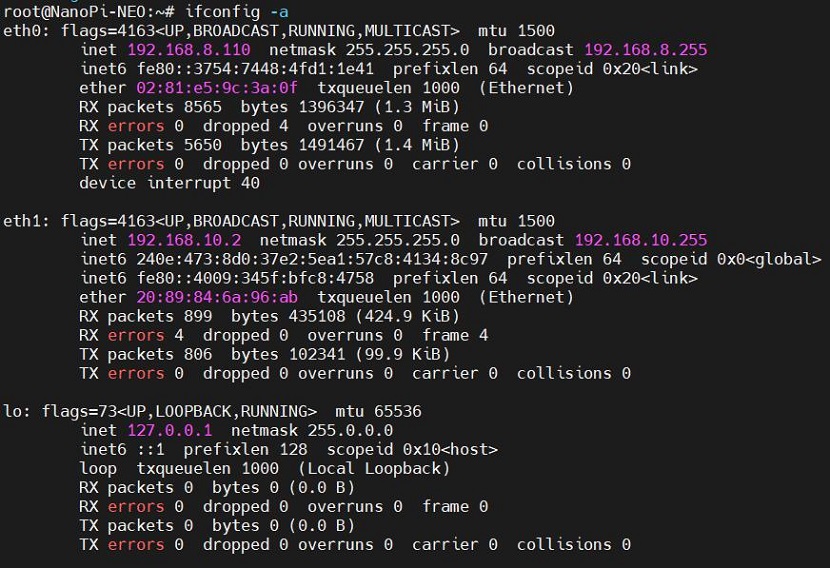
eth0 is the NEO's own Ethernet port, and eth1 is the 4G CAT1 module; both have correctly obtained IP addresses.
In the previous section, we have already set up a general DNS address. Now, we will perform ping tests separately through eth0 and eth1:
ping www.mcuzone.com -I eth0
ping www.mcuzone.com -I eth1
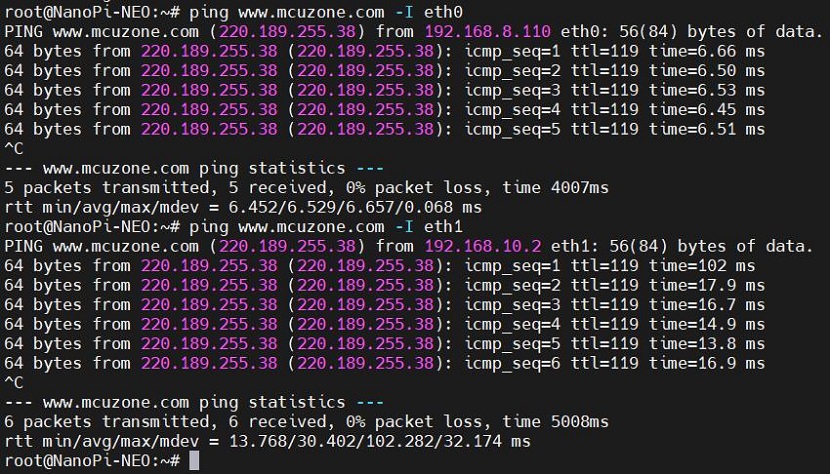
Confirms successful internet access via both wired and 4G networks.
3.2 Based on Ubuntu system
Flash the Ubuntu system (command-line version, without a GUI) to the TF card.
The version of the official FriendlyElec system we tested: h3-sd-ubuntu-noble-core-20240823.img.gz
NEO has an Ethernet port, so there are two methods for operation: one is to connect to a computer via a USB-to-TTL serial module, and the other is to connect to a router using the Ethernet port and access it through SSH.
3.2.1 Operate through TTL serial connection to PC
The operations for connecting to the computer via a TTL serial port are the same under Debian, please refer to Section 3.1.1.
Open this serial port and log in to the Ubuntu system (username: root, password: fa):
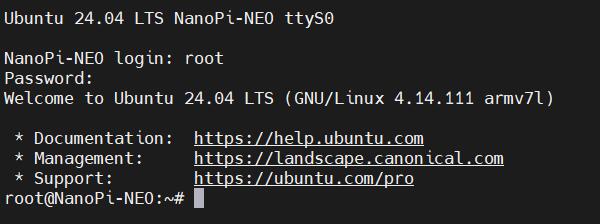
Excecute ifconfig -a to view the following network parameters:
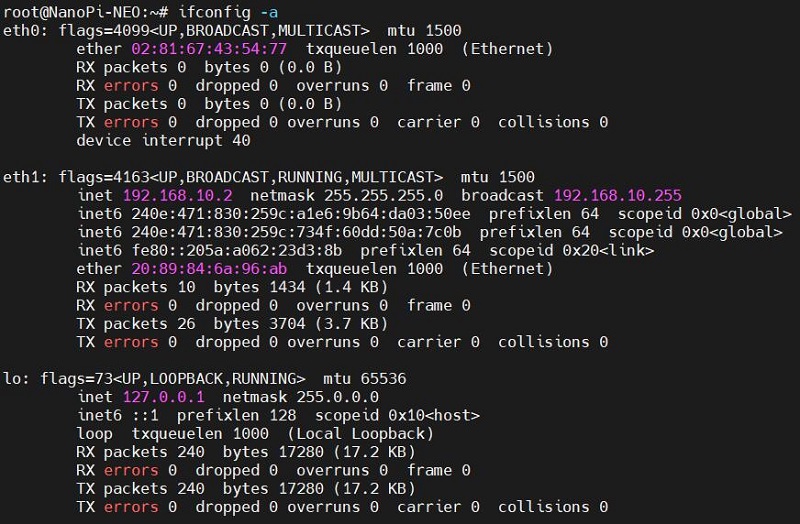
eth0 is the NEO's own Ethernet port, which does not have an IP address since it is not connected to a network cable. eth1 is the 4G CAT1 module, which has correctly obtained an IP address. We performed a ping test, and the results are as follows:
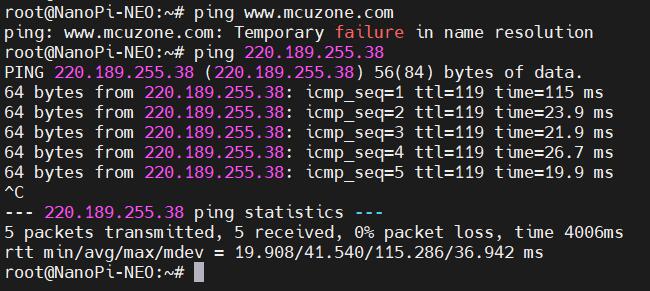
Pinging the IP address succeeds, but pinging a domain name results in an error, indicating that the system needs to have its DNS addresses configured. The setup method is as follows:
Edit the resolv.conf file:
sudo vi /etc/resolv.conf
Change the address in the red box in the image below to a general DNS server address (such as 114.114.114.114, or any other general DNS address):
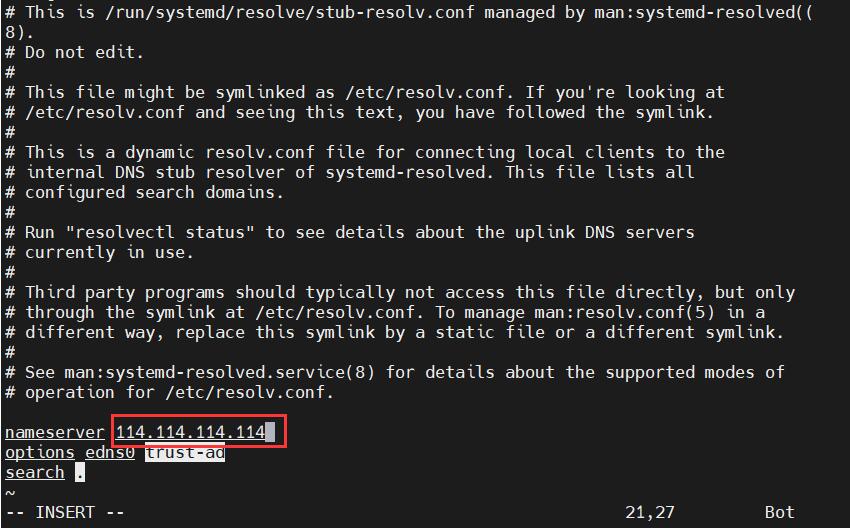
If the DNS addresses are not set in the file, please enter:
nameserver 114.114.114.114
Save and exit.
At this point, pinging the domain name and pinging the IP address both succeed:
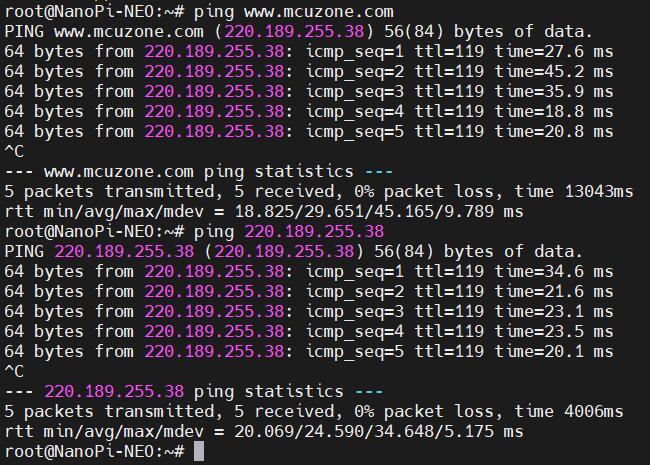
However, after making these changes, if the system restarts, the DNS entries in the resolv.conf file will be reset to their default addresses. Therefore, if you need the 4G internet connection to start automatically upon boot, you will also need to modify the permissions of the resolv.conf file. Since /etc/resolv.conf is actually a symbolic link, you need to regenerate the resolv.conf file in order to modify its permissions. The method to do so is as follows:
sudo mv /etc/resolv.conf /etc/resolv.conf.link
sudo vi /etc/resolv.conf
This recreates the resolv.conf file. In this newly created file, enter the following:
nameserver 114.114.114.114
Save and exit, then execute:
sudo chattr +i /etc/resolv.conf
After completing the above steps, restart the system, and the contents of the resolv.conf file will remain unchanged.
3.2.2 Operate through SSH over Ethernet
Connect NEO's Ethernet port to the upstream router using an Ethernet cable, then connect the PC to the same upstream router. Insert the SIM card and the TF card with the system. After the system starts, check NEO's IP address through the router's backend. In this document, the address obtained by the system is: 192.168.8.77.
Then use MobaXterm to connect to the system via SSH (username: root, password: fa):
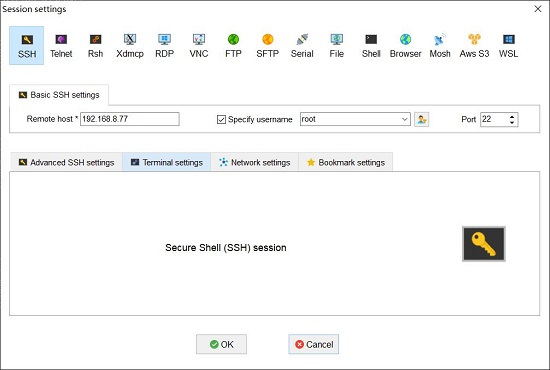
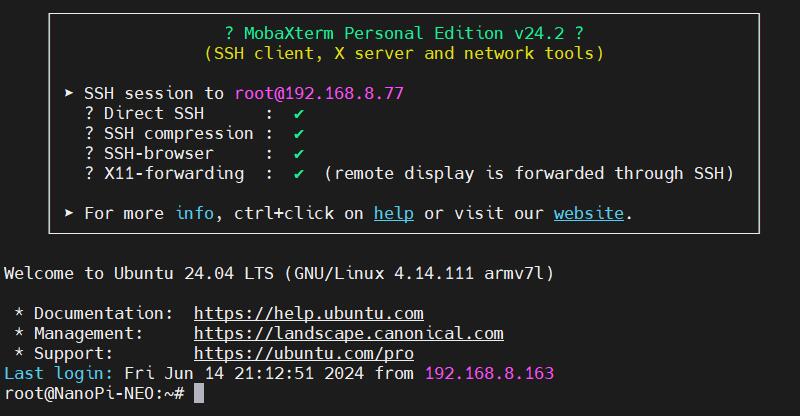
Excecute ifconfig -a to view the following network parameters:
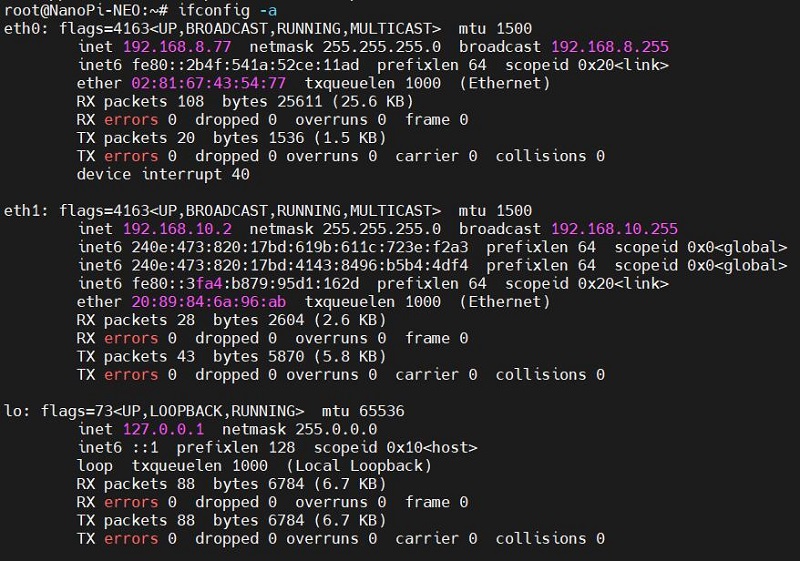
eth0 is the NEO's own Ethernet port, and eth1 is the 4G CAT1 module; both have correctly obtained IP addresses.
In the previous section, we have already set up a general DNS address. Now, we will perform ping tests separately through eth0 and eth1:
ping www.mcuzone.com -I eth0
ping www.mcuzone.com -I eth1
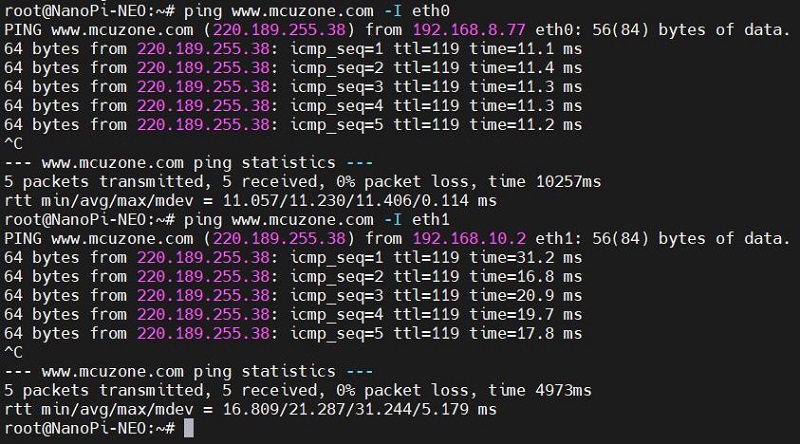
Confirms successful internet access via both wired and 4G networks.
IV. Operations for NEO Core with CAT1
4.1 Based on Debian system
The system for NEO Core is flashed into the eMMC storage.
The version of the official FriendlyElec system we tested: h3-eflasher-debian-bookworm-core-4.14-armhf-20240818.img.gz
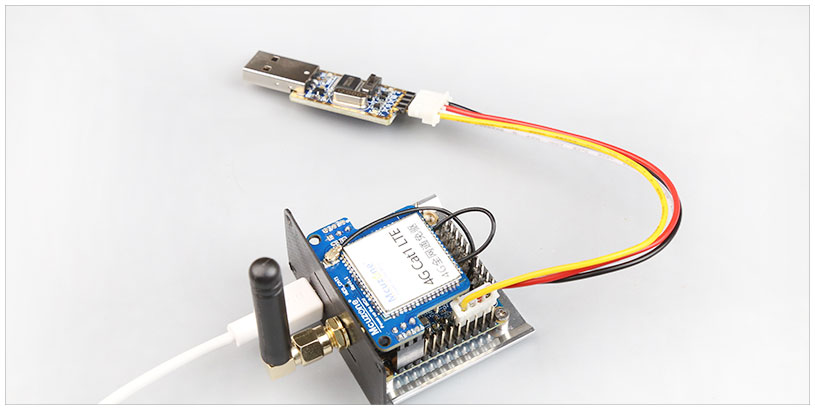
Connection Method: Connect the NEO Core to the computer using a USB-to-TTL serial module, as shown in the figure below:
Open MobaXterm and configure the TTL serial port as shown in the figure below:
Note: Use a baud rate of 115200.

Then open this serial port and log in to the Debian system (username: root, password: fa).
Excecute ifconfig -a to view the following network parameters:
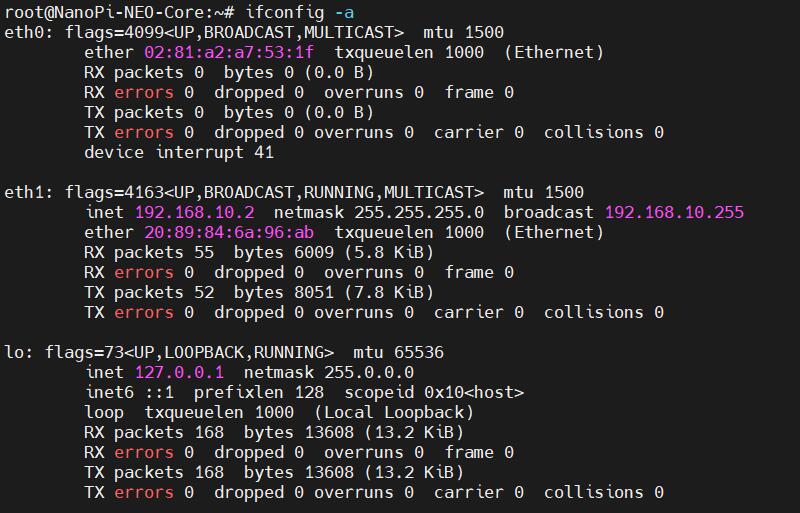
Note: eth1 (the 4G CAT1 module) has correctly obtained an IP address. If it has not obtained an IP address, please execute dhclient eth1.
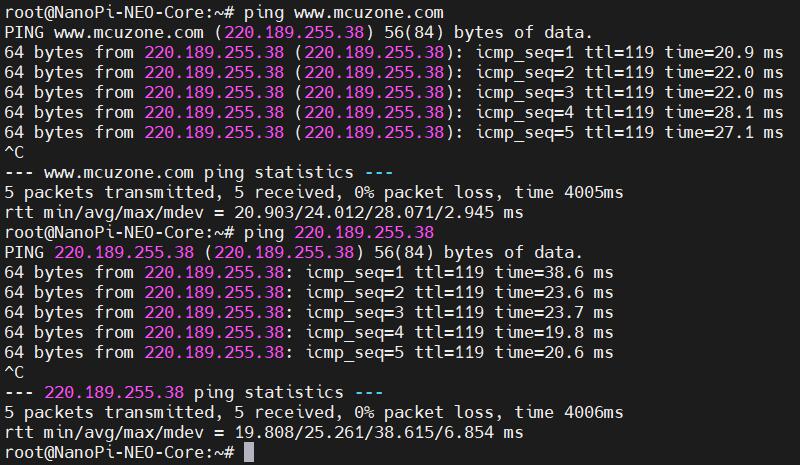
Both pinging the IP address and pinging the domain name succeed, indicating that the 4G module is functioning properly:
4.2 Based on Ubuntu system
NEO Core comes with Ubuntu system pre-installed on the eMMC by default.
Configure the TTL serial port in the same manner as with the Debian system, then open this serial port. By default, the system logs in with the user account pi.
Execute sudo suto switch to the root account (password: pi).
Excecute ifconfig -a to view the following network parameters:
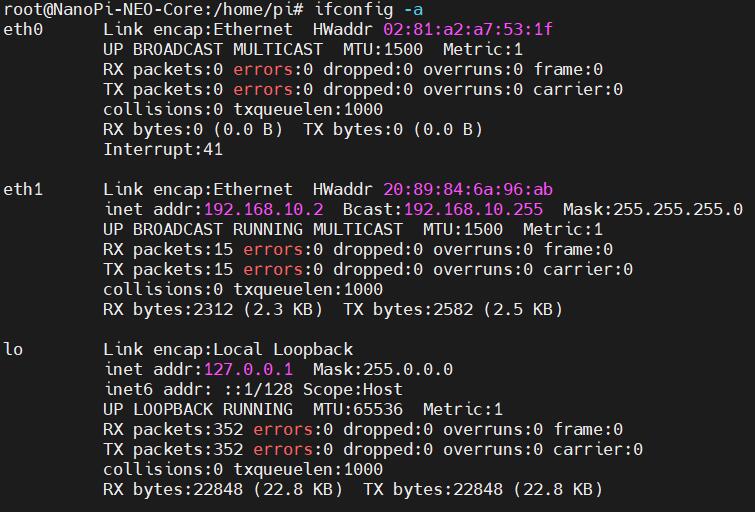
Note: eth1 (the 4G CAT1 module) has correctly obtained an IP address. If it has not obtained an IP address, please execute dhclient eth1.
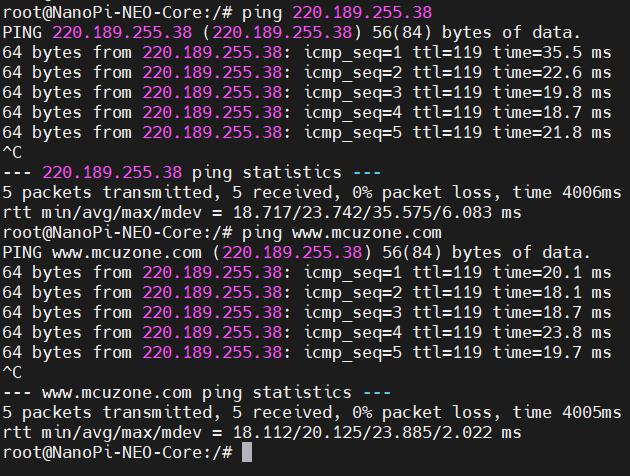
Both pinging the IP address and pinging the domain name succeed, indicating that the 4G module is functioning properly:
V. Operations for NEO Air with CAT1
5.1 Based on Debian system
The system for NEO Air is flashed into the eMMC storage.
The version of the official FriendlyElec system we tested: h3-eflasher-debian-bookworm-core-4.14-armhf-20240818.img.gz
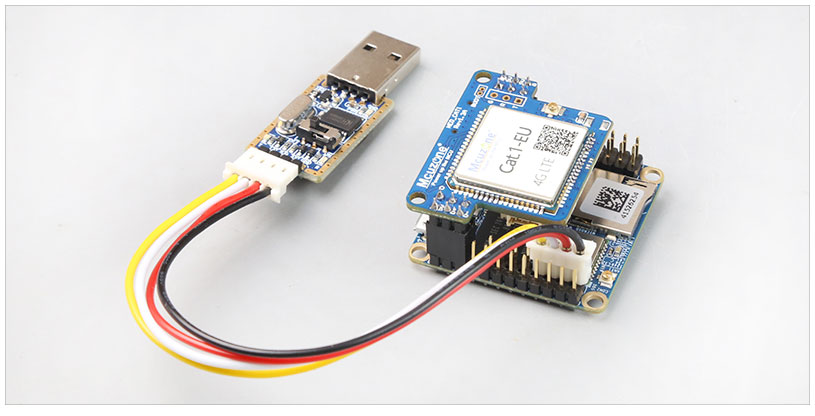
Connection Method: Connect the NEO Air to the computer using a USB-to-TTL serial module, as shown in the figure below:

Open MobaXterm and configure the TTL serial port as shown in the figure below:
Note: Use a baud rate of 115200.

Then open this serial port and log in to the Debian system (username: root, password: fa).
Excecute ifconfig -a to view the following network parameters:
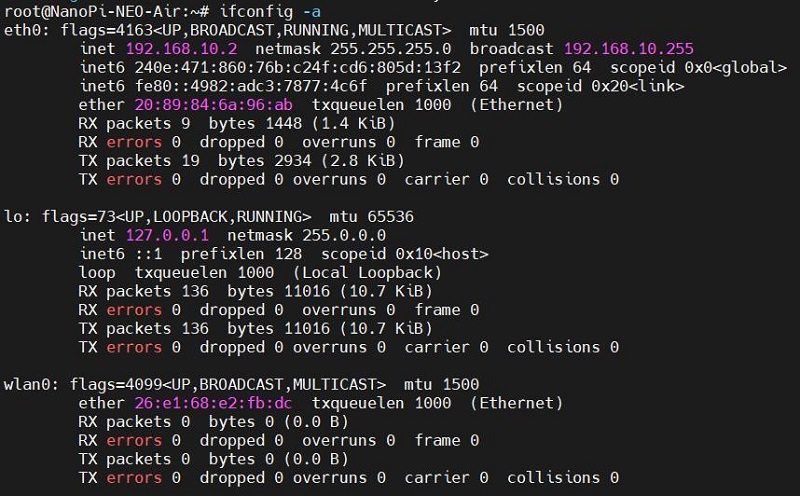
Note: eth0 (the 4G CAT1 module) has correctly obtained an IP address. If it has not obtained an IP address, please execute dhclient eth0.
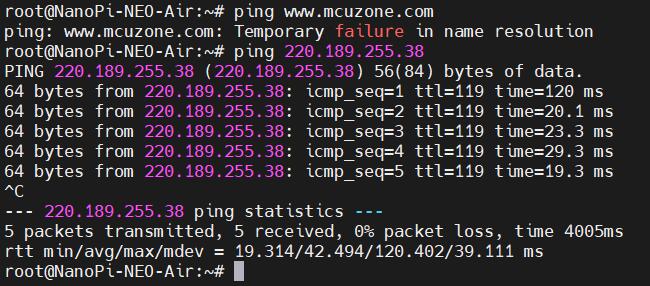
Pinging the IP address succeeds, but pinging a domain name results in an error, indicating that the system needs to have its DNS addresses configured:
The setup method is as follows:
Edit the resolv.conf file:
sudo nano /etc/resolv.conf
Add the address in the red box in the image below to a general DNS server address (such as 114.114.114.114, or any other general DNS address):
nameserver 114.114.114.114
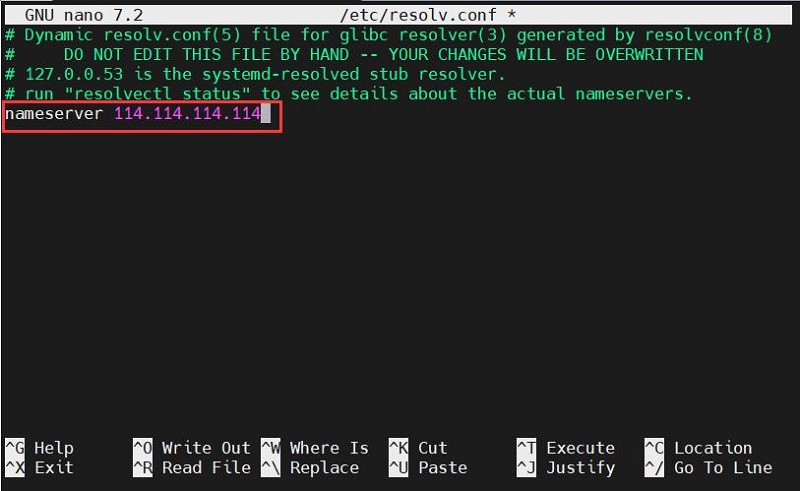
Save and exit.
At this point, pinging the domain name and pinging the IP address both succeed:
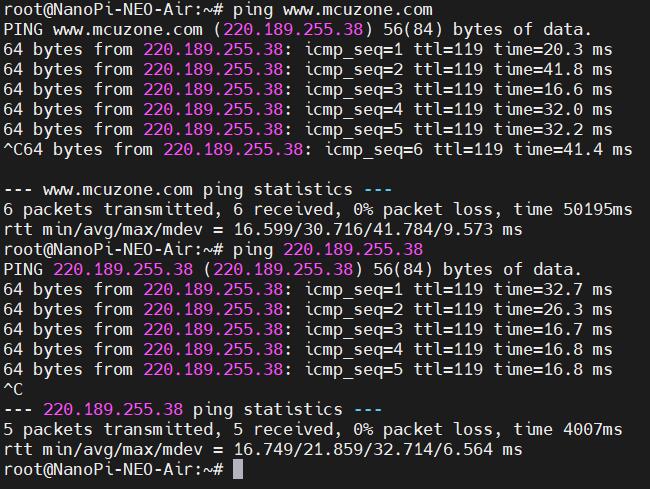
However, after making these changes, if the system restarts, the DNS entries in the resolv.conf file will be reset to their default addresses. Therefore, if you need the 4G internet connection to start automatically upon boot, you will also need to modify the permissions of the resolv.conf file. Since /etc/resolv.conf is actually a symbolic link, you need to regenerate the resolv.conf file in order to modify its permissions. The method to do so is as follows:
sudo mv /etc/resolv.conf /etc/resolv.conf.link
sudo nano /etc/resolv.conf
This recreates the resolv.conf file. In this newly created file, enter the following:
nameserver 114.114.114.114
Save and exit, then execute:
sudo chattr +i /etc/resolv.conf
After completing the above steps, restart the system, and the contents of the resolv.conf file will remain unchanged.
5.2 Based on Ubuntu system
Configure the TTL serial port in the same manner as with the Debian system, then open this serial port. By default, the system logs in with the user account pi.
Execute sudo suto switch to the root account (password: pi).
Excecute ifconfig -a to view the following network parameters:
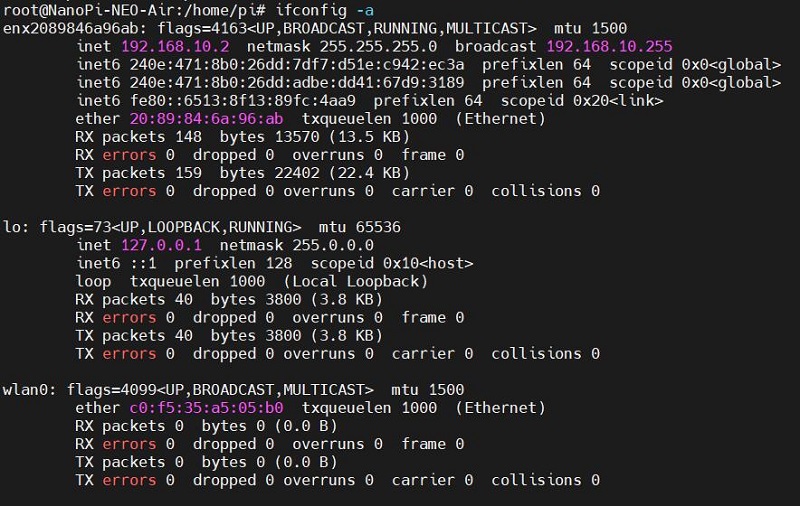
可见enx2089846a96ab(4G CAT1模块)已经正确获得了ip地址
Note: enx2089846a96ab (the 4G CAT1 module) has correctly obtained an IP address. (Note: The numbers following 'enx' represent the MAC address of the 4G module, which is unique for each module. Please refer to the actual device.) If it has not obtained an IP address, please execute dhclient enx2089846a96ab。
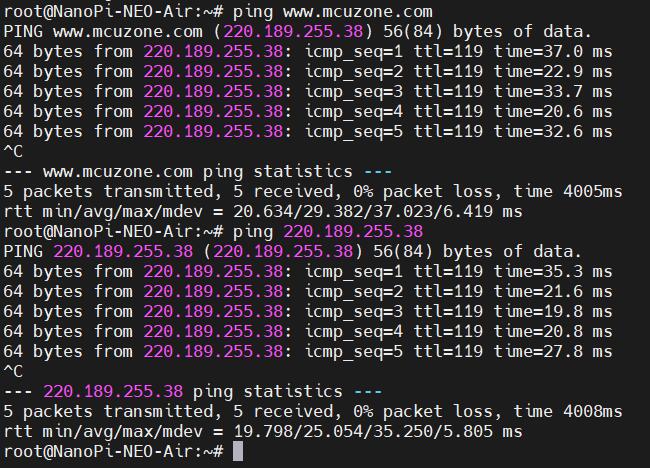
Both pinging the IP address and pinging the domain name succeed, indicating that the 4G module is functioning properly:
VI. 4G Module Operations
6.1 Modification of Network Priority
In the case of both 4G and wired networks being available, the NEO's Debian and Ubuntu systems are configured to prioritize the 4G network for internet access by default.
In the case of both 4G and wireless networks being available, the NEO Air's Debian and Ubuntu systems are configured to prioritize the 4G network for internet access by default too.
If you want to prioritize the wired or wireless network for internet access, you can execute the following command:
sudo ip route del default && sudo route add -net default netmask 0.0.0.0 gw 192.168.8.1
Explanation of these two commands (separated by '&&'):
sudo ip route del default: Remove the default route from the routing table.
sudo route add -net default netmask 0.0.0.0 gw 192.168.8.1: Add the gateway of the wired or wireless network as a new default route (ensure to use the actual gateway address).
After completing the execution, execute the route command to view the routing table. The current default route is the gateway of the wired or wireless network:

This way, the network will default to using the wired or wireless connection. If you need to switch back to defaulting to the 4G network, please execute the following command:
sudo ip route del default && sudo route add -net default netmask 0.0.0.0 gw 192.168.10.1
Or, you can restart the system.
Note that 192.168.10.1 is the default gateway for the 4G module; please refer to the actual configuration.
Note: After a reboot, the routing table resets. To ensure the network continues to use the wired or wireless connection as the default route post-restart, you'll need to execute sudo ip route del default && sudo route add -net default netmask 0.0.0.0 gw 192.168.8.1 again.
6.2 AT命令操作
适用于NEO/NEO Core/NEO Air
如果无法执行lsusb,请先安装usbutils:
sudo apt install usbutils
使用lsusb查看USB设备,红框处即为4G模组:

然后安装串口软件minicom:
apt install minicom
然后执行:
ls /dev
此时应该能看到dev设备下有ttyACM0-2三个设备:

通过minicom打开AT命令串口:
minicom -D /dev/ttyACM0
如果需要查看回显,请键入命令:ate1,然后回车,继续键入其它命令,回车可以看到结果。
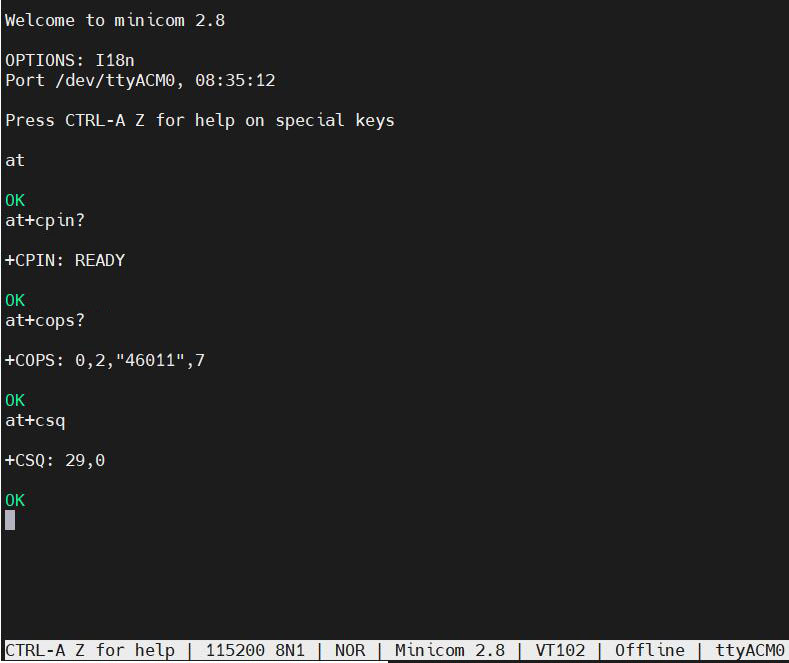
常用AT命令:
1. 检查SIM卡是否识别到:
at+cpin?
返回ready表示卡已识别,返回error要检查硬件
2. 检查天线信号质量:
at+csq
返回值在26-31表示信号OK,信号满格31;返回值在20-25表示信号勉勉强强;返回值在20以下表示信号比较糟糕或者天线没接
3. 检查注网情况:
at+cops?
正常应该返回运营商代码和7,7代表4G。
注意,以上命令只有at+csq不要加问号,另外两条命令需要加问号。
4. 查看4G模块的IMEI码:
at+cgsn
5. 重启4G模块(有时候如果重插SIM卡,热插拔不一定管用,可以用这个reset命令来复位模块):
at+reset
6. 关闭射频:
at+cfun=0
开启射频:
at+cfun=1
上述两条命令成对使用,可以在不重启4G模组的情况下让模组重新注网。
6.3 修改4G模组的IP地址
适用于NEO/NEO Core/NEO Air
执行AT命令:
AT+ROUTEIP=<newip>
注意,只支持192.168.x.2这样格式的地址,设置完毕后需断电重启系统。
查询当前IP:AT+ROUTEIP?
测试IP是否生效:AT+ROUTEIP=?
七、总结
此处我们只是基于CAT1的使用操作,不涉及到NanoPi开发板自身的操作及软件系统,关于NanoPi NEO/NEO Core/NEO Air开发板资料,请前往友善官网查阅:
https://wiki.friendlyelec.com/wiki/index.php/NanoPi_NEO/zh
https://wiki.friendlyelec.com/wiki/index.php/NanoPi_NEO_Core/zh
https://wiki.friendlyelec.com/wiki/index.php/NanoPi_NEO_Air/zh
联系我们
电话:13957118045
如本页面有任何疏漏、错误或者侵权,请通过上述途径联系我们,谢谢!
Copyright 2004-2025 野芯科技


 QQ:8204136