0008 MPS2.5G(SSD and 2.5G ETH)
Keywords
Raspberry Pi 5, PCIe Expansion, 2.5G, NVMe, M.2, SSD, X1 Gen2
I. Introduction
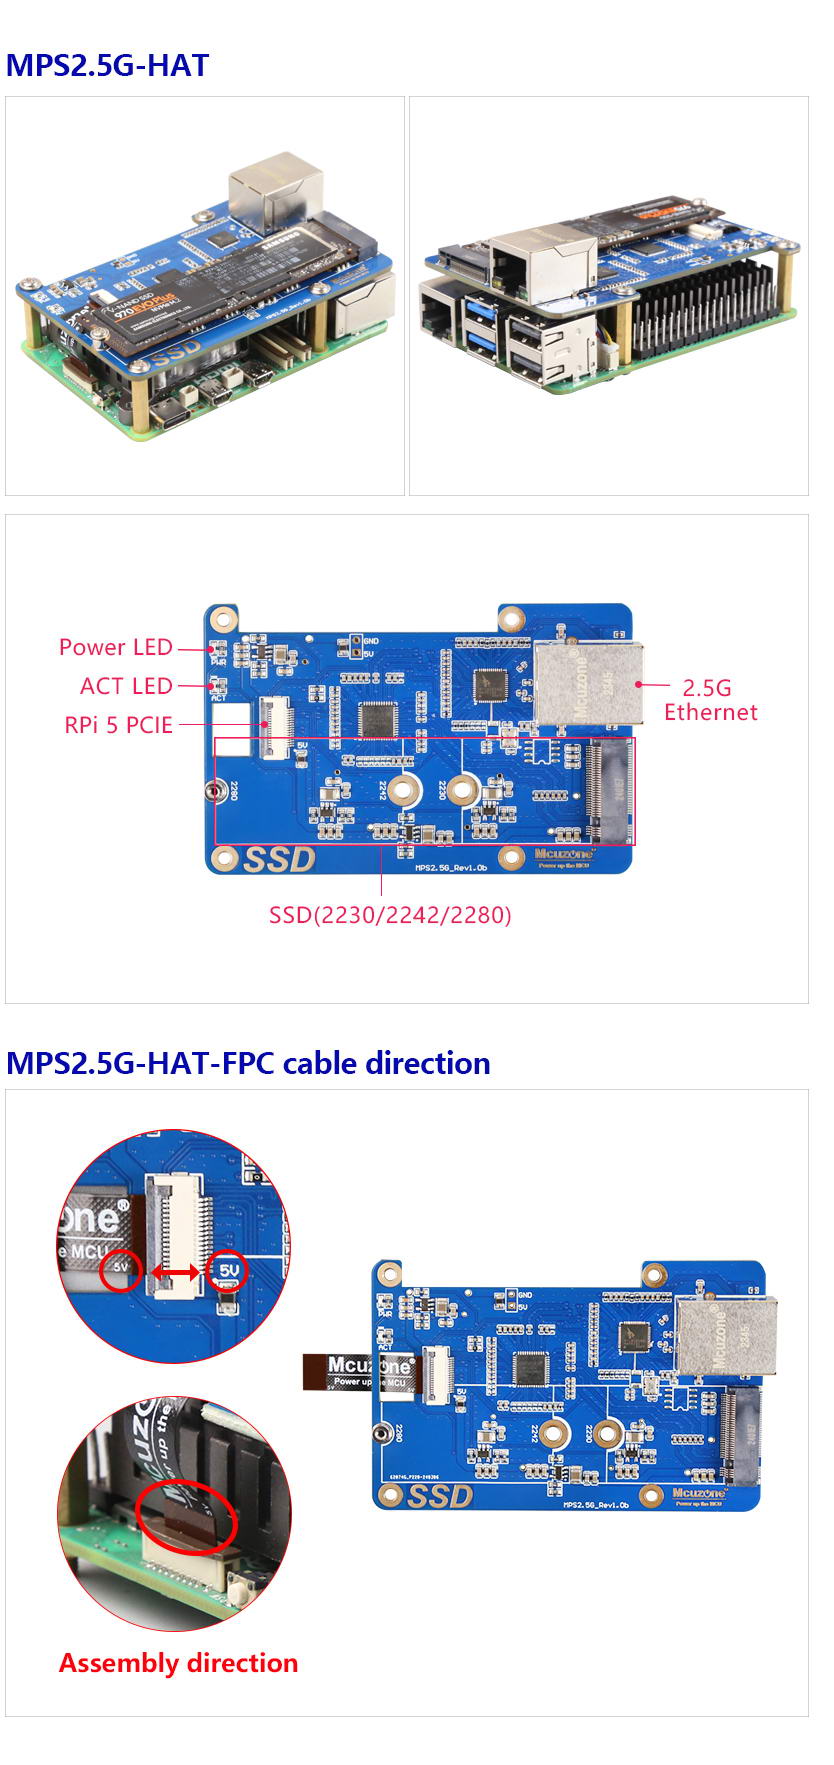
The Raspberry Pi 5 is equipped with a 16-pin PCIe interface, through which we can attach various PCIe devices. This expansion board is specifically designed for the Raspberry Pi 5, offering 2.5G networking and NVMe SSD storage. The expansion board is plug-and-play in the Raspberry Pi system, but the 2.5G network adapter requires driver installation in Ubuntu system.
Note:
1. The latest firmware for the Raspberry Pi now supports booting from an SSD connected to the rear of the PCIe Switch. The SSD can be used for storage expansion and system booting.
2. Since the PCIe Switch is x1 Gen2, changing the mode to Gen3 in config.txt will not increase the interface speed; therefore, the SSD interface speed test will be limited to around 400MB/s, which is slightly faster than CM4.
II. Hardware Spec
1. Based on the PCIe interface of the Raspberry Pi 5, a PCIe Switch is used to expand one port into two, providing one NVMe SSD port and one 2.5G Ethernet port.
2. 2.5Gbps Ethernet based on the RTL8125 chip (if the workload on the 2.5G Ethernet port is high, it is recommended to add a heatsink to the onboard chip).
3. Supports NVMe SSD of 2230/2242/2280 sizes (default comes with welded 2280 copper pillars); does not support SATA and NGFF SSD. The SSD can be used for expanded storage and also supports booting from the SSD (requires the Raspberry Pi official firmware to be at least updated to 2024.5.13). Note: After firmware updates, do not modify the settings, as doing so will automatically revert the firmware to the previous version.
4. The RTL8125 2.5G Ethernet adapter is driver-free in the official Raspberry Pi OS and OpenWrt systems, but requires driver installation in Ubuntu systems.
5. Gold immersion PCB process, lead-free production, certified by UL, compliant with ROHS standards, and has a fire rating of 94V-0.
6. The board has four M2.5 mounting holes, with a recessed design on the top of the board to facilitate the use of the 40-Pin GPIO.
三、系统烧写及设置
3.1 概述
This document uses the Raspberry Pi OS, Ubuntu system and OpenWrt system for testing.
1)The version of the Raspberry Pi OS is: 2024-07-04-raspios-bookworm-arm64.img.xz
You can download the Raspberry Pi OS in:
https://www.raspberrypi.com/software/operating-systems/#raspberry-pi-os-64-bit
2)The version of the Ubuntu system is: ubuntu-24.04-preinstalled-desktop-arm64+raspi.img.xz
You can download the Ubuntu system in:
https://ubuntu.com/download/raspberry-pi
3)The version of the OpenWrt system is: openwrt-bcm27xx-bcm2712-rpi-5-squashfs-sysupgrade-linux-6.1.100-20240805.img.gz
3.2 System flashed onto the SD (TF) card
Click here to read the instructions for System flashing
3.3 System flashed onto the SSD
Click here to read the instructions for System flashing
IV. Work with Raspberry Pi OS
4.1 2.5G Ethernet test
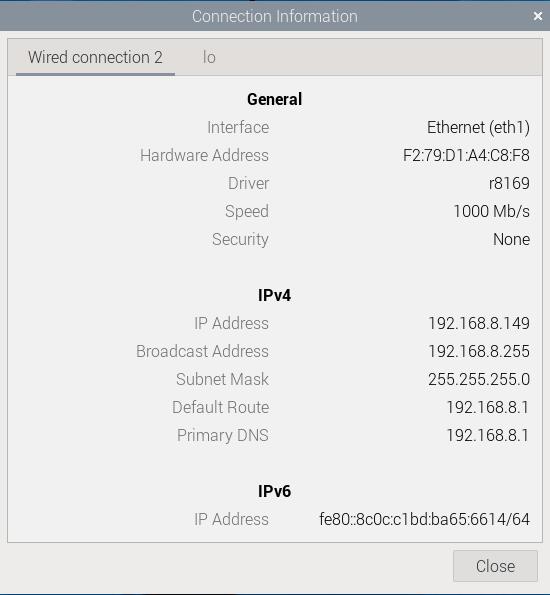
The 2.5G Ethernet port on the MPS2.5G expansion board is plug-and-play under Raspberry Pi OS and can obtain an IP address once the system is up and running:
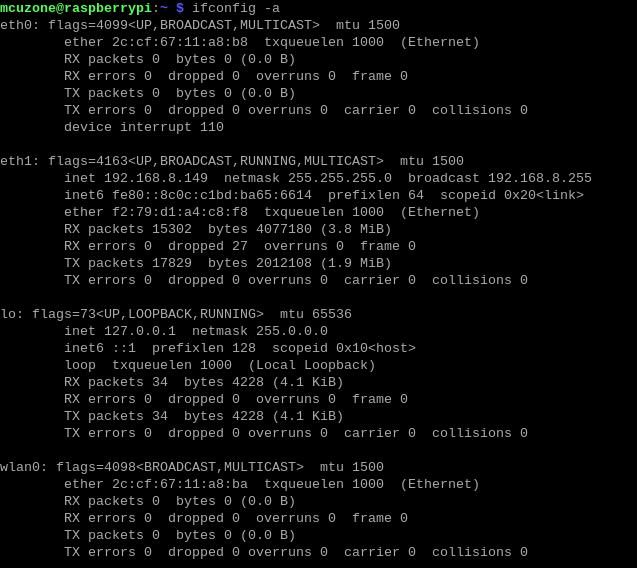
You can also enter ifconfig -a in the terminal to view the network status:
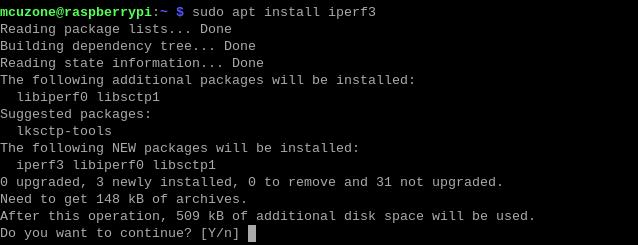
Install the network speed testing tool iperf3:
sudo apt install iperf3
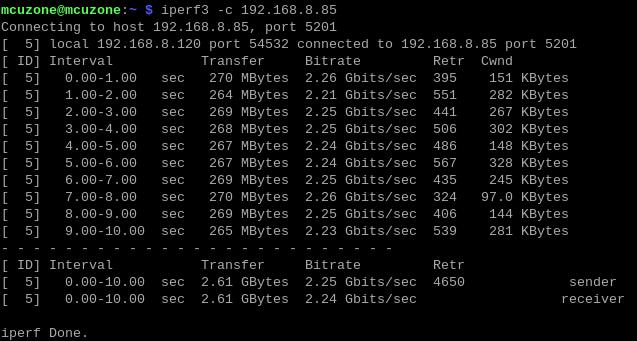
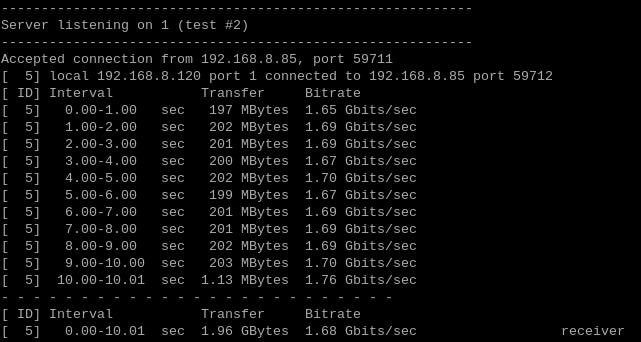
Use iperf3 to perform a speed test between the Raspberry Pi OS and the PC.
When Raspberry Pi OS acts as a client, the speed is about 2.25 Gbps:
When Raspberry Pi OS acts as a server, the speed is about 1.68 Gbps:
Note: Network speed tests are affected by network conditions and testing methods. The actual speed may vary; this test is for reference only.
4.2 Fix the MAC address of the 2.5G Ethernet port
The 2.5G Ethernet port uses the RTL8125 network card, and during use, the MAC address is not fixed. Each time the device is powered on again, the MAC address changes randomly. The following explains how to set a fixed MAC address for the RTL8125 network card.
This explanation also applies to the Ubuntu system.
First, check the identification information of the RTL8125 network card in terminal:
ipconfig -a
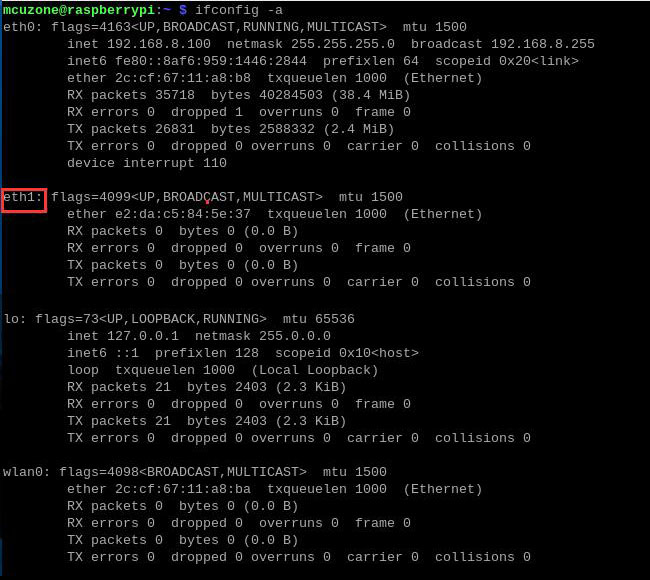
Here, the RTL8125 network card is identified as eth1, but in practice, the name recognized by the system might be different.
Then input:
sudo mousepad /etc/systemd/system/macspoof@eth1.service
Or:
sudo nano /etc/systemd/system/macspoof@eth1.service
eth1 is the name recognized by the system for the network card shown above.
Executing the above command will create a new document, then enter the following text:
[Unit]
Description=MAC Address Change %I
Wants=network-pre.target
Before=network-pre.target
BindsTo=sys-subsystem-net-devices-%i.device
After=sys-subsystem-net-devices-%i.device
[Service]
Type=oneshot
ExecStart=/usr/bin/ip link set dev %i address xx:xx:xx:xx:xx:xx
ExecStart=/usr/bin/ip link set dev %i up
[Install]
WantedBy=multi-user.target
Here, "xx:xx:xx:xx:xx:xx" represents the MAC address you wish to assign. You can determine it according to the MAC address format (make sure it does not duplicate the MAC address of other network devices). After setting it, save and exit.
Then execute the following command to enable the service:
sudo systemctl enable macspoof@eth1.service
This completes the fixation of the MAC address for eth1.
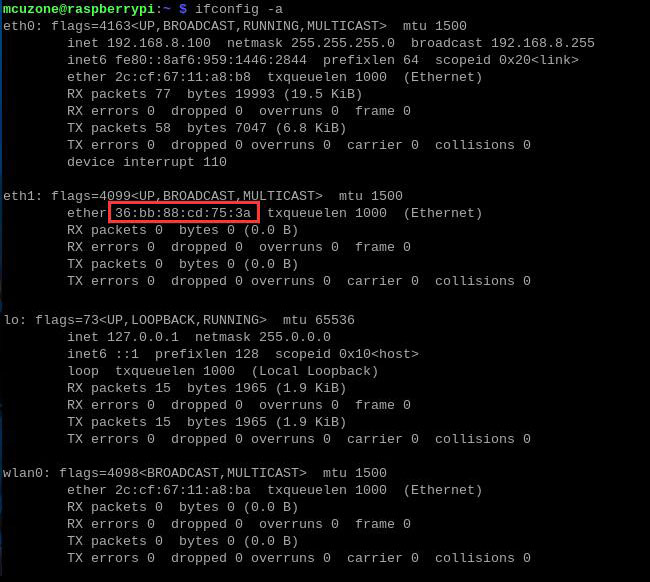
After completing all operations, restart the system. Once the system has finished rebooting, execute ipconfig -a to see that the MAC address has been successfully changed.
4.3 SSD test
For basic operations on the SSD drive, we can refer to the following link:
1. Use the SSD for storage expansion(Raspberry Pi OS)
2. Perform partitioning and other operations on the SSD
3. Adjust the boot devices order
4. Install the SSD speed testing software hdparm
Since the MPS2.5G cannot operate in PCIe Gen3 mode, we do not need to change the PCIe mode and can directly use the hdparm to test the speed.
Run df in the Raspberry Pi terminal to check the partition name of the SSD, which is nvme0n1p1:

Excute the command; it can be executed multiple times to test the disk speed repeatedly:
sudo hdparm -t /dev/nvme0n1p1
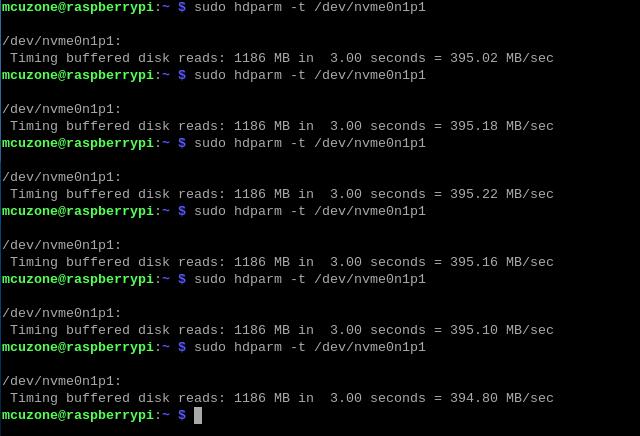
The test shows that the operating speed of this disk is about 395 MBps.
Note: The disk operation speed is affected by various factors including the quality of the disk and the file storage situation on the disk. The above test results are for reference only and do not represent the final parameters of the actual product.
V. Work with Ubuntu System
5.1 2.5G网络测试
Ubuntu系统下需安装2.5G网卡驱动才能使用,本文档以Ubuntu 24.04为例。
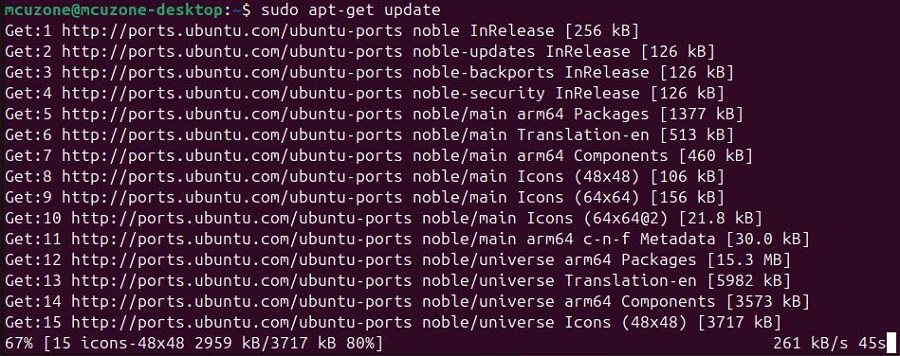
首先需要更新系统:
sudo apt-get update
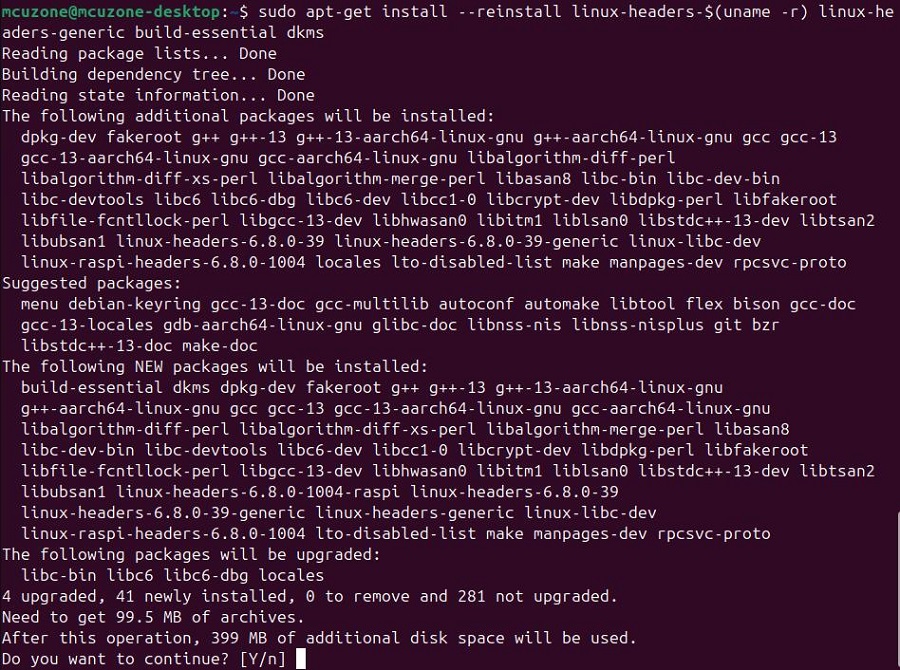
接着准备编译环境:
sudo apt-get install --reinstall linux-headers-$(uname -r) linux-headers-generic build-essential dkms
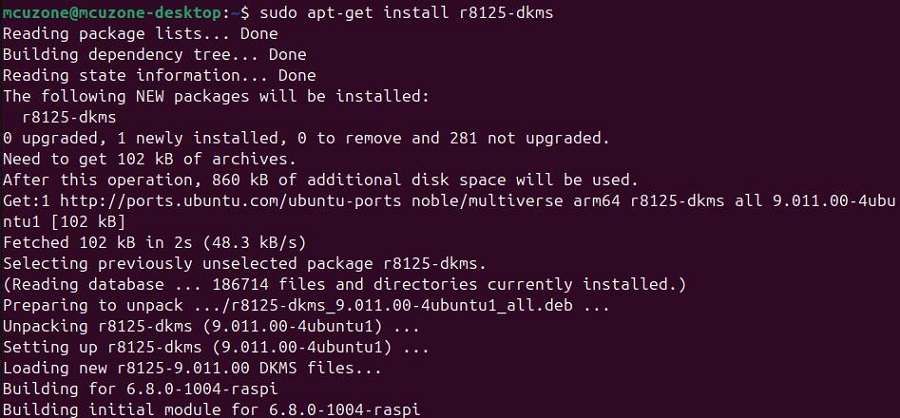
然后安装驱动:
sudo apt-get install r8125-dkms
按提示安装即可:
安装完成后输入:
sudo modprobe r8125

Ubuntu系统默认不安装ifconfig工具,所以需要手动安装:
sudo apt install net-tools
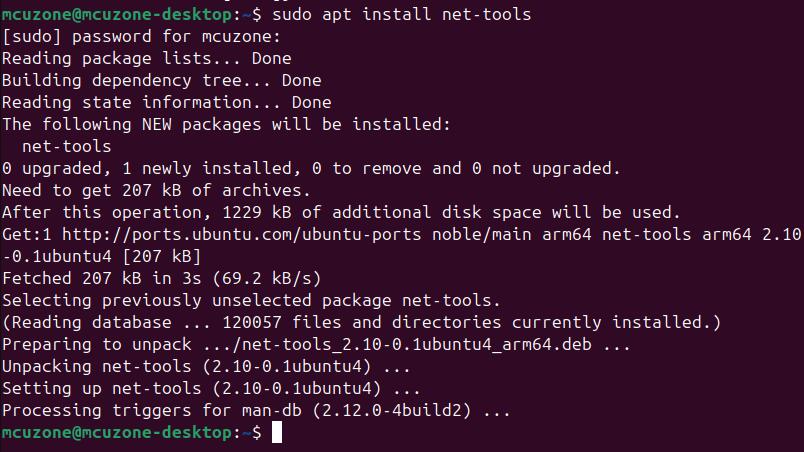
输入ifconfig -a就可以看到enxxx的网卡接口,这样就安装完毕2.5G网卡驱动:

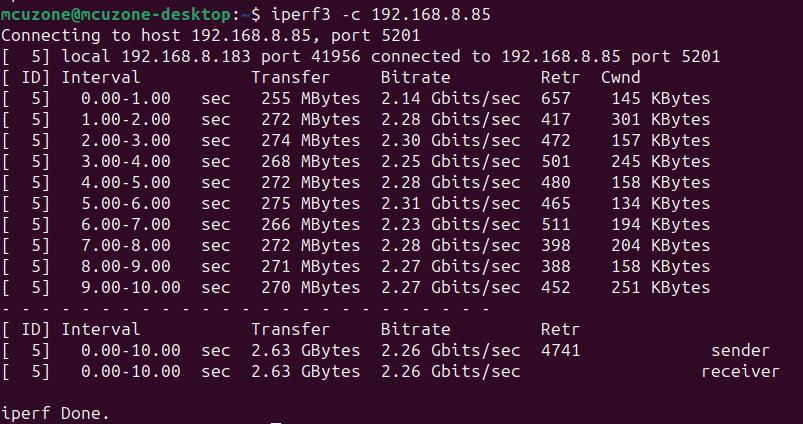
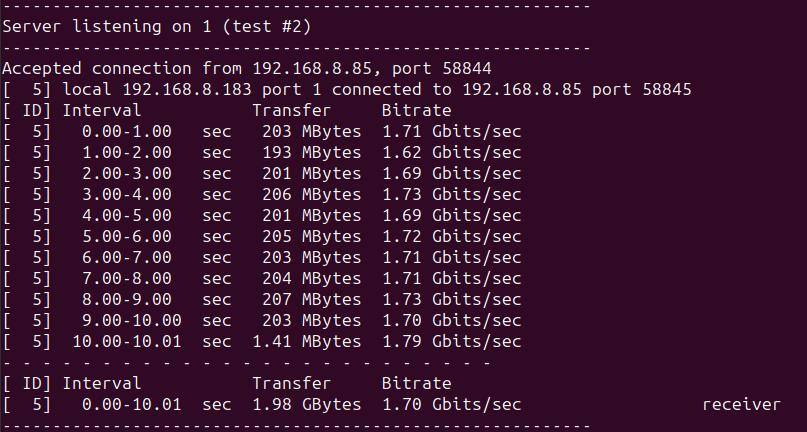
利用iperf3,在树莓派OS与PC之间进行测速。
当Ubuntu系统作为client时,速度大约为2.26Gbps:
当Ubuntu系统作为server时,速度大约为1.70Gbps:
注意:网络测速受网络环境和测试方法影响,速度请以实际为准,本测试仅供参考。
5.2 SSD硬盘测试
关于对SSD硬盘的基本操作,我们可以参考以下链接,除了SSD用作存储扩展中与树莓派OS下操作略有不同,其余部分基本相同:
因为MPS2.5G无法工作在PCIe Gen3模式下,所以我们无需更改PCIe模式,直接使用hdparm软件测试速度即可。
在Ubuntu终端下运行df,查看SSD分区名为nvme0n1p1和nvme0n1p2:

我们选一个进行测速:
sudo hdparm -t /dev/nvme0n1p1
运行命令,可多次运行,测试多次硬盘速度:
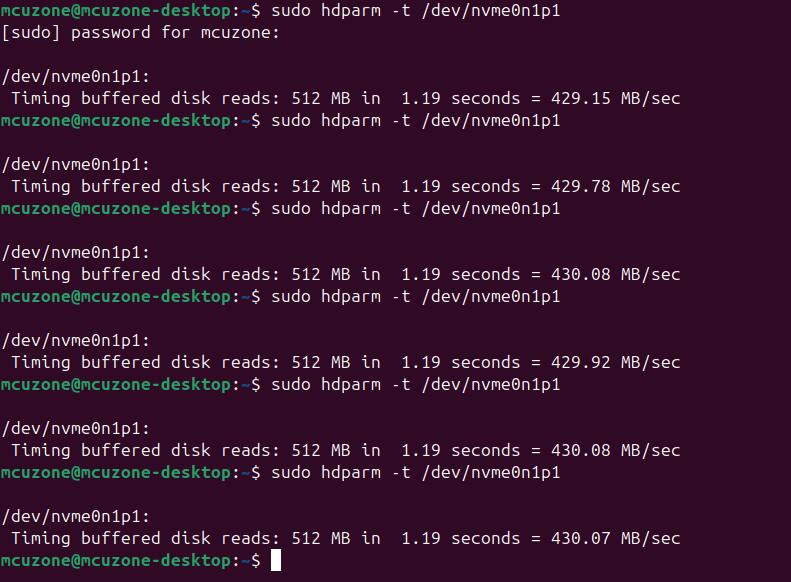
可见此测试硬盘的运行速度为430Mbps左右。
注意:硬盘运行速度受硬盘质量、硬盘上的文件存储情况等多种因素影响,以上测试结果仅供参考,不作为实际产品的最终参数。
六、OpenWrt系统操作演示
6.1 概述
MPS2.5G扩展板在OpenWrt系统下可配置为二进二出的交换机模式,扩展板上的2.5G网口作为WAN口(连接Internet),或者树莓派5上的内置WiFi作为WAN口(连接Internet),树莓派5上的网口配置为LAN口,用于连接PC,或者树莓派5上的内置WiFi作为无线AP,连接手机等设备。
6.2 准备工作
本文档使用的OpenWrt系统为:openwrt-bcm27xx-bcm2712-rpi-5-squashfs-sysupgrade-linux-6.1.100-20240805.img.gz
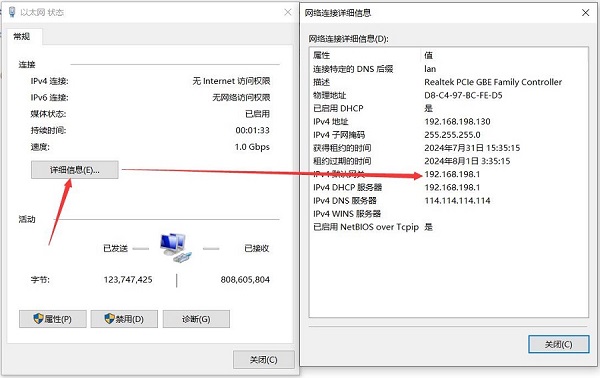
烧写OpenWrt系统并上电启动后,我们通过树莓派5上的网口连接网线至PC网口,将联通外网的网线连接到扩展板上的2.5G网口,待PC的网卡与树莓派5上的网口连接成功后,我们在Windows设置中找到网络和Internet,在以太网中打开连接的网络查看默认网关的IP地址,这个地址就是OpenWrt系统的后台配置页面地址,如图所示,本文测试的地址为192.168.198.1:
然后打开网页浏览器输入192.168.198.1进入OpenWrt系统。默认用户名为root,默认密码为password:

6.3 PC通过2.5G网口上网
打开“网络 - 接口”,点击“添加新接口”:
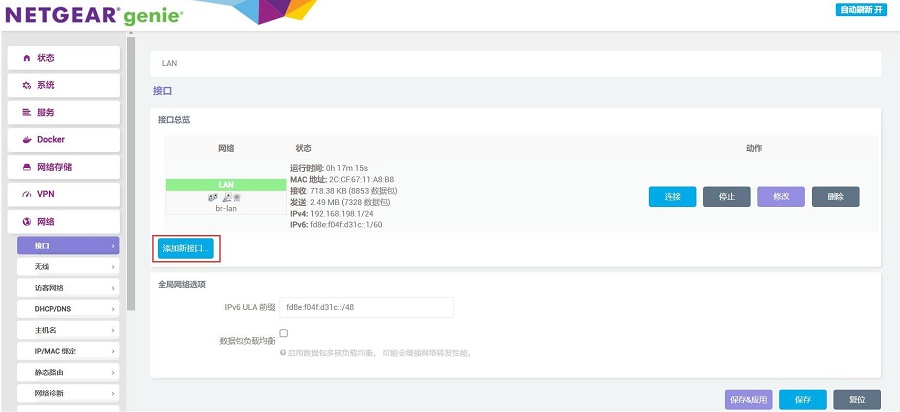
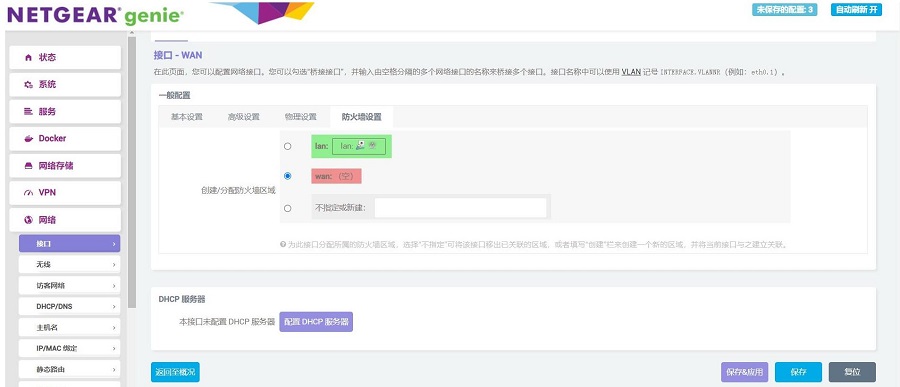
接口名称设置为WAN,接口协议选择DHCP客户端,接口选择eth1后点击“提交”按钮:

在防火墙设置中选择WAN口后点击“保存&应用”按钮:
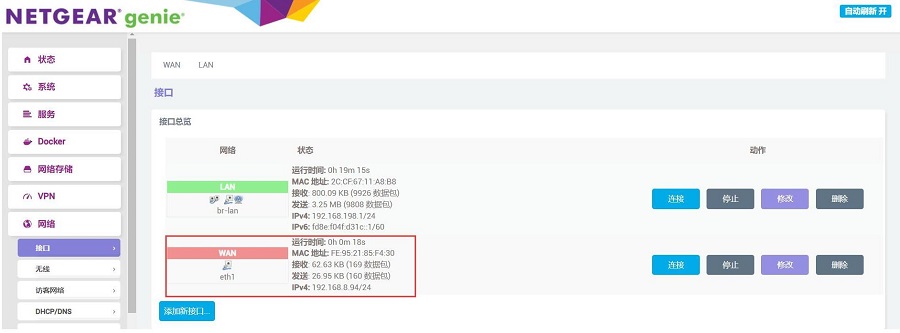
回到“网络 - 接口”,稍等片刻,就可以看见新建的WAN接口获取了IP地址,这样PC就可以通过MPS2.5G扩展板上网了:
上网测速结果如下:

注意:网络测速受网络环境和测试方法影响,速度请以实际为准,本测试仅供参考。
6.4 树莓派自带WiFI做无线AP(master模式)使用
默认状态下,树莓派5自带的无线模块已经配置成了无线AP,我们在在“网络 - 无线”可以看到这个AP:

点击“修改”,在“接口配置 - 基本设置”中,可以看到该AP的SSID:
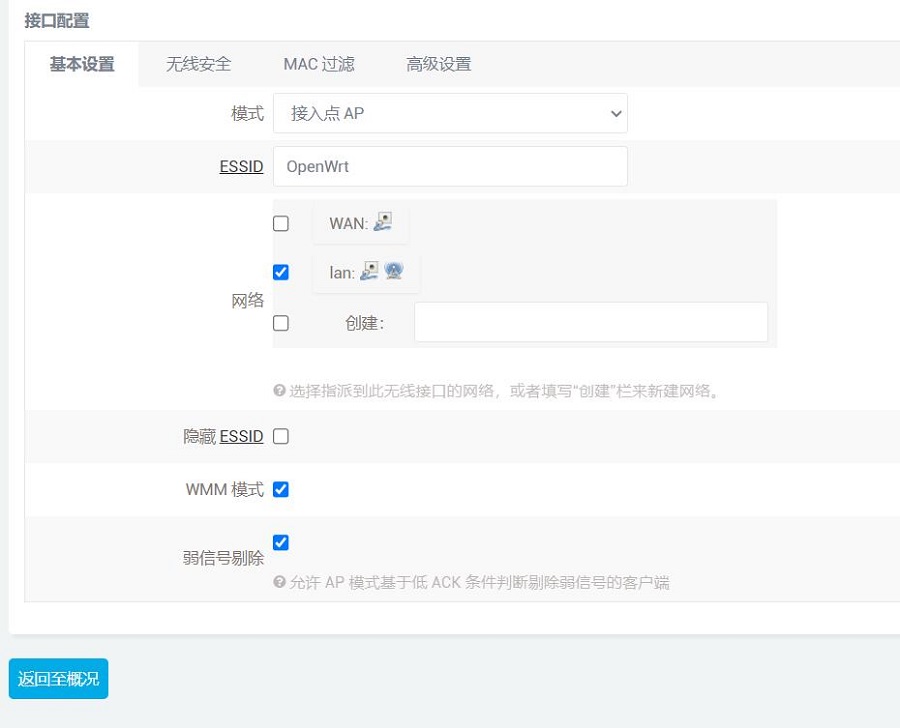
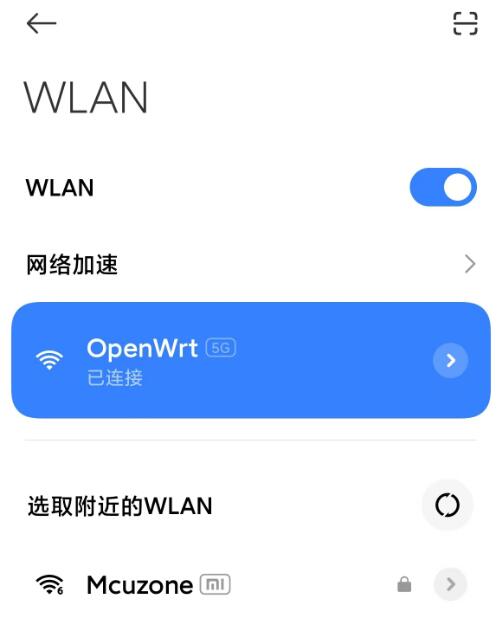
我们用手机去搜索这个AP,连接上以后即可上网(手机连接树莓派5原生无线网卡作为的AP,2.5G网口作为WAN口连接上级路由器,原生千兆网口作为LAN口连接PC):
6.5 树莓派自带WiFi做Client使用
本节主要内容是讲述如何使用树莓派自带WiFi做Client,即树莓派通过WiFi连接至上级路由器。
在“网络 - 无线”中查看无线概况:

点击“扫描”按钮,扫描出附近的无线AP:
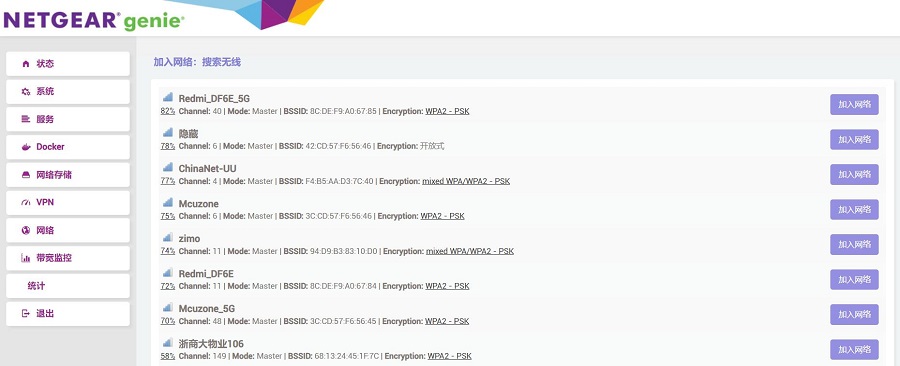
选择一个进行连接,防火墙选WAN:

然后按“提交”,提交后在点击“保存&应用”:

成功后再回到“无线概况”,就能看到此时无线已经连接成功:
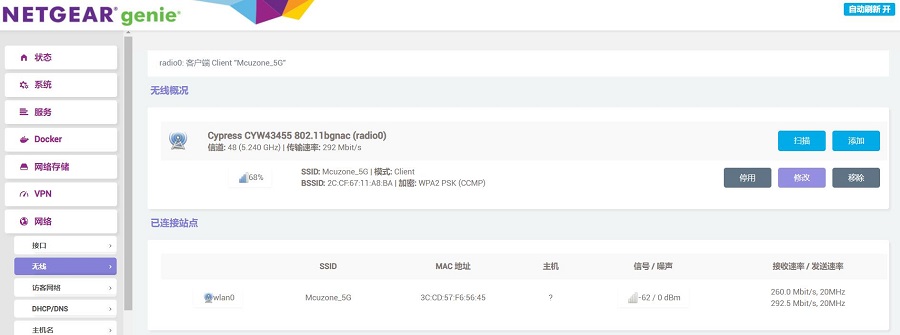
回到“网络 - 接口”,可以看见新建的WAN接口获取了IP地址,这样PC就可以通过无线模块连接上级路由器上网了:
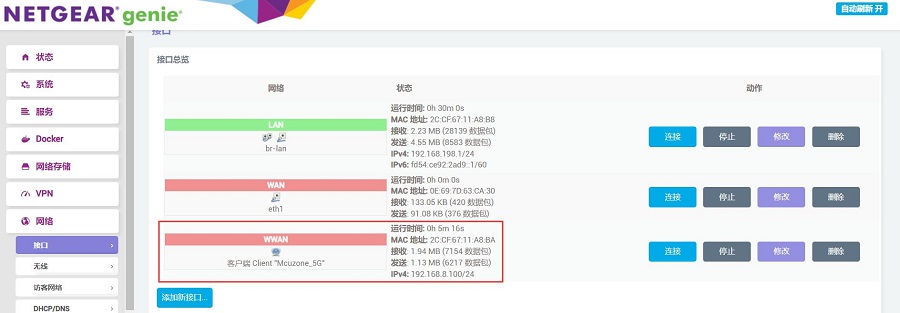
上网测速结果如下:

注意:网络测速受网络环境和测试方法影响,速度请以实际为准,本测试仅供参考。
6.6 SSD硬盘测试
MPS2.5G扩展板在OpenWrt系统下,默认树莓派上的原生千兆网口为LAN口,我们可以把扩展板上的2.5G网口作为LAN口,而把树莓派5上的原生网口作为WAN口,这样就能利用2.5G网口在内网高速传输文件。
交换LAN口,然后进行SSD硬盘测试,请参照下面的文档:
联系我们
电话:13957118045
如本页面有任何疏漏、错误或者侵权,请通过上述途径联系我们,谢谢!
Copyright 2004-2024 野芯科技


 QQ:8204136