0011 MPW7(WiFi7 on Raspberry Pi 5):修订间差异
(创建页面,内容为“== '''关键词''' == 树莓派5、PCIe扩展、WiFi7、Raspberry Pi5、Ubuntu 和RPi OS。 == '''一、简介''' == 树莓派5板载一个16Pin的PCIe接口,我们可以通过该接口外挂各种PCIe设备。本扩展板就是专为树莓派5设计的WiFi7转接板。在树莓派系统下使用WiFi7需安装驱动,而在Ubuntu系统下免驱即插即用。本模块也支持M.2 E接口的WiFi6和WiFi5。 == '''二、硬件资源''' == 1. 专为树莓派5…”) |
无编辑摘要 |
||
| 第1行: | 第1行: | ||
[[0011 MPW7(树莓派5的WiFi7)|切换语言为中文]] | |||
== ''' | == '''Keywords''' == | ||
Raspberry Pi 5, PCIe Expansion, WiFi7, Raspberry Pi5, Ubuntu, RPi OS | |||
== ''' | == '''I. Introduction''' == | ||
The Raspberry Pi 5 features a 16-pin PCIe interface, through which various PCIe devices can be connected. This expansion board is specifically designed for the Raspberry Pi 5 to serve as a WiFi 7 adapter. This module requires driver installation to use WiFi 7 on the Raspberry Pi system, while it is plug-and-play under Ubuntu without needing additional drivers. The module also supports WiFi 6 and WiFi 5 via the M.2 E key interface. | |||
== '''II. Hardware Spec''' == | |||
1. PCIe expansion board designed specifically for the Raspberry Pi 5; | |||
2. One M.2 E-Key PCIe interface, supporting the BE200 WiFi 7 module, with hardware also supporting WiFi 6(E) and WiFi 5, such as AX210, AX200, MT7922, and Intel 8265C; | |||
4. | 3. One USB Bluetooth interface (built-in with the WiFi module), exposed via a 1.25mm 4-pin USB connector. To use the Bluetooth function, this USB must be connected to a USB 2.0 port on the Raspberry Pi 5, and it requires the appropriate drivers and profiles to be installed; | ||
4. Reserved CSI/DSI cable routing slots, supporting 22-pin cables with 0.5mm pitch and 15-pin cables with 1mm pitch; | |||
5. Board-mounted power indicator light ('PWR') and one WiFi activity indicator light ('ACT'); | |||
6. Uses an efficient DC-DC circuit; | |||
7. Gold immersion PCB process, lead-free production, certified by UL, compliant with ROHS standards, and has a fire rating of 94V-0; | |||
8. The board has four M2.5 mounting holes, with a recessed design on the top of the board to facilitate the use of the 40-Pin GPIO; | |||
10. | 9. Optional PCB antenna or SMA antenna, with an IPEX4 interface; | ||
10. Optional aluminum alloy enclosure. | |||
http://www.mcuzone.com/wiki/0011_MPW7/0011_MPW7_43.jpg | http://www.mcuzone.com/wiki/0011_MPW7/0011_MPW7_43.jpg | ||
== ''' | == '''III. Software Spec''' == | ||
=== 3.1 Overview === | |||
This document uses Raspberry Pi OS and Ubuntu systems, tested with the BE200 (WiFi 7) module. | |||
1)The version of the Raspberry Pi OS is: 2024-07-04-raspios-bookworm-arm64.img.xz | |||
You can download the Raspberry Pi OS in: | |||
https://www.raspberrypi.com/software/operating-systems/#raspberry-pi-os-64-bit | |||
2)The version of the Ubuntu system is: ubuntu-24.04-preinstalled-desktop-arm64+raspi.img.xz | |||
You can download the Ubuntu system in: | |||
https://ubuntu.com/download/raspberry-pi<!-- | |||
OpenWrt系统版本为:openwrt-bcm27xx-bcm2712-rpi-5-squashfs-sysupgrade-linux-6.1.100-20240805.img.gz | OpenWrt系统版本为:openwrt-bcm27xx-bcm2712-rpi-5-squashfs-sysupgrade-linux-6.1.100-20240805.img.gz | ||
--> | --> | ||
== ''' | === 3.2 System flashed onto the SD (TF) card === | ||
[[0005 MPS2242 2280 2280P(Single SSD Expansion Board)#3.2 Boot from TF card|Click here to read the instructions for System flashing]] | |||
== '''IV. Work with Raspberry Pi OS''' == | |||
=== 4.1 | === 4.1 Installing WiFi 7 driver (BE200) === | ||
''''' | '''''Note: Once the WiFi 7 driver (BE200) is successfully installed, the original WiFi module on the Raspberry Pi 5 will no longer be usable!''''' | ||
This installation procedure also applies to the AX210 (WiFi 6E) and AX200 (WiFi 6) modules. | |||
==== 4.1.1 | ==== 4.1.1 Update the system and header files ==== | ||
Execute commands in the Raspberry Pi terminal: | |||
<code>sudo apt-get update</code> | <code>sudo apt-get update</code> | ||
| 第61行: | 第68行: | ||
http://www.mcuzone.com/wiki/0011_MPW7/0011_MPW7_01.jpg | http://www.mcuzone.com/wiki/0011_MPW7/0011_MPW7_01.jpg | ||
==== 4.1.2 | ==== 4.1.2 Download and extract the source code ==== | ||
Execute commands in the Raspberry Pi terminal: | |||
<code>mkdir wifi && cd wifi</code> | <code>mkdir wifi && cd wifi</code> | ||
| 第72行: | 第79行: | ||
http://www.mcuzone.com/wiki/0011_MPW7/0011_MPW7_10.jpg | http://www.mcuzone.com/wiki/0011_MPW7/0011_MPW7_10.jpg | ||
==== 4.1.3 | ==== 4.1.3 Compilation Environment ==== | ||
Execute commands in the Raspberry Pi terminal: | |||
<code>sudo make defconfig-iwlwifi-public</code> | <code>sudo make defconfig-iwlwifi-public</code> | ||
| 第81行: | 第88行: | ||
http://www.mcuzone.com/wiki/0011_MPW7/0011_MPW7_03.jpg | http://www.mcuzone.com/wiki/0011_MPW7/0011_MPW7_03.jpg | ||
==== 4.1.4 | ==== 4.1.4 Compile source code ==== | ||
Execute commands in the Raspberry Pi terminal: | |||
<code>sudo make -j 4</code> | <code>sudo make -j 4</code> | ||
| 第92行: | 第99行: | ||
http://www.mcuzone.com/wiki/0011_MPW7/0011_MPW7_05.jpg | http://www.mcuzone.com/wiki/0011_MPW7/0011_MPW7_05.jpg | ||
At this point, the system will prompt you to restart. Please do not restart yet. | |||
==== 4.1.5 | ==== 4.1.5 Install firmware (not necessary for AX200 or AX210) ==== | ||
Execute commands in the Raspberry Pi terminal: | |||
<code>cd ..</code> | <code>cd ..</code> | ||
| 第111行: | 第118行: | ||
http://www.mcuzone.com/wiki/0011_MPW7/0011_MPW7_11.jpg | http://www.mcuzone.com/wiki/0011_MPW7/0011_MPW7_11.jpg | ||
Then reboot system: | |||
<code>sudo reboot</code> | <code>sudo reboot</code> | ||
2024年11月8日 (五) 17:36的版本
Keywords
Raspberry Pi 5, PCIe Expansion, WiFi7, Raspberry Pi5, Ubuntu, RPi OS
I. Introduction
The Raspberry Pi 5 features a 16-pin PCIe interface, through which various PCIe devices can be connected. This expansion board is specifically designed for the Raspberry Pi 5 to serve as a WiFi 7 adapter. This module requires driver installation to use WiFi 7 on the Raspberry Pi system, while it is plug-and-play under Ubuntu without needing additional drivers. The module also supports WiFi 6 and WiFi 5 via the M.2 E key interface.
II. Hardware Spec
1. PCIe expansion board designed specifically for the Raspberry Pi 5;
2. One M.2 E-Key PCIe interface, supporting the BE200 WiFi 7 module, with hardware also supporting WiFi 6(E) and WiFi 5, such as AX210, AX200, MT7922, and Intel 8265C;
3. One USB Bluetooth interface (built-in with the WiFi module), exposed via a 1.25mm 4-pin USB connector. To use the Bluetooth function, this USB must be connected to a USB 2.0 port on the Raspberry Pi 5, and it requires the appropriate drivers and profiles to be installed;
4. Reserved CSI/DSI cable routing slots, supporting 22-pin cables with 0.5mm pitch and 15-pin cables with 1mm pitch;
5. Board-mounted power indicator light ('PWR') and one WiFi activity indicator light ('ACT');
6. Uses an efficient DC-DC circuit;
7. Gold immersion PCB process, lead-free production, certified by UL, compliant with ROHS standards, and has a fire rating of 94V-0;
8. The board has four M2.5 mounting holes, with a recessed design on the top of the board to facilitate the use of the 40-Pin GPIO;
9. Optional PCB antenna or SMA antenna, with an IPEX4 interface;
10. Optional aluminum alloy enclosure.

III. Software Spec
3.1 Overview
This document uses Raspberry Pi OS and Ubuntu systems, tested with the BE200 (WiFi 7) module.
1)The version of the Raspberry Pi OS is: 2024-07-04-raspios-bookworm-arm64.img.xz
You can download the Raspberry Pi OS in:
https://www.raspberrypi.com/software/operating-systems/#raspberry-pi-os-64-bit
2)The version of the Ubuntu system is: ubuntu-24.04-preinstalled-desktop-arm64+raspi.img.xz
You can download the Ubuntu system in:
https://ubuntu.com/download/raspberry-pi
3.2 System flashed onto the SD (TF) card
Click here to read the instructions for System flashing
IV. Work with Raspberry Pi OS
4.1 Installing WiFi 7 driver (BE200)
Note: Once the WiFi 7 driver (BE200) is successfully installed, the original WiFi module on the Raspberry Pi 5 will no longer be usable!
This installation procedure also applies to the AX210 (WiFi 6E) and AX200 (WiFi 6) modules.
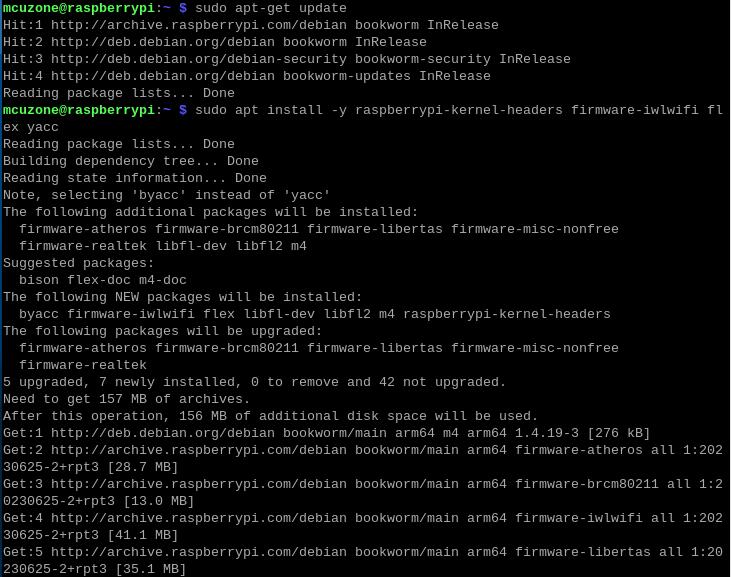
4.1.1 Update the system and header files
Execute commands in the Raspberry Pi terminal:
sudo apt-get update
sudo apt install -y raspberrypi-kernel-headers firmware-iwlwifi flex yacc
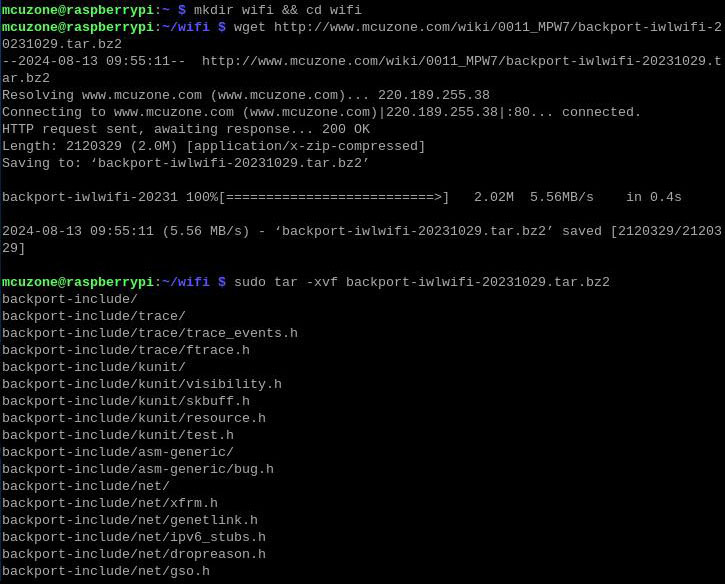
4.1.2 Download and extract the source code
Execute commands in the Raspberry Pi terminal:
mkdir wifi && cd wifi
wget http://www.mcuzone.com/wiki/0011_MPW7/backport-iwlwifi-20231029.tar.bz2
sudo tar -xvf backport-iwlwifi-20231029.tar.bz2
4.1.3 Compilation Environment
Execute commands in the Raspberry Pi terminal:
sudo make defconfig-iwlwifi-public
sudo sed -i 's/CPTCFG_IWLMVM_VENDOR_CMDS=y/# CPTCFG_IWLMVM_VENDOR_CMDS is not set/' .config

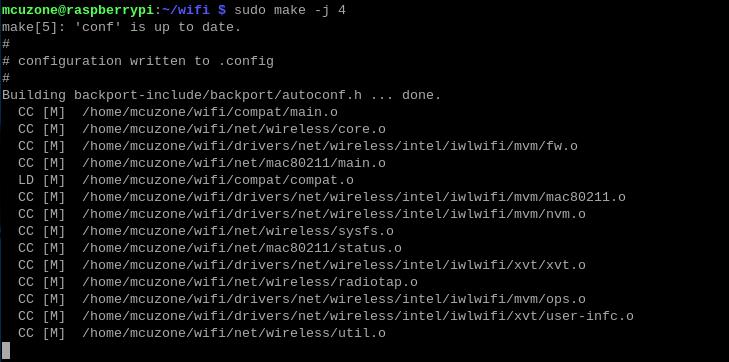
4.1.4 Compile source code
Execute commands in the Raspberry Pi terminal:
sudo make -j 4
sudo make install
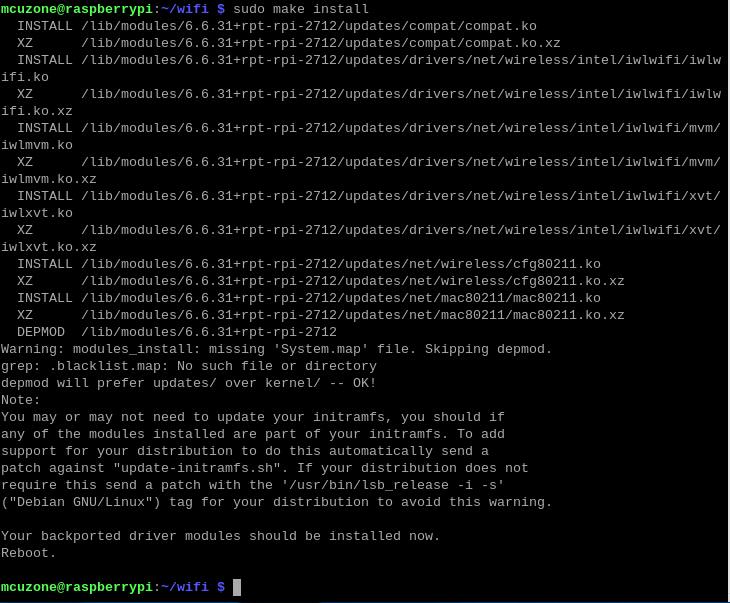
At this point, the system will prompt you to restart. Please do not restart yet.
4.1.5 Install firmware (not necessary for AX200 or AX210)
Execute commands in the Raspberry Pi terminal:
cd ..
cd Downloads
wget http://www.mcuzone.com/wiki/0011_MPW7/firmware_wifi7.zip
unzip firmware_wifi7.zip
sudo cp iwlwifi-gl-c0-fm-c0-86.ucode /lib/firmware
sudo cp iwlwifi-gl-c0-fm-c0.pnvm /lib/firmware
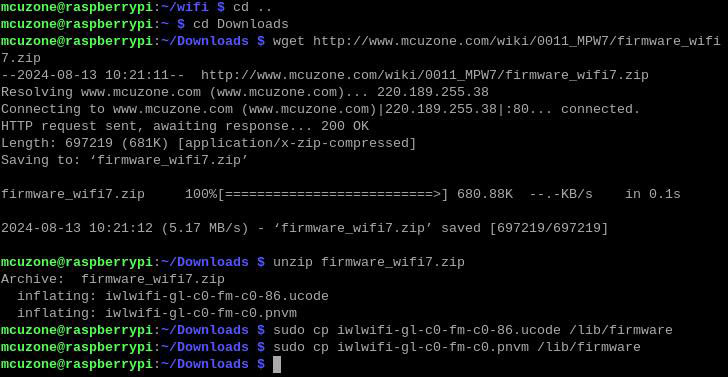
Then reboot system:
sudo reboot
4.2 WiFi7模块BE200测试
重启系统后,我们在终端中执行lspci:

可以看到这个WiFi7模块。
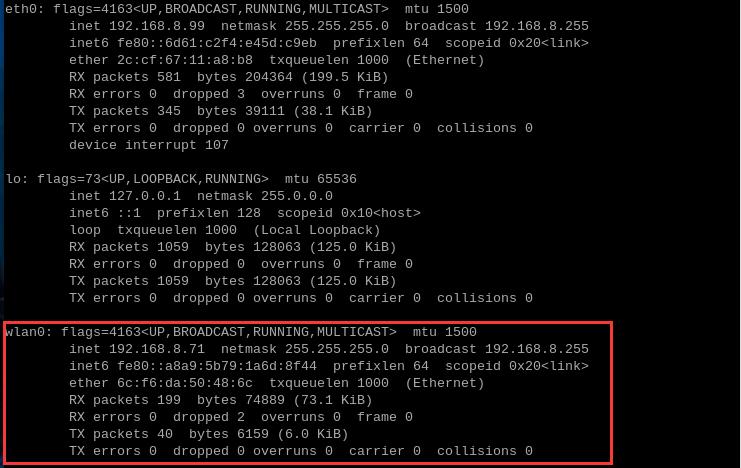
执行ifconfig -a,可以看到这个无线网卡(wlan0)的信息:
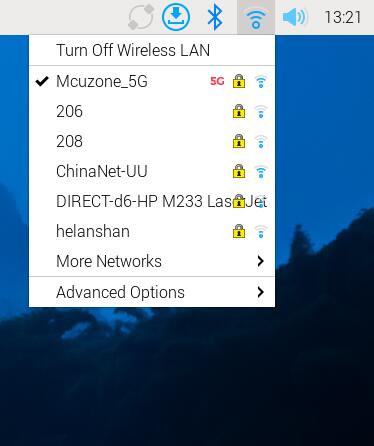
此时就可以在网络连接里面使用BE200(WiFi7)模块连接无线AP了:
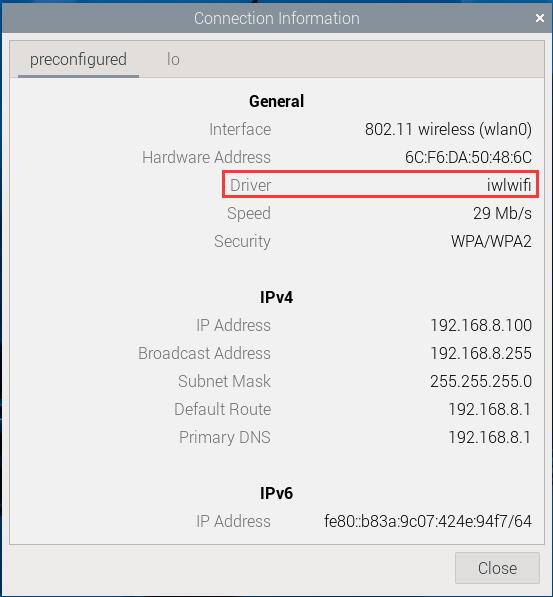
在网络连接的信息中,我们也可以看到这个驱动为iwlwifi的网络连接:
通过BE200(WiFi7)模块连接外网(200M宽带)测速,结果如下:

注意:网络测速受网络环境和测试方法影响,速度请以实际为准,本测试仅供参考。
连接WiFi7无线路由器测速:
注意:这里的测试都使用SSH连接开发板进行测试。
路由器为小米BE6500 Pro,WiFi7+四口2.5G路由器,树莓派5+WiFi7距离路由器约1米。
使用BE200+树莓派5,连接WiFi7无线网络,与同一路由器下的Windows系统(2.5G USB网卡,ip地址为:192.168.8.197)进行iperf3测速:
30个线程测速,结果如下:
iperf3 -c 192.168.8.197 -P 30
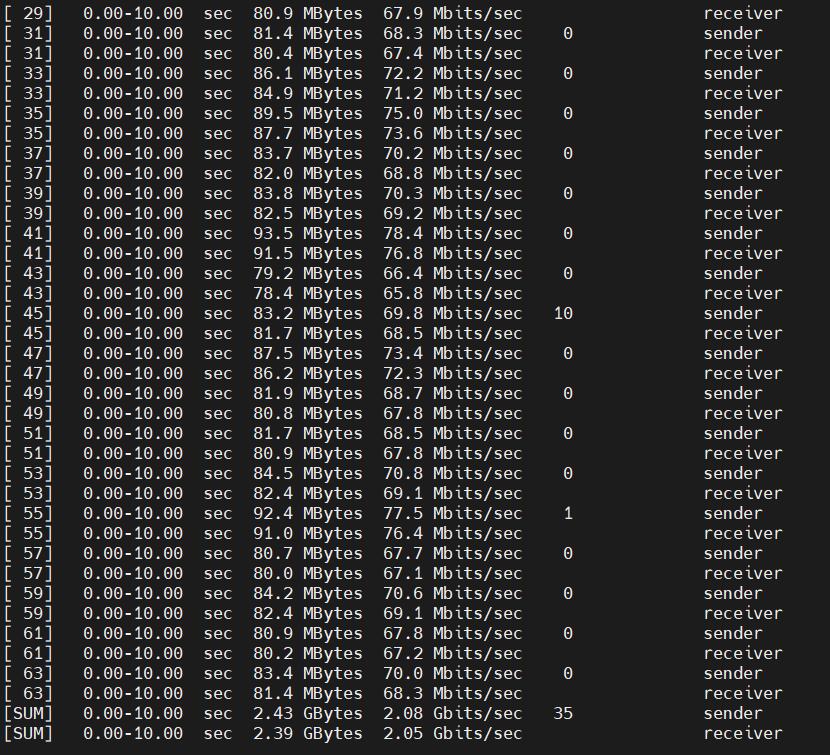
约为2.08Gbps。
单个线程测速,结果如下:
iperf3 -c 192.168.8.197
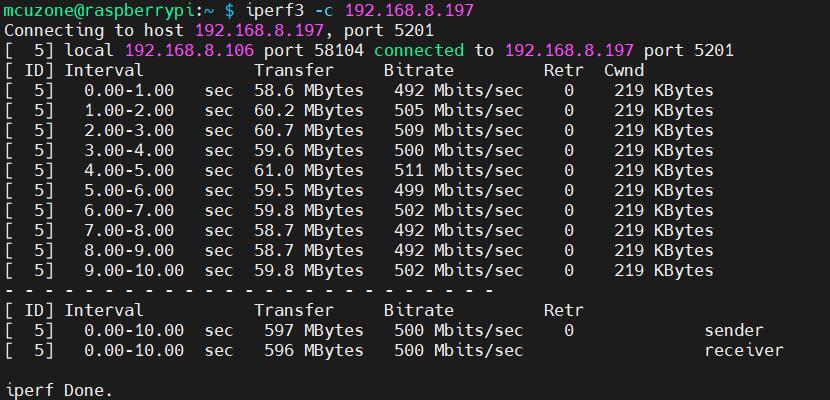
约为500Mbps。
作为对比,我们换了WiFi6无线模块AX210,进行了同样的测试。
30个线程测速,结果如下:
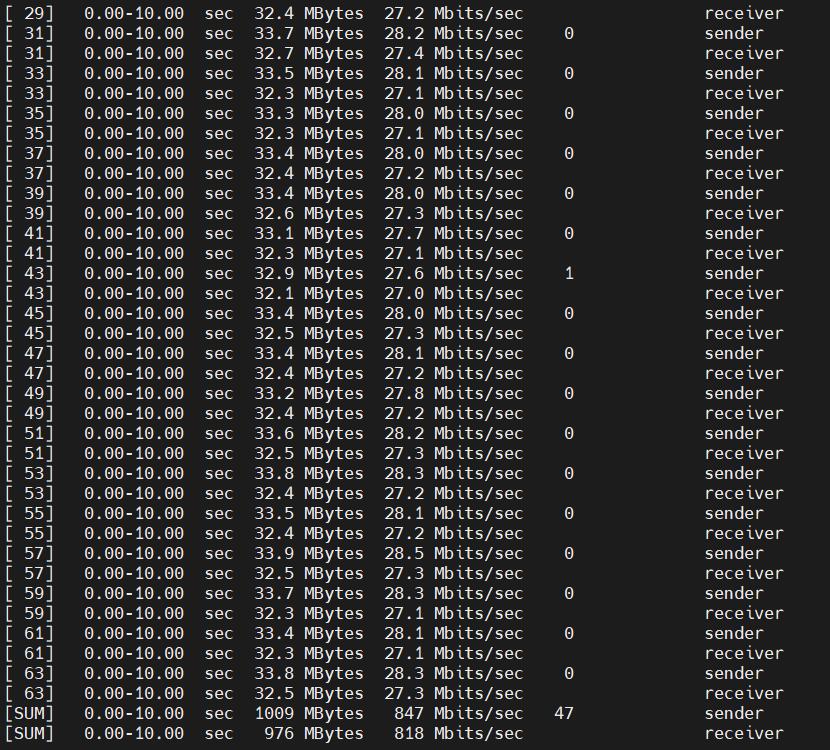
约为847Mbps。
单个线程测速,结果如下:
iperf3 -c 192.168.8.197
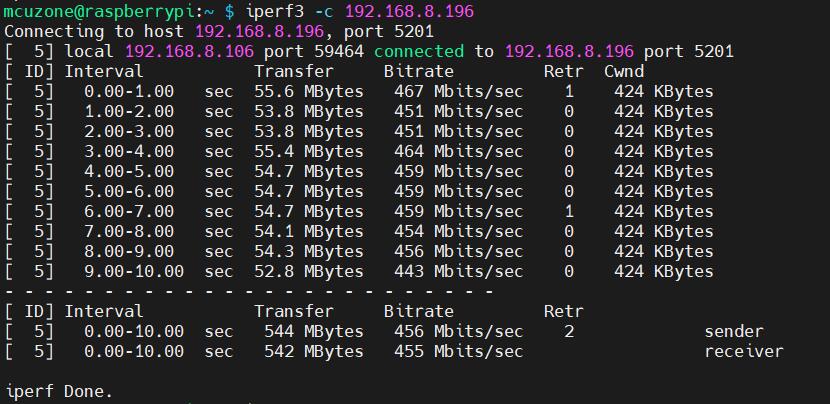
约为456Mbps。
注意:网络测速受网络环境和测试方法影响,速度请以实际为准,本测试仅供参考。
4.3 蓝牙测试
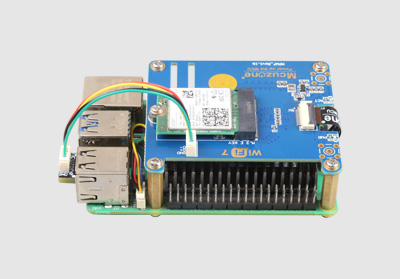
将蓝牙接口1.25 4P USB口接到树莓派5的USB2.0上:
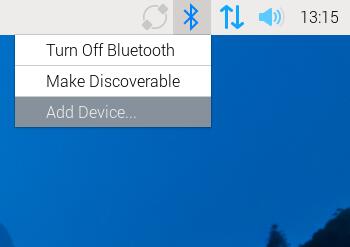
树莓派OS下可以直接认到树莓派5的蓝牙模块,点击桌面右上角的设备图标,然后点击Add Device...:
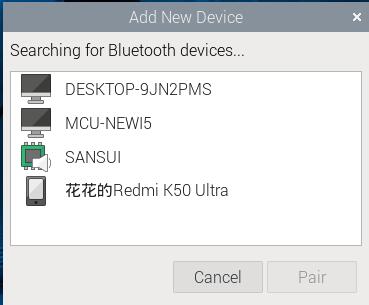
在打开的窗口中,蓝牙模块会自动扫描周围可连接的蓝牙设备,如图所示:
点击其中的手机,与之配对,树莓派OS与手机上如下图所示:


配对成功后,在手机上点击raspberrypi这个设备,连接成功后,树莓派被识别成一个音频设备,如下图所示:

在树莓派OS中也能看见连接成功:

五、Ubuntu系统的操作
测试的Ubuntu系统版本如下:

5.1 WiFi7(BE200)
BE200(WiFi7)模块在Ubuntu系统下是免驱的,即插即用,系统启动后,我们在终端中执行lspci:

可以看到这个WiFi7模块。
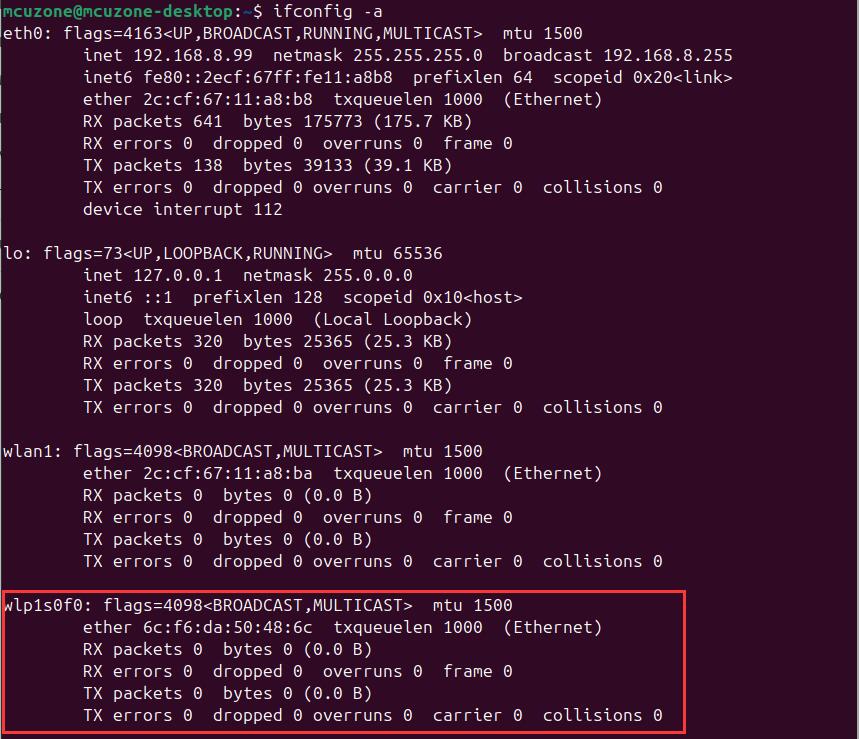
执行ifconfig -a,可以看到这个WiFi7无线网卡(wlp1s0f0)的信息,wlan1为树莓派5自带的无线网卡:
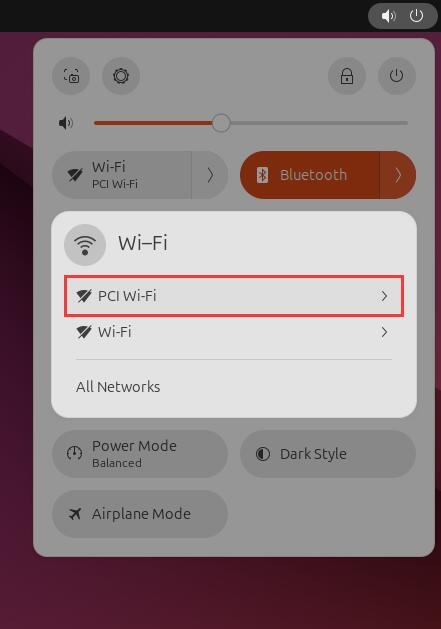
在屏幕右上角的“Wi-Fi”里有一个“PCI Wi-Fi”,即是这个WiFi7模块:
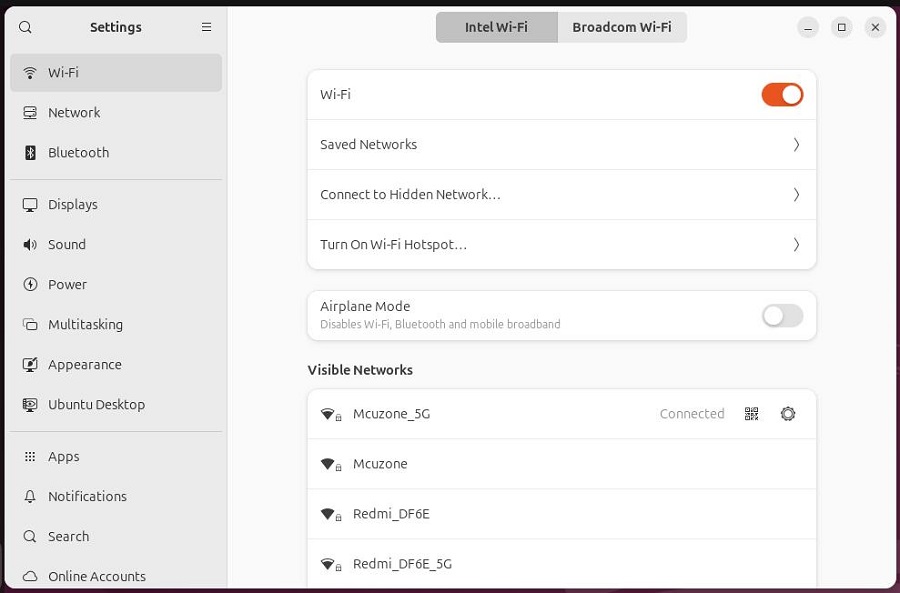
使用该“PCI Wi-Fi”连接无线AP后,在“All Networks”里面可以看见一个名为Intel的无线WiFi,这个就是该WiFi7模块,连接成功后即可通过WiFi7模块上网:
通过BE200(WiFi7)模块连接外网(200M宽带)测速,结果如下:

注意:网络测速受网络环境和测试方法影响,速度请以实际为准,本测试仅供参考。
如果使用Ubuntu内置的Firefox浏览器时运行速度很慢或者经常无响应,建议安装轻量浏览器Falkon:
sudo apt install falkon
5.2 WiFi6(AX210/AX200)
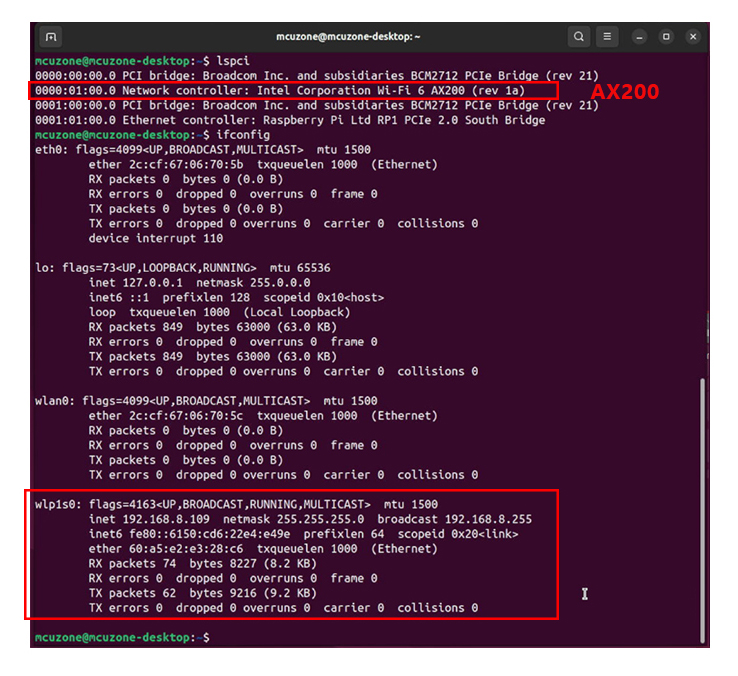
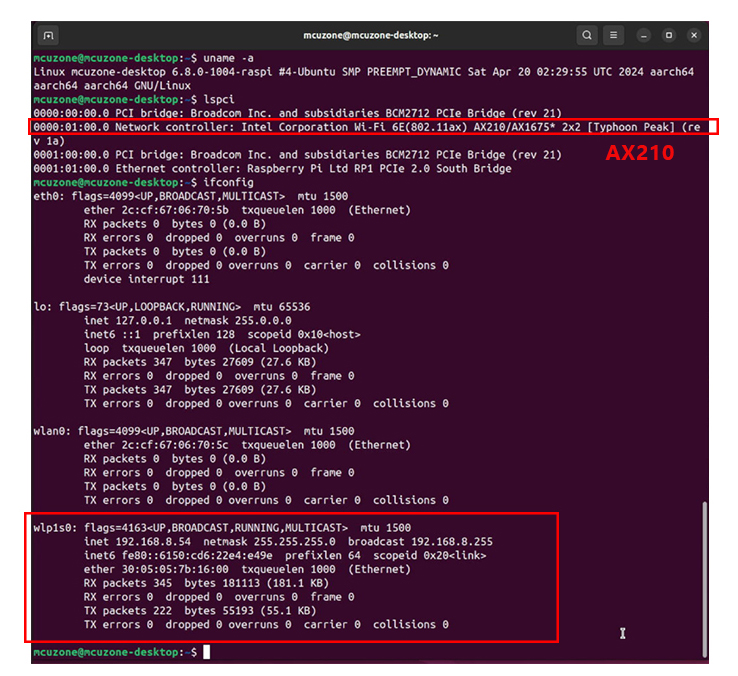
WiFi6 AX200和AX210模块,在Ubuntu系统下也是免驱,即插即用的,同上步骤操作,执行结果如下:
AX200:
AX210:
5.3 蓝牙测试
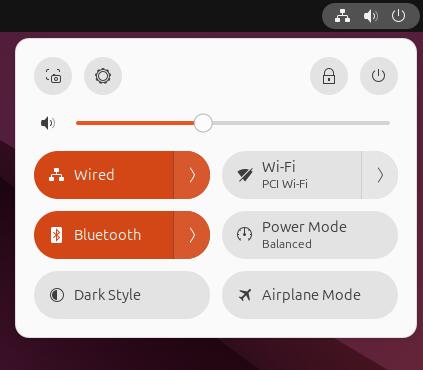
Ubuntu下可以直接认到树莓派5的蓝牙模块,点击桌面右上角的设备图标,可以看到Bluetooth已经处于打开状态:
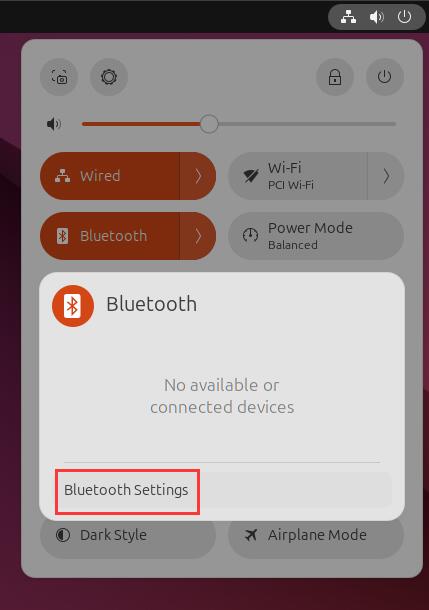
点击Bluetooth的箭头,点击Bluetooth Settings,打开蓝牙设置:
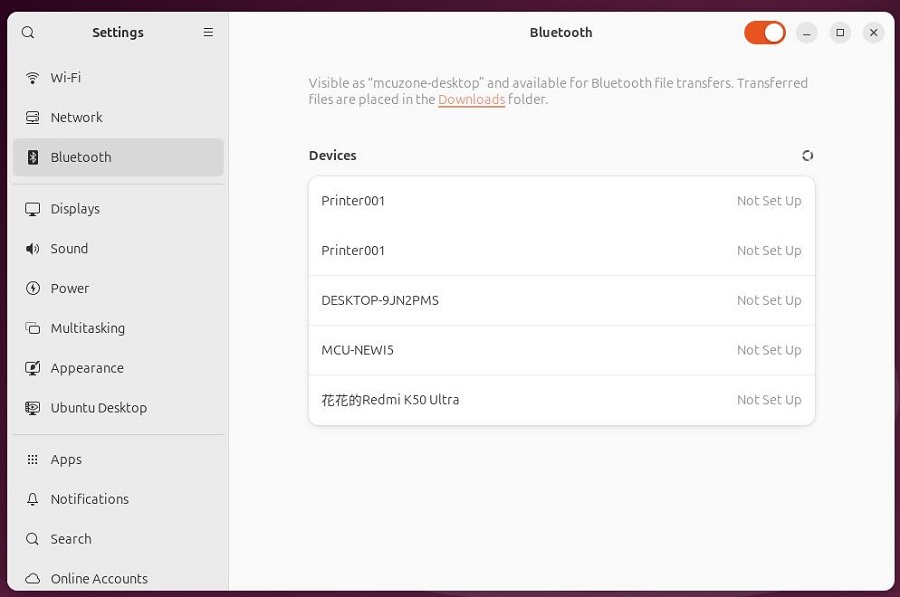
蓝牙模块会自动扫描周围可连接的蓝牙设备,如图所示:
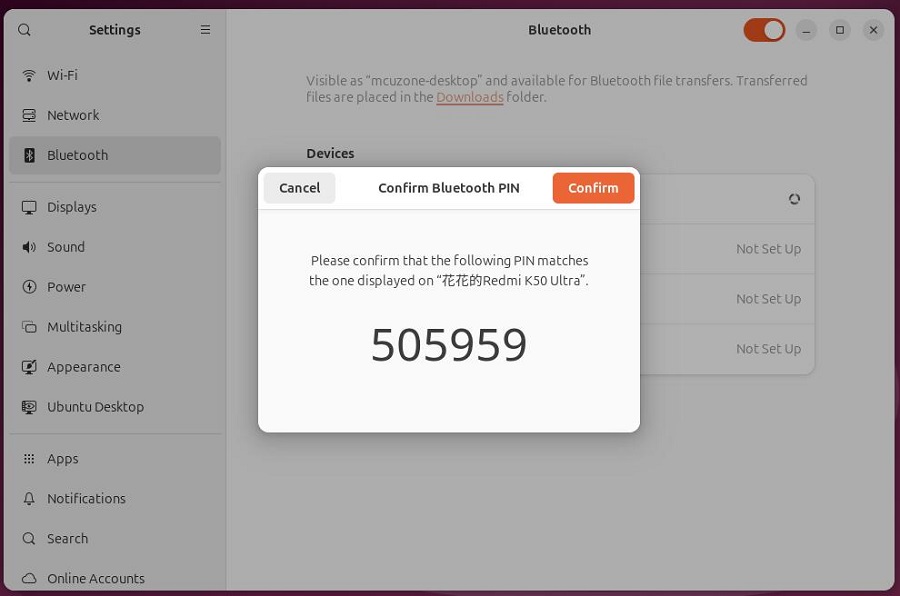
我们可以选择所需的蓝牙设备进行连接,下面为与手机配对的例子:
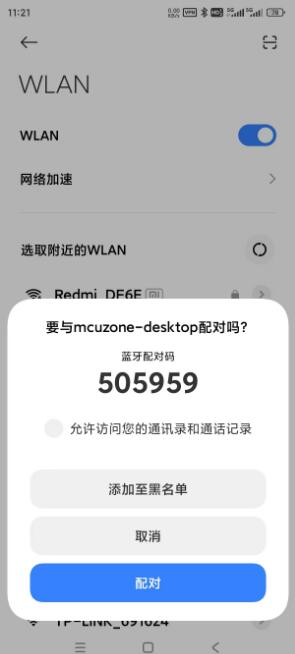
配对连接成功后,该设备显示Connected,我们可以在桌面右上角的蓝牙中看到这个设备(手机):
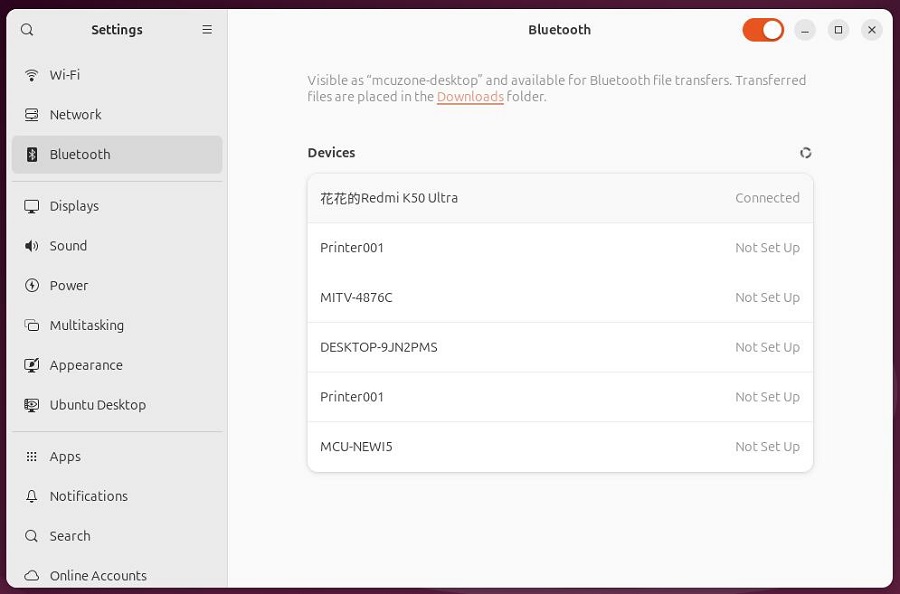
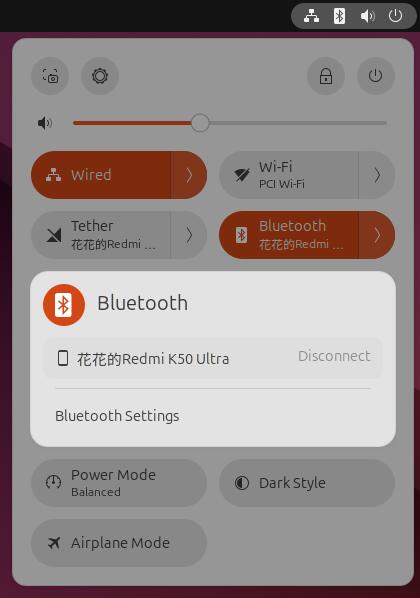
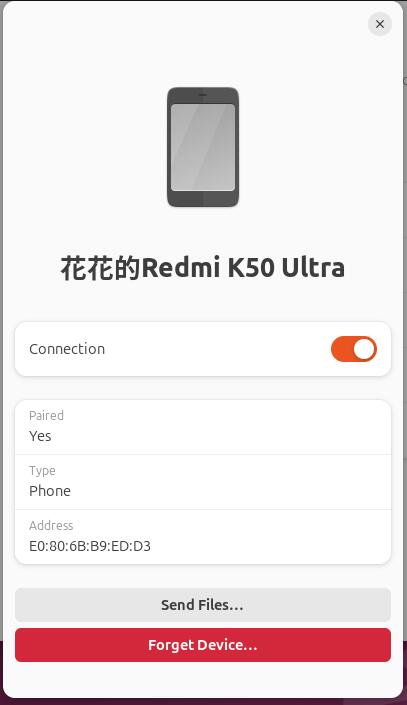
Ubuntu系统能识别出手机,而手机把树莓派5识别为耳机:

联系我们
电话:13957118045
如本页面有任何疏漏、错误或者侵权,请通过上述途径联系我们,谢谢!
Copyright 2004-2024 野芯科技


 QQ:8204136