0006 MPTPU(M.2 E) EN:修订间差异
| (未显示同一用户的18个中间版本) | |||
| 第1行: | 第1行: | ||
[[0006 MPTPU(M.2 E)|切换语言为中文]] | |||
== '''Keywords''' == | == '''Keywords''' == | ||
Raspberry Pi5, PCIe, TPU, DTPU, Driver installation, Operation demonstration, AI, | Raspberry Pi5, PCIe, TPU, DTPU, Driver installation, Operation demonstration, AI, Google, Coral | ||
== ''' | == '''I. Introduction''' == | ||
MPTPU is a TPU expansion board specifically designed for the Raspberry Pi 5, driven by a Coral TPU module through PCIe 1x Gen2. TPU module on the Raspberry Pi system requires the installation of drivers and configuration of the operating environment. This document is based on the MPTPU expansion board (single TPU), and the driver installation is also applicable for dual TPU setups. | MPTPU is a TPU expansion board specifically designed for the Raspberry Pi 5, driven by a Coral TPU module through PCIe 1x Gen2. TPU module on the Raspberry Pi system requires the installation of drivers and configuration of the operating environment. This document is based on the MPTPU expansion board (single TPU), and the driver installation is also applicable for dual TPU setups. | ||
'''''Note: The operation requires a stable internet connection to the regions out of China. Otherwise, many files may not download or may only partially download, which could ultimately lead to the code failing to run.''''' | '''''Note: The operation requires a stable internet connection to the regions out of China (you may need to find your own method). Otherwise, many files may not download or may only partially download, which could ultimately lead to the code failing to run.''''' | ||
== ''' | == '''II. Hardware Resources''' == | ||
2.1 Specifically designed for the PCIe interface of the Raspberry Pi 5. | 2.1 Specifically designed for the PCIe interface of the Raspberry Pi 5. | ||
| 第16行: | 第18行: | ||
2.4 An onboard power indicator LED ("PWR"). | 2.4 An onboard power indicator LED ("PWR"). | ||
2.5 Adopts high-quality electronic components, lead-free production, immersion gold process; the PCB board is UL certified and | 2.5 Adopts high-quality electronic components, lead-free production, immersion gold process; the PCB board is UL certified and RoHS compliant. | ||
2.6 The board has four M2. | 2.6 The board has four M2.5 mounting holes, with a recessed design on the top of the board to facilitate the use of the 40-Pin GPIO without affecting the use of the Raspberry Pi 5's 40-Pin GPIO. | ||
http://www.mcuzone.com/wiki/0006_MPW7_TPU/ | http://www.mcuzone.com/wiki/0006_MPW7_TPU/0006_MPW7_TPU_41.jpg | ||
== '''III. System flashing''' == | |||
== ''' | |||
3.1 The Raspberry Pi OS used in this document is: 2024-07-04-raspios-bookworm-armhf.img.xz(Raspberry Pi OS with desktop)。 | 3.1 The Raspberry Pi OS used in this document is: 2024-07-04-raspios-bookworm-armhf.img.xz(Raspberry Pi OS with desktop)。 | ||
| 第32行: | 第31行: | ||
https://www.raspberrypi.com/software/operating-systems/#raspberry-pi-os-64-bit | https://www.raspberrypi.com/software/operating-systems/#raspberry-pi-os-64-bit | ||
3.2 Use Imager or balenaEtcher to flash the OS image in TF card. [[ | 3.2 Use Imager or balenaEtcher to flash the OS image in TF card. [[0005 MPS2242 2280 2280P(Single SSD Expansion Board)#3.2 Boot from TF card|Click here to read the instructions for System flashing]] | ||
'''''Note: The TF card used for flashing the system should have a space of at least 16GB, otherwise, it will display space errors during the installation and configuration process!''''' | |||
== ''' | == '''IV. Driver installation, configuration and demonstration under Raspberry Pi OS''' == | ||
=== 4.1 | === 4.1 Config config.txt === | ||
After the system starts, open the Raspberry Pi terminal and enter the command: | |||
<code>sudo nano /boot/firmware/config.txt</code> | <code>sudo nano /boot/firmware/config.txt</code> | ||
Or: | |||
<code>sudo mousepad /boot/firmware/config.txt</code> | <code>sudo mousepad /boot/firmware/config.txt</code> | ||
Add the codes in the ending of this file: | |||
<code>dtparam=pciex1</code> | <code>dtparam=pciex1</code> | ||
| 第57行: | 第58行: | ||
http://www.mcuzone.com/wiki/0006_MPW7_TPU/0006_MPW7_TPU_02.jpg | http://www.mcuzone.com/wiki/0006_MPW7_TPU/0006_MPW7_TPU_02.jpg | ||
Then, save the file and reboot the system: | |||
<code>sudo reboot</code> | <code>sudo reboot</code> | ||
=== 4.2 | === 4.2 Ensuring software environment === | ||
After reboot the system, open the Raspberry Pi terminal and enter the command: | |||
<code>uname -r</code> | <code>uname -r</code> | ||
After ensuring the kernel version is greater than 4.18, enter: | |||
<code>lsmod | grep apex</code> | <code>lsmod | grep apex</code> | ||
Ensure there is no output, then you can begin installing the TPU driver. | |||
http://www.mcuzone.com/wiki/0006_MPW7_TPU/0006_MPW7_TPU_03.jpg | http://www.mcuzone.com/wiki/0006_MPW7_TPU/0006_MPW7_TPU_03.jpg | ||
=== 4.3 | === 4.3 Install necessary software === | ||
Ensure the network is connected to internet connection to the regions out of China (you may need to find your own method), and then add the Google TPU software library: | |||
<code>echo "deb <nowiki>https://packages.cloud.google.com/apt</nowiki> coral-edgetpu-stable main" | sudo tee /etc/apt/sources.list.d/coral-edgetpu.list</code> | <code>echo "deb <nowiki>https://packages.cloud.google.com/apt</nowiki> coral-edgetpu-stable main" | sudo tee /etc/apt/sources.list.d/coral-edgetpu.list</code> | ||
| 第83行: | 第84行: | ||
http://www.mcuzone.com/wiki/0006_MPW7_TPU/0006_MPW7_TPU_04.jpg | http://www.mcuzone.com/wiki/0006_MPW7_TPU/0006_MPW7_TPU_04.jpg | ||
Update the software list after adding: | |||
<code>sudo apt-get update</code> | <code>sudo apt-get update</code> | ||
| 第89行: | 第90行: | ||
http://www.mcuzone.com/wiki/0006_MPW7_TPU/0006_MPW7_TPU_06.jpg | http://www.mcuzone.com/wiki/0006_MPW7_TPU/0006_MPW7_TPU_06.jpg | ||
Install the necessary software after the update is completed: | |||
<code>sudo apt-get install cmake libedgetpu1-std devscripts debhelper dkms dh-dkms</code> | <code>sudo apt-get install cmake libedgetpu1-std devscripts debhelper dkms dh-dkms</code> | ||
| 第97行: | 第98行: | ||
http://www.mcuzone.com/wiki/0006_MPW7_TPU/0006_MPW7_TPU_08.jpg | http://www.mcuzone.com/wiki/0006_MPW7_TPU/0006_MPW7_TPU_08.jpg | ||
=== 4.4 | === 4.4 Install Gasket Driver === | ||
Enter the following commands in sequence to install the Gasket Driver: | |||
<code>git clone <nowiki>https://github.com/google/gasket-driver.git</nowiki></code> | <code>git clone <nowiki>https://github.com/google/gasket-driver.git</nowiki></code> | ||
| 第116行: | 第117行: | ||
http://www.mcuzone.com/wiki/0006_MPW7_TPU/0006_MPW7_TPU_11.jpg | http://www.mcuzone.com/wiki/0006_MPW7_TPU/0006_MPW7_TPU_11.jpg | ||
After the installation is complete, enter the following command to ensure that the driver and software were installed successfully: | |||
<code>sudo apt-get install gasket-dkms libedgetpu1-std</code> | <code>sudo apt-get install gasket-dkms libedgetpu1-std</code> | ||
| 第122行: | 第123行: | ||
http://www.mcuzone.com/wiki/0006_MPW7_TPU/0006_MPW7_TPU_12.jpg | http://www.mcuzone.com/wiki/0006_MPW7_TPU/0006_MPW7_TPU_12.jpg | ||
Then, add a udev rule to obtain device operation permissions: | |||
<code>sudo sh -c "echo 'SUBSYSTEM==\"apex\", MODE=\"0660\", GROUP=\"apex\"' >> /etc/udev/rules.d/65-apex.rules"</code> | <code>sudo sh -c "echo 'SUBSYSTEM==\"apex\", MODE=\"0660\", GROUP=\"apex\"' >> /etc/udev/rules.d/65-apex.rules"</code> | ||
add user to apex: | |||
<code>sudo groupadd apex</code> | <code>sudo groupadd apex</code> | ||
| 第134行: | 第135行: | ||
http://www.mcuzone.com/wiki/0006_MPW7_TPU/0006_MPW7_TPU_13.jpg | http://www.mcuzone.com/wiki/0006_MPW7_TPU/0006_MPW7_TPU_13.jpg | ||
Reboot the system after the setup is complete: | |||
<code>sudo reboot</code> | <code>sudo reboot</code> | ||
=== 4.5 | === 4.5 Verification module testing and driver installation === | ||
After system starting, verification module testing and driver installation: | |||
<code>lspci -nn | grep 089a</code> | <code>lspci -nn | grep 089a</code> | ||
| 第147行: | 第148行: | ||
http://www.mcuzone.com/wiki/0006_MPW7_TPU/0006_MPW7_TPU_14.jpg | http://www.mcuzone.com/wiki/0006_MPW7_TPU/0006_MPW7_TPU_14.jpg | ||
This board has a single TPU onboard, so you can see a TPU module: | |||
By entering <code>sudo lspci -v</code>, you can see the driver loading: | |||
http://www.mcuzone.com/wiki/0006_MPW7_TPU/0006_MPW7_TPU_15.jpg | http://www.mcuzone.com/wiki/0006_MPW7_TPU/0006_MPW7_TPU_15.jpg | ||
=== 4.6 | === 4.6 Configuration of the Code Execution Environment === | ||
Google | Running Google TPU module code requires Python versions between 3.6 and 3.9, while the latest Raspberry Pi system is Python 3.11. Therefore, we need to use Pyenv to download an older version of Python. | ||
First, install the depends: | |||
<code>sudo apt-get install -y make build-essential libssl-dev zlib1g-dev \libbz2-dev libreadline-dev libsqlite3-dev wget curl llvm libncurses5-dev \libncursesw5-dev xz-utils tk-dev libffi-dev liblzma-dev python3-openssl</code> | <code>sudo apt-get install -y make build-essential libssl-dev zlib1g-dev \libbz2-dev libreadline-dev libsqlite3-dev wget curl llvm libncurses5-dev \libncursesw5-dev xz-utils tk-dev libffi-dev liblzma-dev python3-openssl</code> | ||
| 第164行: | 第165行: | ||
http://www.mcuzone.com/wiki/0006_MPW7_TPU/0006_MPW7_TPU_18.jpg | http://www.mcuzone.com/wiki/0006_MPW7_TPU/0006_MPW7_TPU_18.jpg | ||
Install pyenv after the depends are installed: | |||
<code>curl <nowiki>https://pyenv.run</nowiki> | bash</code> | <code>curl <nowiki>https://pyenv.run</nowiki> | bash</code> | ||
| 第170行: | 第171行: | ||
http://www.mcuzone.com/wiki/0006_MPW7_TPU/0006_MPW7_TPU_19.jpg | http://www.mcuzone.com/wiki/0006_MPW7_TPU/0006_MPW7_TPU_19.jpg | ||
Enter the command: | |||
<code>sudo nano ~/.bashrc</code> | <code>sudo nano ~/.bashrc</code> | ||
Or: | |||
<code>sudo mousepad ~/.bashrc</code> | <code>sudo mousepad ~/.bashrc</code> | ||
Add the codes in the ending of this file: | |||
<code>export PYENV_ROOT="$HOME/.pyenv"</code> | <code>export PYENV_ROOT="$HOME/.pyenv"</code> | ||
| 第186行: | 第187行: | ||
<code>eval "$(pyenv init -)"</code> | <code>eval "$(pyenv init -)"</code> | ||
http://www.mcuzone.com/wiki/0006_MPW7_TPU/ | http://www.mcuzone.com/wiki/0006_MPW7_TPU/0006_MPW7_TPU_36.jpg | ||
http://www.mcuzone.com/wiki/0006_MPW7_TPU/0006_MPW7_TPU_21.jpg | http://www.mcuzone.com/wiki/0006_MPW7_TPU/0006_MPW7_TPU_21.jpg | ||
Save and exit after adding, then reload the shell: | |||
<code>exec "$SHELL"</code> | <code>exec "$SHELL"</code> | ||
| 第196行: | 第197行: | ||
http://www.mcuzone.com/wiki/0006_MPW7_TPU/0006_MPW7_TPU_22.jpg | http://www.mcuzone.com/wiki/0006_MPW7_TPU/0006_MPW7_TPU_22.jpg | ||
Then, we can use pyenv to install an older version of Python: | |||
<code>pyenv install -v 3.8.8</code> | <code>pyenv install -v 3.8.8</code> | ||
| 第204行: | 第205行: | ||
http://www.mcuzone.com/wiki/0006_MPW7_TPU/0006_MPW7_TPU_24.jpg | http://www.mcuzone.com/wiki/0006_MPW7_TPU/0006_MPW7_TPU_24.jpg | ||
After the installation is successful, we will change the system Python version to 3.8.8: | |||
<code>pyenv global 3.8.8</code> | <code>pyenv global 3.8.8</code> | ||
After the change is successful, you can check the current Python version is 3.8.8: | |||
<code>pyenv versions</code> | <code>pyenv versions</code> | ||
| 第216行: | 第217行: | ||
http://www.mcuzone.com/wiki/0006_MPW7_TPU/0006_MPW7_TPU_25.jpg | http://www.mcuzone.com/wiki/0006_MPW7_TPU/0006_MPW7_TPU_25.jpg | ||
== | === 4.7 Download the code and run the module === | ||
Enter the following commands in sequence to download: | |||
<code>mkdir coral && cd coral</code> | <code>mkdir coral && cd coral</code> | ||
| 第235行: | 第234行: | ||
http://www.mcuzone.com/wiki/0006_MPW7_TPU/0006_MPW7_TPU_27.jpg | http://www.mcuzone.com/wiki/0006_MPW7_TPU/0006_MPW7_TPU_27.jpg | ||
Then, download the code and run the module: | |||
<code>pip3 install numpy</code> | <code>pip3 install numpy</code> | ||
| 第249行: | 第248行: | ||
http://www.mcuzone.com/wiki/0006_MPW7_TPU/0006_MPW7_TPU_30.jpg | http://www.mcuzone.com/wiki/0006_MPW7_TPU/0006_MPW7_TPU_30.jpg | ||
=== | === 4.8 Run the code === | ||
After the module download is complete, back to the coral/pycoral path: | |||
<code>cd ..</code> | <code>cd ..</code> | ||
Enter the following code to run it: | |||
http://www.mcuzone.com/wiki/0006_MPW7_TPU/0006_MPW7_TPU_39.jpg | |||
Note: You can copy the following code, but please paste it into a text editor first. Then, following the format shown above, remove any extra enter. After that, copy it again and paste it into the terminal to run. | |||
<code>python3 examples/classify_image.py \</code> | <code>python3 examples/classify_image.py \</code> | ||
| 第266行: | 第269行: | ||
http://www.mcuzone.com/wiki/0006_MPW7_TPU/0006_MPW7_TPU_31.jpg | http://www.mcuzone.com/wiki/0006_MPW7_TPU/0006_MPW7_TPU_31.jpg | ||
'''<big> | '''<big>You should downloading a large amount of data from the internet out of China to use the testing of this development board, so users can contact our company after buying this development board to obtain a pre-configured Raspberry Pi OS image.</big>''' | ||
{{ | {{Contact_Us_icon}} | ||
2024年9月4日 (三) 09:36的最新版本
Keywords
Raspberry Pi5, PCIe, TPU, DTPU, Driver installation, Operation demonstration, AI, Google, Coral
I. Introduction
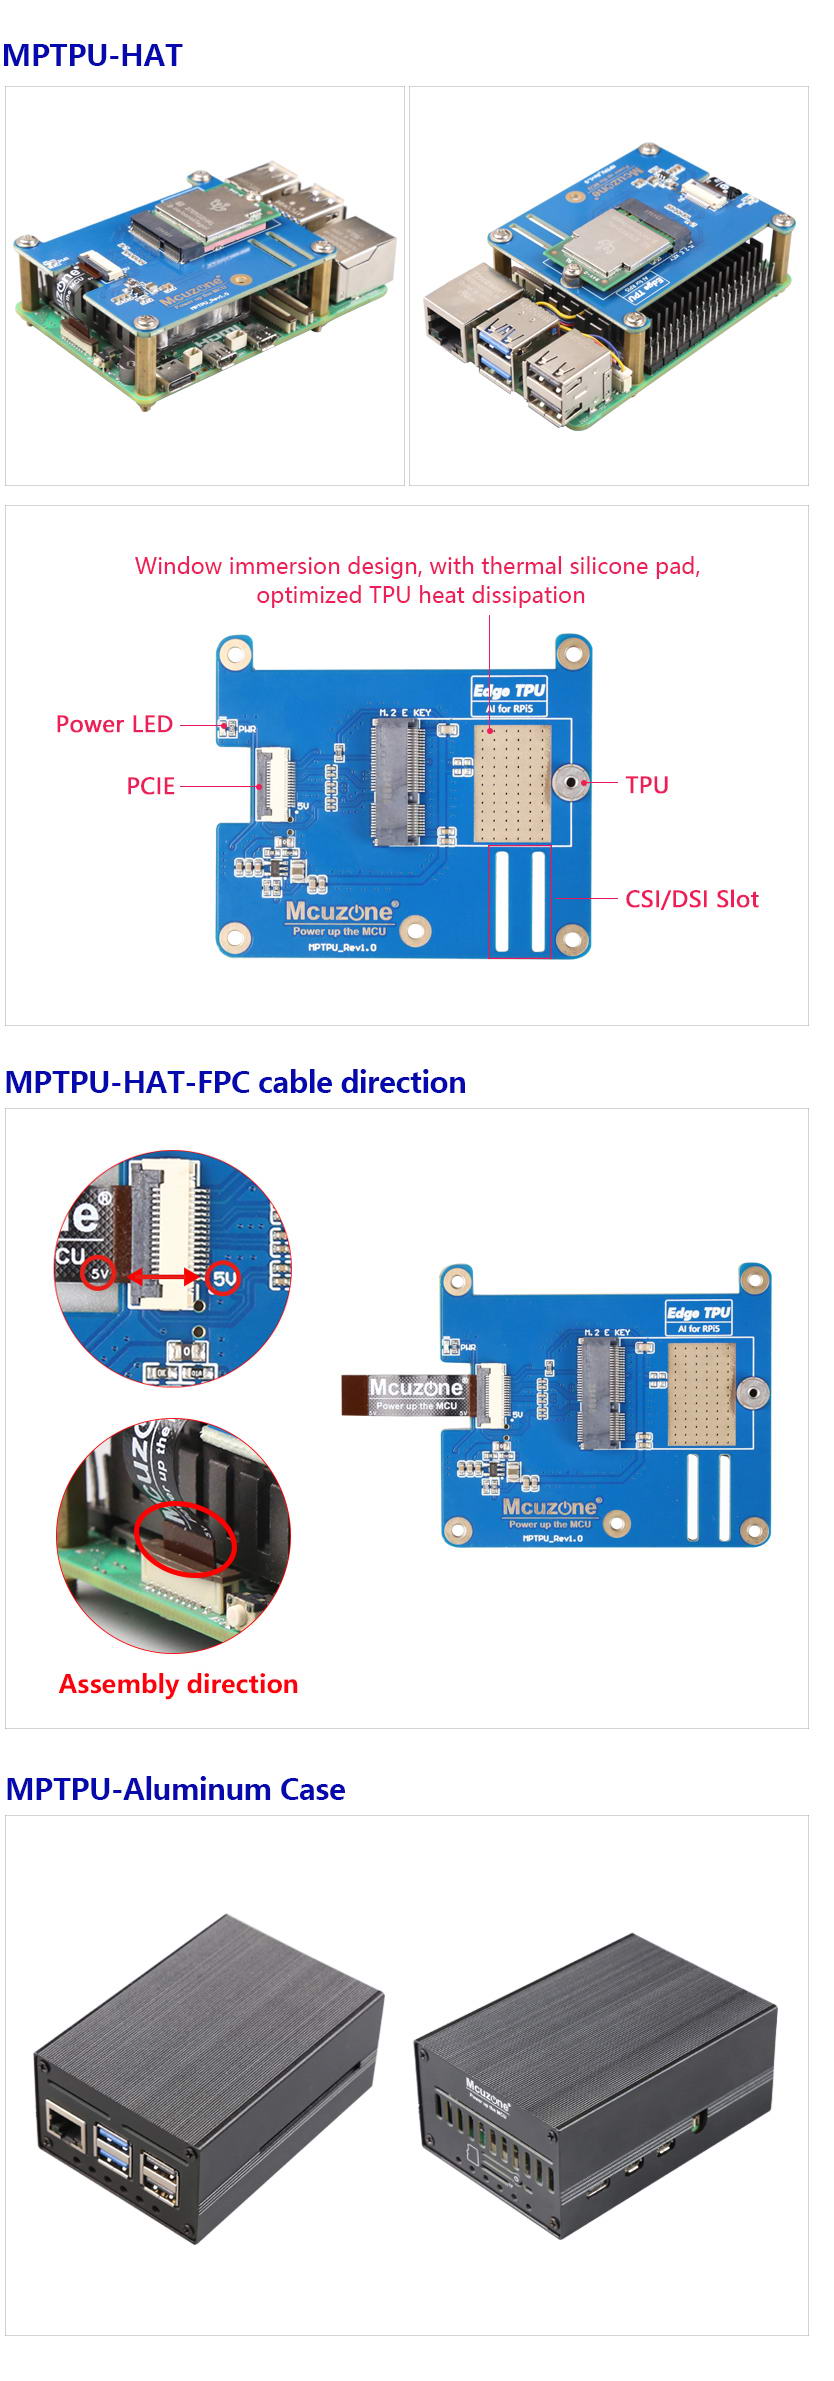
MPTPU is a TPU expansion board specifically designed for the Raspberry Pi 5, driven by a Coral TPU module through PCIe 1x Gen2. TPU module on the Raspberry Pi system requires the installation of drivers and configuration of the operating environment. This document is based on the MPTPU expansion board (single TPU), and the driver installation is also applicable for dual TPU setups.
Note: The operation requires a stable internet connection to the regions out of China (you may need to find your own method). Otherwise, many files may not download or may only partially download, which could ultimately lead to the code failing to run.
II. Hardware Resources
2.1 Specifically designed for the PCIe interface of the Raspberry Pi 5.
2.2 Support M.2 E-KEY PCIe and Google coral Edge TPU.
2.3 CSI/DSI slots: Supports 0.5mm pitch 22-pin cables and 1mm pitch 15-pin cables.
2.4 An onboard power indicator LED ("PWR").
2.5 Adopts high-quality electronic components, lead-free production, immersion gold process; the PCB board is UL certified and RoHS compliant.
2.6 The board has four M2.5 mounting holes, with a recessed design on the top of the board to facilitate the use of the 40-Pin GPIO without affecting the use of the Raspberry Pi 5's 40-Pin GPIO.
III. System flashing
3.1 The Raspberry Pi OS used in this document is: 2024-07-04-raspios-bookworm-armhf.img.xz(Raspberry Pi OS with desktop)。
You can download it in:
https://www.raspberrypi.com/software/operating-systems/#raspberry-pi-os-64-bit
3.2 Use Imager or balenaEtcher to flash the OS image in TF card. Click here to read the instructions for System flashing
Note: The TF card used for flashing the system should have a space of at least 16GB, otherwise, it will display space errors during the installation and configuration process!
IV. Driver installation, configuration and demonstration under Raspberry Pi OS
4.1 Config config.txt
After the system starts, open the Raspberry Pi terminal and enter the command:
sudo nano /boot/firmware/config.txt
Or:
sudo mousepad /boot/firmware/config.txt
Add the codes in the ending of this file:
dtparam=pciex1
kernel=kernel8.img
dtoverlay=pineboards-hat-ai

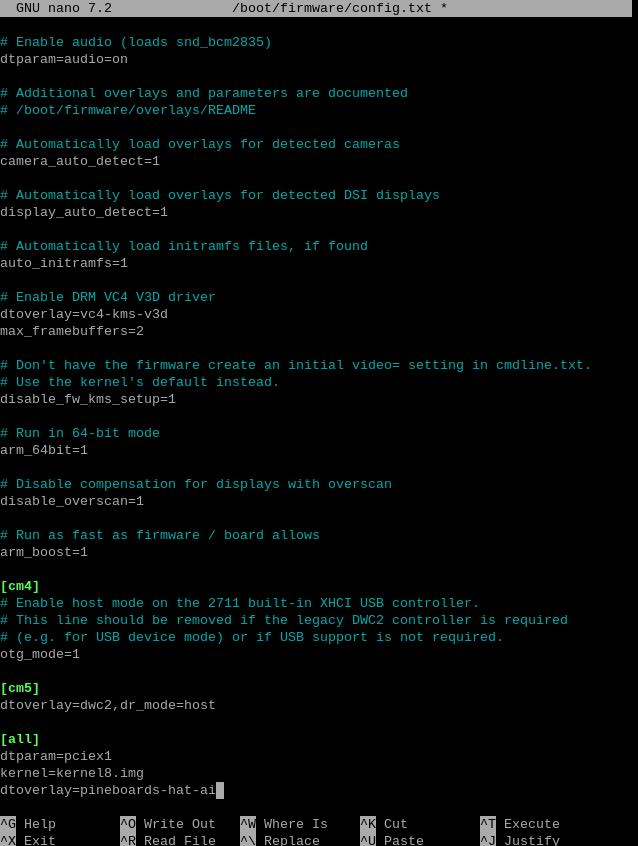
Then, save the file and reboot the system:
sudo reboot
4.2 Ensuring software environment
After reboot the system, open the Raspberry Pi terminal and enter the command:
uname -r
After ensuring the kernel version is greater than 4.18, enter:
lsmod | grep apex
Ensure there is no output, then you can begin installing the TPU driver.

4.3 Install necessary software
Ensure the network is connected to internet connection to the regions out of China (you may need to find your own method), and then add the Google TPU software library:
echo "deb https://packages.cloud.google.com/apt coral-edgetpu-stable main" | sudo tee /etc/apt/sources.list.d/coral-edgetpu.list
curl https://packages.cloud.google.com/apt/doc/apt-key.gpg | sudo apt-key add -

Update the software list after adding:
sudo apt-get update
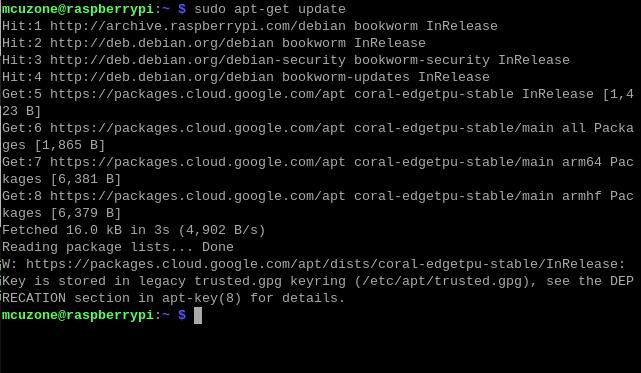
Install the necessary software after the update is completed:
sudo apt-get install cmake libedgetpu1-std devscripts debhelper dkms dh-dkms
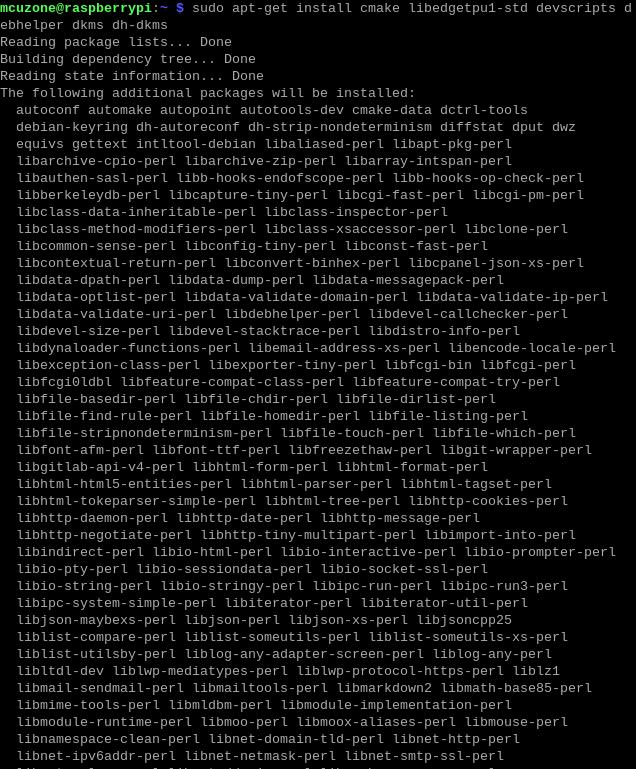

4.4 Install Gasket Driver
Enter the following commands in sequence to install the Gasket Driver:
git clone https://github.com/google/gasket-driver.git
cd gasket-driver
sudo debuild -us -uc -tc -b
cd ..
sudo dpkg -i gasket-dkms_1.0-18_all.deb

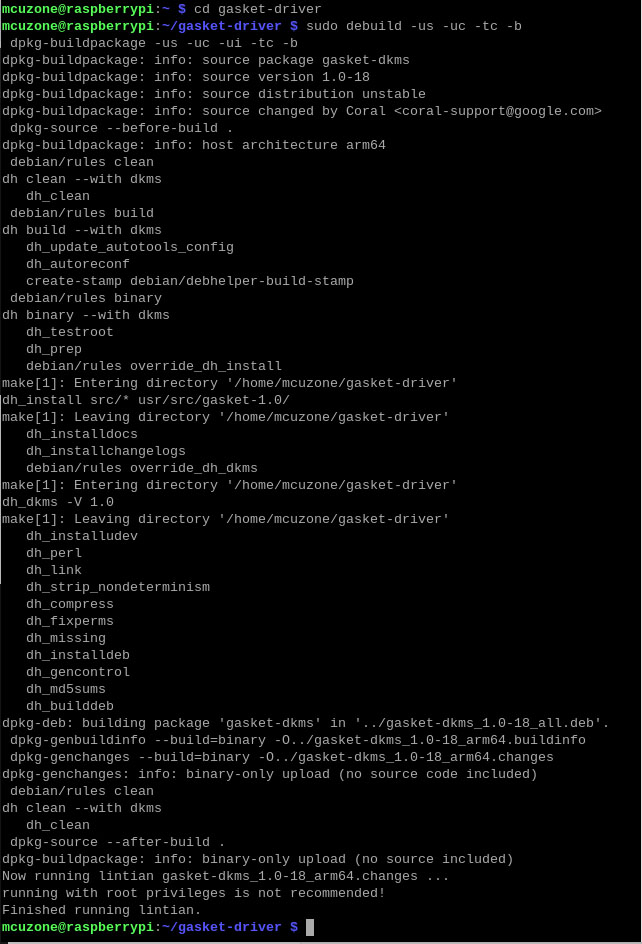
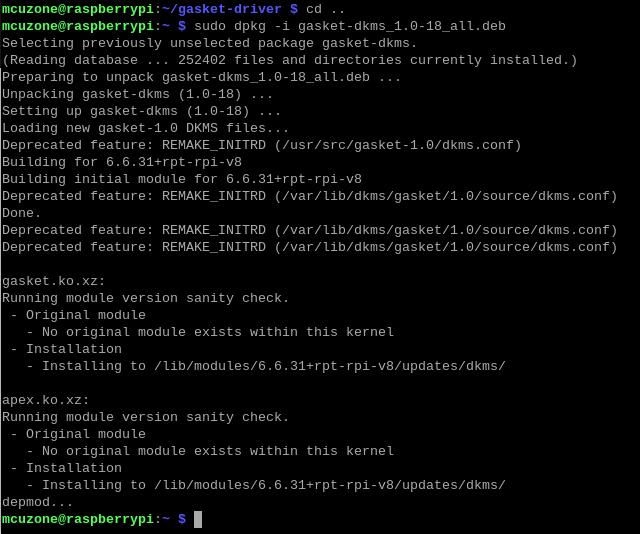
After the installation is complete, enter the following command to ensure that the driver and software were installed successfully:
sudo apt-get install gasket-dkms libedgetpu1-std

Then, add a udev rule to obtain device operation permissions:
sudo sh -c "echo 'SUBSYSTEM==\"apex\", MODE=\"0660\", GROUP=\"apex\"' >> /etc/udev/rules.d/65-apex.rules"
add user to apex:
sudo groupadd apex
sudo adduser $USER apex

Reboot the system after the setup is complete:
sudo reboot
4.5 Verification module testing and driver installation
After system starting, verification module testing and driver installation:
lspci -nn | grep 089a
ls /dev/apex_0

This board has a single TPU onboard, so you can see a TPU module:
By entering sudo lspci -v, you can see the driver loading:
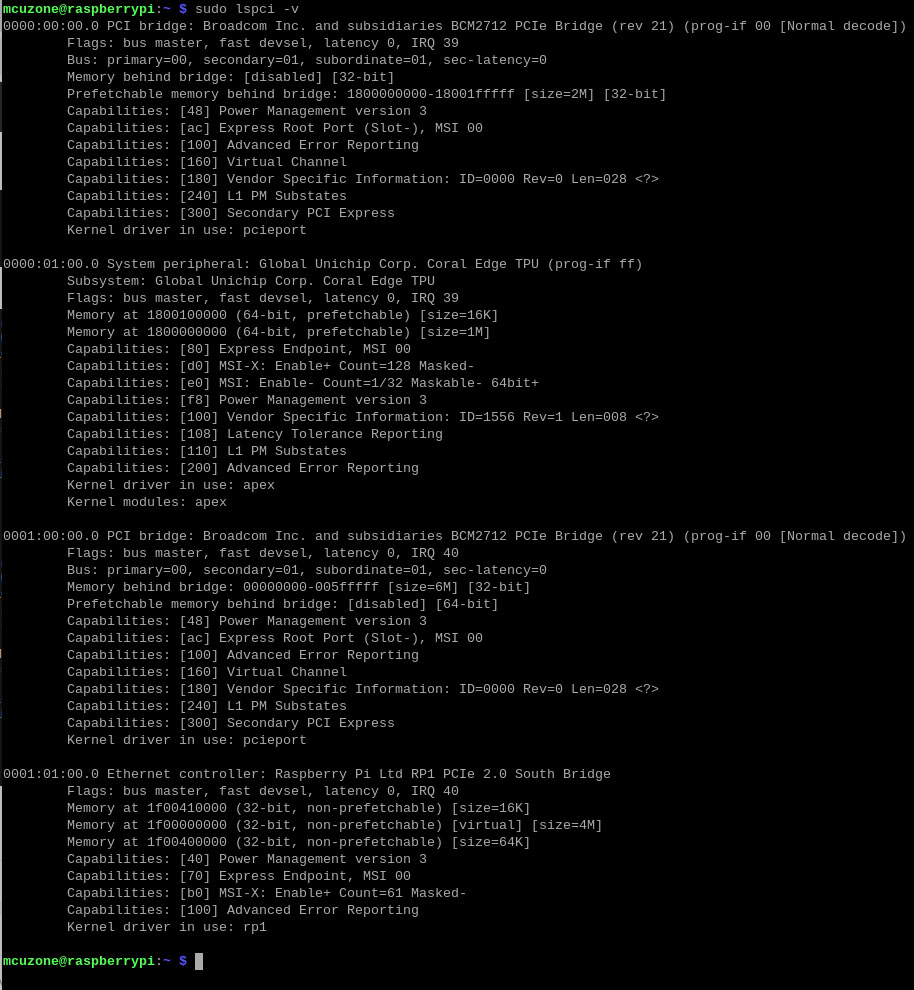
4.6 Configuration of the Code Execution Environment
Running Google TPU module code requires Python versions between 3.6 and 3.9, while the latest Raspberry Pi system is Python 3.11. Therefore, we need to use Pyenv to download an older version of Python.
First, install the depends:
sudo apt-get install -y make build-essential libssl-dev zlib1g-dev \libbz2-dev libreadline-dev libsqlite3-dev wget curl llvm libncurses5-dev \libncursesw5-dev xz-utils tk-dev libffi-dev liblzma-dev python3-openssl

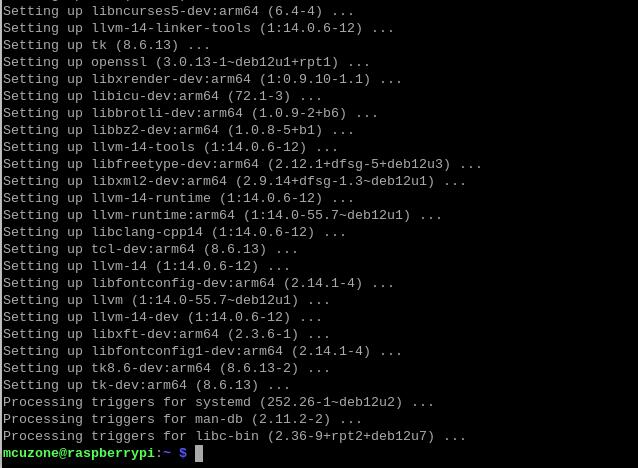
Install pyenv after the depends are installed:
curl https://pyenv.run | bash

Enter the command:
sudo nano ~/.bashrc
Or:
sudo mousepad ~/.bashrc
Add the codes in the ending of this file:
export PYENV_ROOT="$HOME/.pyenv"
[[ -d $PYENV_ROOT/bin ]] && export PATH="$PYENV_ROOT/bin:$PATH"
eval "$(pyenv init -)"

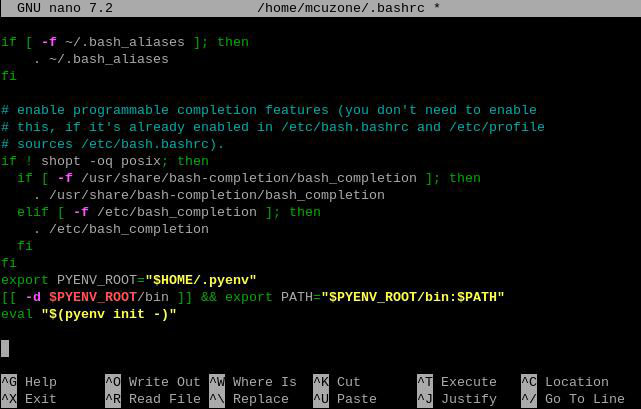
Save and exit after adding, then reload the shell:
exec "$SHELL"

Then, we can use pyenv to install an older version of Python:
pyenv install -v 3.8.8


After the installation is successful, we will change the system Python version to 3.8.8:
pyenv global 3.8.8
After the change is successful, you can check the current Python version is 3.8.8:
pyenv versions
python3 -V

4.7 Download the code and run the module
Enter the following commands in sequence to download:
mkdir coral && cd coral
git clone https://github.com/google-coral/pycoral.git
cd pycoral
cd test_data
git clone https://github.com/google-coral/test_data.git


Then, download the code and run the module:
pip3 install numpy
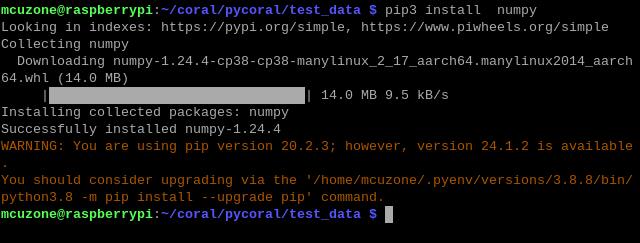
pip3 install Pillow

pip3 install --extra-index-url https://google-coral.github.io/py-repo/ pycoral
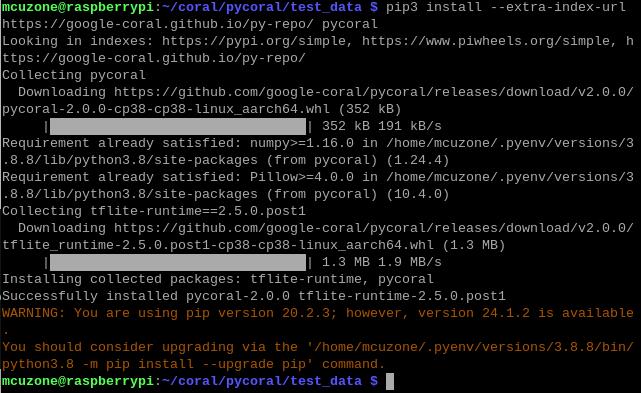
4.8 Run the code
After the module download is complete, back to the coral/pycoral path:
cd ..
Enter the following code to run it:

Note: You can copy the following code, but please paste it into a text editor first. Then, following the format shown above, remove any extra enter. After that, copy it again and paste it into the terminal to run.
python3 examples/classify_image.py \
--model test_data/test_data/mobilenet_v2_1.0_224_inat_bird_quant_edgetpu.tflite \
--labels test_data/test_data/inat_bird_labels.txt \
--input test_data/test_data/parrot.jpg
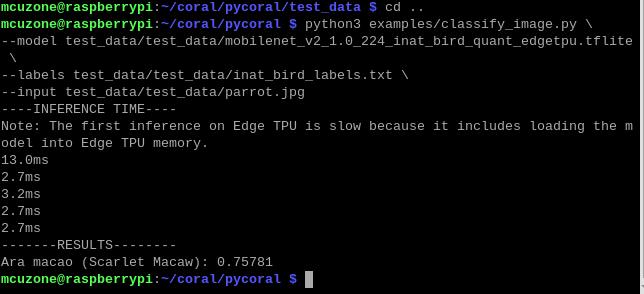
You should downloading a large amount of data from the internet out of China to use the testing of this development board, so users can contact our company after buying this development board to obtain a pre-configured Raspberry Pi OS image.
Contact Us
Email: mcuzone@vip.qq.com
Tel: +86(0)13957118045
If there are any omissions, errors, or infringements on this page, please contact us through the above methods. Thank you!
Copyright 2004-2024 Wildchip


 QQ:8204136