0001 MPRG4 EN:修订间差异
| (未显示2个用户的44个中间版本) | |||
| 第41行: | 第41行: | ||
http://www.mcuzone.com/wiki/0001_MPRG4/MPRG4_68.jpg | http://www.mcuzone.com/wiki/0001_MPRG4/MPRG4_68.jpg | ||
http://www.mcuzone.com/wiki/0001_MPRG4/ | http://www.mcuzone.com/wiki/0001_MPRG4/MPRG4_130.jpg | ||
http://www.mcuzone.com/wiki/0001_MPRG4/MPRG4_70.jpg | http://www.mcuzone.com/wiki/0001_MPRG4/MPRG4_70.jpg | ||
| 第56行: | 第56行: | ||
http://www.mcuzone.com/wiki/0001_MPRG4/MPRG4_98.jpg | http://www.mcuzone.com/wiki/0001_MPRG4/MPRG4_98.jpg | ||
{| class="wikitable" | |||
|+ | |||
!4G module | |||
!Band | |||
!4G module | |||
!Band | |||
|- | |||
|CAT 4G | |||
|• LTE FDD: Band 1/3/5/8 | |||
• LTE TDD: Band 34/38/39/40/41 | |||
|NL668-EU | |||
|• LTE FDD: Band 1/3/5/7/8/20 | |||
• WCDMA: Band 1/5/8 | |||
• GSM/GPRS/EDGE: 850/900/1800MHz | |||
|- | |||
|Qualcomm 4G/GPS | |||
|• LTE FDD: Band 1/3/5/8 | |||
• LTE TDD: Band 34/38/39/40/41 | |||
• WCDMA: Band 1/8 | |||
• TD-SCDMA: Band 34/39 | |||
• EVDO/CDMA1X: BC0 | |||
• GSM/GPRS/EDGE: 900/1800MHz(OPT) | |||
|NL668-EAU | |||
|• LTE FDD: Band 1/3/5/7/8/20/28 | |||
• LTE TDD: Band 38/40/41 | |||
• WCDMA: Band 1/5/8 | |||
• GSM/GPRS/EDGE: 850/900/1800MHz | |||
|- | |||
|NL668-AM | |||
|• LTE FDD: B2/4/5/12/13/17/66/71 | |||
• WCDMA: B2/4/5 | |||
| | |||
| | |||
|} | |||
== '''III. Work with Raspberry Pi OS''' == | == '''III. Work with Raspberry Pi OS''' == | ||
| 第69行: | 第108行: | ||
=== 3.1 View Ethernet === | === 3.1 View Ethernet === | ||
After the system starts, execute <code>ifconfig -a</code>, and the red box will indicate the extended RTL8111H Ethernet card | |||
==== 3.1.1 View Gigabit Ethernet ==== | |||
After the system starts, execute <code>ifconfig -a</code>, and the red box will indicate the extended RTL8111H Ethernet card: | |||
http://www.mcuzone.com/wiki/0001_MPRG4/MPRG4_51.jpg | http://www.mcuzone.com/wiki/0001_MPRG4/MPRG4_51.jpg | ||
By executing <code>ifconfig -a</code>, you can see that eth0 is the | By executing <code>ifconfig -a</code>, you can see that eth0 is the Ethernet port of the Raspberry Pi 5; the eth1 device is the extended RTL8111H network card (which provides four Gigabit Ethernet ports). | ||
http://www.mcuzone.com/wiki/0001_MPRG4/MPRG4_146.jpg | |||
==== 3.1.2 Test 4G LTE ==== | |||
If you have chosen the 4G LTE module, our 4G module is driver-free and automatically recognized in the Raspberry Pi OS. | |||
After the system starts, execute <code>ifconfig -a</code>, and the following is displayed: | |||
'''CAT4 4G:''' | |||
http://www.mcuzone.com/wiki/0001_MPRG4/MPRG4_147.jpg | |||
We execute <code>route</code> to view the routing table, and we can see that the network card "eth2" is listed first, indicating that 4G internet is being used by default at this time. | |||
http://www.mcuzone.com/wiki/0001_MPRG4/MPRG4_111.jpg | |||
'''Qualcomm 4G:''' | |||
http://www.mcuzone.com/wiki/0001_MPRG4/MPRG4_148.jpg | |||
We execute <code>route</code> to view the routing table, and we can see that the network card "usb0" is listed first, indicating that 4G internet is being used by default at this time. | |||
http://www.mcuzone.com/wiki/0001_MPRG4/MPRG4_114.jpg | |||
'''ZTE CAT4:''' | |||
http://www.mcuzone.com/wiki/0001_MPRG4/MPRG4_149.jpg | |||
We execute the <code>route</code> and check the routing table, and we can see that eth1 is listed first, which indicates that the RTL8111H expansion network port is currently being used as the default for internet access. | |||
http://www.mcuzone.com/wiki/0001_MPRG4/MPRG4_115.jpg | |||
If you want to prioritize the 4G network for internet access, you can execute the following command: | |||
<code>sudo ip route del default && sudo route add -net default netmask 0.0.0.0 gw 100.92.213.193</code> | |||
Explanation of these two commands (separated by '&&'): | |||
<code>sudo ip route del default</code>: Remove the default route from the routing table. | |||
<code>sudo route add -net default netmask 0.0.0.0 gw 100.92.213.193</code>: Add the gateway of the 4G network as a new default route (ensure to use the actual gateway address). | |||
After completing the execution, execute the <code>route</code> command to view the routing table. The current default route is the gateway of the 4G network (eth2 is listed first, which is ZTE CAT4): | |||
http://www.mcuzone.com/wiki/0001_MPRG4/MPRG4_116.jpg | |||
This way, the network will default to using the 4G connection. If you need to switch back to defaulting to the wired network, please execute the following command: | |||
<code>sudo ip route del default && sudo route add -net default netmask 0.0.0.0 gw 192.168.8.1</code> | |||
Or, you can restart the system. | |||
Note that 192.168.8.1 is the default gateway for the 4G module; please refer to the actual configuration. | |||
'''''Note: After a reboot, the routing table resets. To ensure the network continues to use the 4G connection as the default route post-restart, you'll need to execute <code>sudo ip route del default && sudo route add -net default netmask 0.0.0.0 gw 100.92.213.193</code> again.''''' | |||
'''ZTE CAT4-EU:''' | |||
http://www.mcuzone.com/wiki/0001_MPRG4/MPRG4_150.jpg | |||
We execute the <code>route</code> and check the routing table, and we can see that eth1 is listed first, which indicates that the RTL8111H expansion network port is currently being used as the default for internet access. | |||
http://www.mcuzone.com/wiki/0001_MPRG4/MPRG4_117.jpg | |||
If you want to prioritize the 4G network for internet access, you can execute the following command: | |||
<code>sudo ip route del default && sudo route add -net default netmask 0.0.0.0 gw 10.42.145.197</code> | |||
After completing the execution, execute the <code>route</code> command to view the routing table. The current default route is the gateway of the 4G network (eth2 is listed first, which is ZTE CAT4): | |||
http://www.mcuzone.com/wiki/0001_MPRG4/MPRG4_118.jpg | |||
The rest of the operations are the same as those for the ZTE CAT4 module. | |||
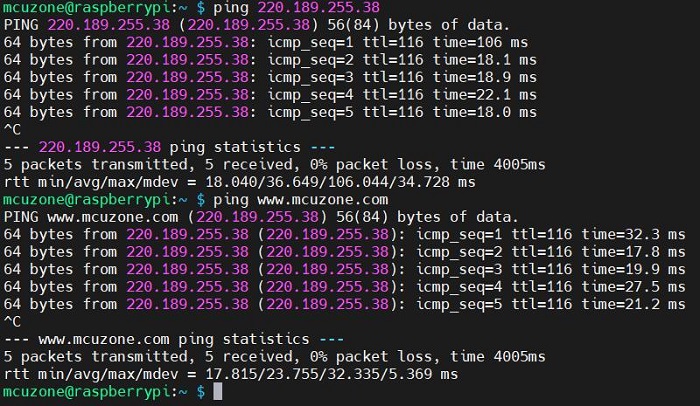
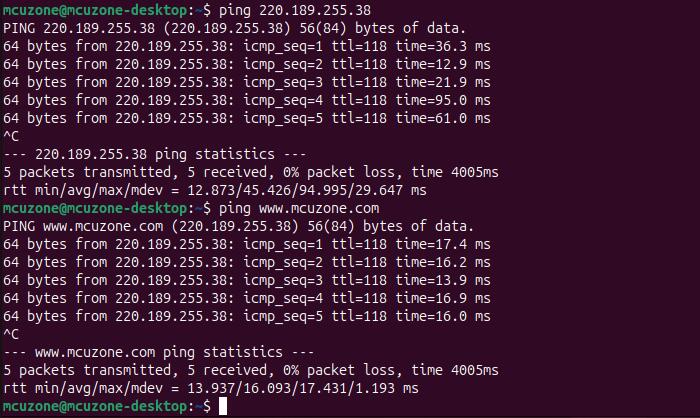
Taking CAT4 4G as an example, it defaults to using 4G for internet access. If we successfully ping both an IP address and a domain name, it indicates that the 4G module is working properly: | |||
http://www.mcuzone.com/wiki/0001_MPRG4/MPRG4_112.jpg | |||
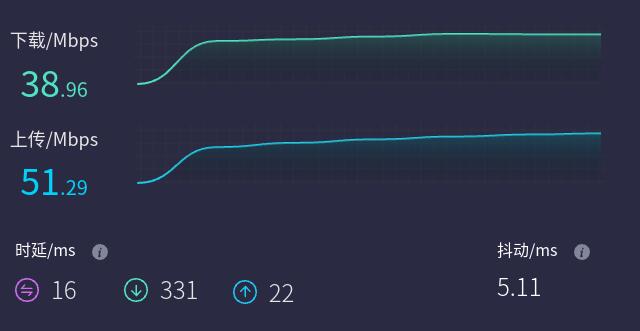
Open https://www.speedtest.cn/ to perform a speed test, and the results are as follows: | |||
http://www.mcuzone.com/wiki/0001_MPRG4/MPRG4_113.jpg | |||
'''''Note: Network speed tests are affected by the network environment and testing methods. Please refer to the actual speed, as this test is for reference only.''''' | |||
=== 3.2 Test Ethernet === | === 3.2 Test Ethernet === | ||
| 第144行: | 第266行: | ||
http://www.mcuzone.com/wiki/0001_MPRG4/MPRG4_57.jpg | http://www.mcuzone.com/wiki/0001_MPRG4/MPRG4_57.jpg | ||
After installation, you can | After installation, you can executing <code>ifconfig -a</code>, you should see devices starting with "'''enp...'''", which are the four expanded Gigabit Ethernet ports. This indicates that the driver has been installed successfully. | ||
http://www.mcuzone.com/wiki/0001_MPRG4/MPRG4_61.jpg | |||
At this moment, the four extended Gigabit Ethernet ports are not connected to the upstream router, so they have not obtained IP addresses. | At this moment, the four extended Gigabit Ethernet ports are not connected to the upstream router, so they have not obtained IP addresses. | ||
=== 4.2 Test Ethernet === | === 4.2 Test Ethernet === | ||
| 第155行: | 第277行: | ||
<code>sudo apt-get install iperf3</code> | <code>sudo apt-get install iperf3</code> | ||
After installation, '''connect one of the four | After installation, '''connect one of the four Gigabit Ethernet ports to the upstream router''', restart the system, and run `ifconfig -a`. You should see that the "'''enp...'''" has obtained an IP address. | ||
http://www.mcuzone.com/wiki/0001_MPRG4/MPRG4_64.jpg | http://www.mcuzone.com/wiki/0001_MPRG4/MPRG4_64.jpg | ||
| 第171行: | 第293行: | ||
It can basically achieve gigabit speed. | It can basically achieve gigabit speed. | ||
=== 4.4 Test 4G LTE === | |||
If you have opted for the accompanying 4G LTE module, all our 4G modules are driver-free in the Ubuntu OS, requiring no additional drivers to be installed. The system automatically recognizes them as enx... devices. The previous chapters have already explained how to install the onboard Gigabit Ethernet driver. Now when we execute <code>ifconfig -a</code>, the display is as follows: | |||
http://www.mcuzone.com/wiki/0001_MPRG4/MPRG4_151.jpg | |||
We execute <code>route</code> to view the routing table, and we can see that the network card starting with "enx" is listed first, indicating that 4G internet is being used by default at this time. | |||
http://www.mcuzone.com/wiki/0001_MPRG4/MPRG4_120.jpg | |||
Taking CAT4 4G as an example, it defaults to using 4G for internet access. If we successfully ping both an IP address and a domain name, it indicates that the 4G module is working properly: | |||
http://www.mcuzone.com/wiki/0001_MPRG4/MPRG4_122.jpg | |||
Open https://test.ustc.edu.cn/ to perform a speed test, and the results are as follows: | |||
http://www.mcuzone.com/wiki/0001_MPRG4/MPRG4_121.jpg | |||
''''' | '''''Note: Network speed tests are affected by the network environment and testing methods. Please refer to the actual speed, as this test is for reference only.''''' | ||
== '''V. Work with OpenWrt''' == | == '''V. Work with OpenWrt''' == | ||
=== 5.1 Overview === | === 5.1 Overview === | ||
The MPRG4 | The MPRG4 board can be configured in OpenWrt as a switch with '''one input and four outputs'''. We can configure the Raspberry Pi5's Ethernet port as the WAN port, and use the four Ethernet ports on the expansion board as LAN ports, which can be used by other devices to obtain IP addresses within the same subnet. | ||
System version: openwrt-bcm27xx-bcm2712-rpi-5-squashfs-sysupgrade-linux-6.1.100-20240805.img.gz | System version: openwrt-bcm27xx-bcm2712-rpi-5-squashfs-sysupgrade-linux-6.1.100-20240805.img.gz | ||
| 第199行: | 第336行: | ||
Run <code>ifconfig -a</code>, and you can see that the extended Gigabit Ethernet port (eth1) has been recognized: | Run <code>ifconfig -a</code>, and you can see that the extended Gigabit Ethernet port (eth1) has been recognized: | ||
http://www.mcuzone.com/wiki/0001_MPRG4/ | http://www.mcuzone.com/wiki/0001_MPRG4/MPRG4_152.jpg | ||
=== 5.3 Configure the WAN port and LAN ports === | === 5.3 Configure the WAN port and LAN ports === | ||
| 第240行: | 第377行: | ||
http://www.mcuzone.com/wiki/0001_MPRG4/MPRG4_30.png | http://www.mcuzone.com/wiki/0001_MPRG4/MPRG4_30.png | ||
基本能达到千兆的速度。 | |||
'''''注意:网络测速受网络环境和测试方法影响,速度请以实际为准,本测试仅供参考。''''' | |||
=== 5.5 Test 4G module === | |||
如果您选配了4G LTE模块,我们的4G模组在OpenWrt系统下均免驱,自动识别。 | |||
插上4G模组(需插入SIM卡),将4个千兆网口之一与PC相连,拔掉树莓派原生网口的网线,启动并登录OpenWrt系统后,点击“系统 - TTYD终端”,我们便可进入OpenWrt自带的终端,使用用户名 <code>root</code>, 以及密码 <code>password</code>登录终端即可: | |||
http://www.mcuzone.com/wiki/0001_MPRG4/MPRG4_65.jpg | |||
运行<code>ifconfig -a</code>,可见已经识别4G模组: | |||
'''CAT4 4G或者ZTE CAT4(识别为eth2):''' | |||
http://www.mcuzone.com/wiki/0001_MPRG4/MPRG4_154.jpg | |||
'''高通4G(识别为usb0):''' | |||
http://www.mcuzone.com/wiki/0001_MPRG4/MPRG4_164.jpg | |||
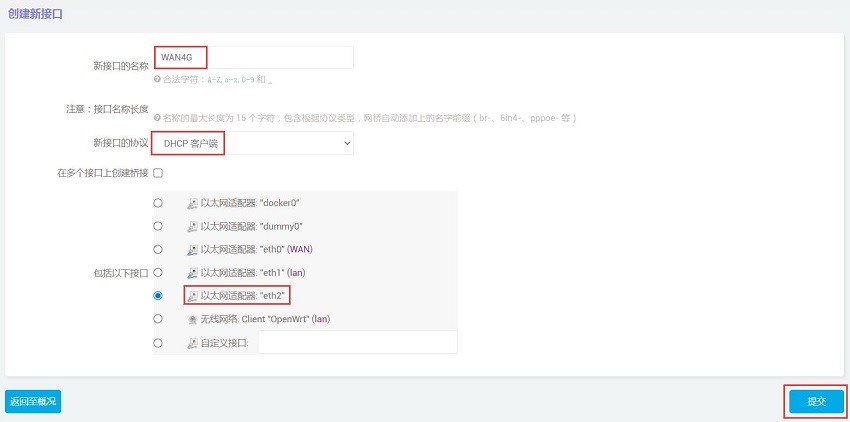
以CAT4 4G为例,我们将4G模组设置为WAN口,步骤如下: | |||
我们点击“'''网络'''” - “'''接口'''”: | |||
http://www.mcuzone.com/wiki/0001_MPRG4/MPRG4_155.jpg | |||
随后我们点击“'''添加新接口'''”,设置好名称、接口协议,将WAN口设置为eth2(如果是其它4G模组,请按照实际的网络标识进行设置),“新接口的名称”可以自定义设置: | |||
http://www.mcuzone.com/wiki/0001_MPRG4/MPRG4_156.jpg | |||
http://www.mcuzone.com/wiki/0001_MPRG4/MPRG4_157.jpg | |||
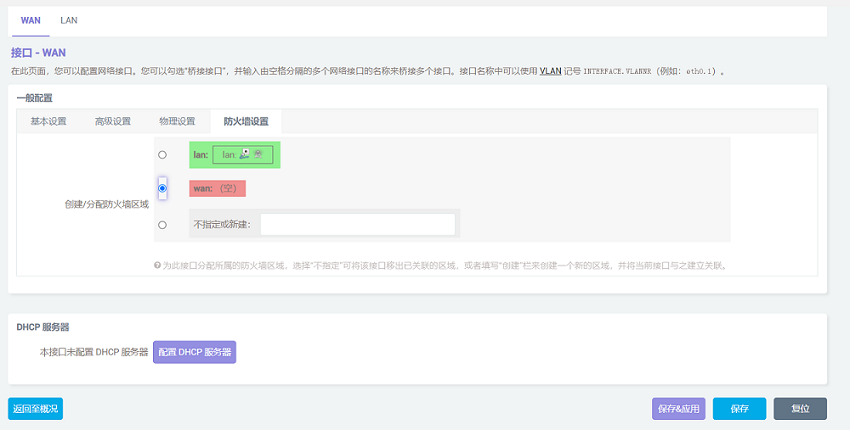
点击“'''提交'''”后在“'''防火墙设置'''”选中“'''WAN'''”。 | |||
http://www.mcuzone.com/wiki/0001_MPRG4/MPRG4_158.jpg | |||
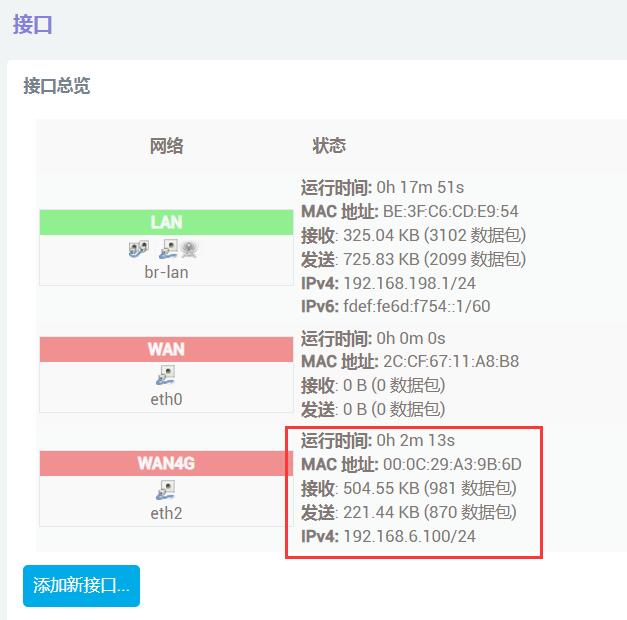
设置完后我们点击“'''保存&应用'''”,成功后自动返回接口页面,稍等片刻,我们就能看到CAT4 4G获得了IP地址,这样我们就能通过CAT4 4G上网了: | |||
http://www.mcuzone.com/wiki/0001_MPRG4/MPRG4_159.jpg | |||
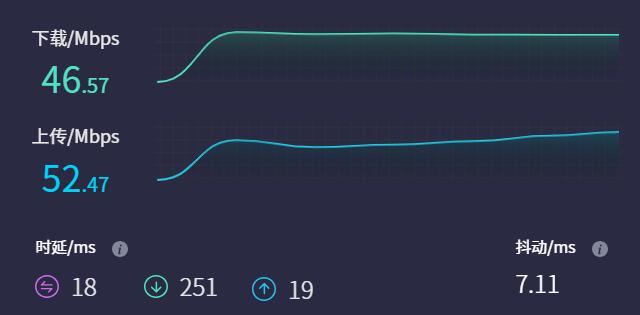
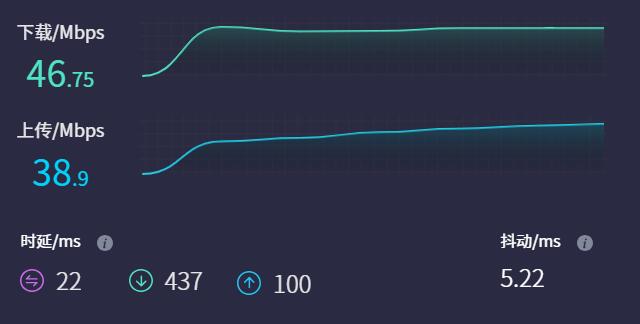
我们在PC端测试4G网络的速度,打开[https://www.speedtest.cn/ 测速网站]进行网速测试,结果如下: | |||
'''CAT4 4G:''' | |||
http://www.mcuzone.com/wiki/0001_MPRG4/MPRG4_160.jpg | |||
'''高通4G:''' | |||
http://www.mcuzone.com/wiki/0001_MPRG4/MPRG4_163.jpg | |||
'''ZTE CAT4:''' | |||
http://www.mcuzone.com/wiki/0001_MPRG4/MPRG4_162.jpg | |||
'''''注意:网络测速受网络环境和测试方法影响,速度请以实际为准,本测试仅供参考。''''' | |||
== '''VI. Radxa Rock 5C (RK3588S2) with MPRG4''' == | == '''VI. Radxa Rock 5C (RK3588S2) with MPRG4''' == | ||
| 第325行: | 第519行: | ||
=== 6.4 Test 4G module === | === 6.4 Test 4G module === | ||
The 4G modules provided by our company feature driver-free, auto-dialing, system auto-recognition, and plug-and-play functionalities. The Rock 5C can be equipped with CAT4 4G and Qualcomm 4G modules, which are automatically recognized in the system as devices starting with "enx". | |||
http://www.mcuzone.com/wiki/0001_MPRG4/MPRG4_129.jpg | |||
==== 6.4.1 | ==== 6.4.1 Connect to 4G network ==== | ||
Connect the 4G module to the Rock 5C via the USB interface, start the system, and execute <code>lsusb</code> in the terminal. The following will be displayed, with the red box indicating the 4G module: | |||
CAT4 | CAT4 4G: | ||
http://www.mcuzone.com/wiki/0001_MPRG4/MPRG4_89.jpg | http://www.mcuzone.com/wiki/0001_MPRG4/MPRG4_89.jpg | ||
Qualcomm 4G: | |||
http://www.mcuzone.com/wiki/0001_MPRG4/MPRG4_90.jpg | http://www.mcuzone.com/wiki/0001_MPRG4/MPRG4_90.jpg | ||
Below is an example using the CAT4 4G module. Connect one of the native Ethernet ports of the Rock 5C and one of the four extended Gigabit Ethernet ports to the upstream router, restart the system, and then execute <code>sudo ifconfig -a</code>. The display will be as follows: | |||
http://www.mcuzone.com/wiki/0001_MPRG4/ | http://www.mcuzone.com/wiki/0001_MPRG4/MPRG4_153.jpg | ||
It shows that the IP address has been correctly obtained (as indicated in the red box). | |||
Execute <code>ip route</code>, and you can see that the device starting with "enx" is listed first, therefore prioritizing internet access through the 4G network. | |||
http://www.mcuzone.com/wiki/0001_MPRG4/MPRG4_92.jpg | http://www.mcuzone.com/wiki/0001_MPRG4/MPRG4_92.jpg | ||
At this point, if we ping both IP addresses and domain names, and they are successful, it indicates that the 4G module is working properly: | |||
http://www.mcuzone.com/wiki/0001_MPRG4/MPRG4_93.jpg | http://www.mcuzone.com/wiki/0001_MPRG4/MPRG4_93.jpg | ||
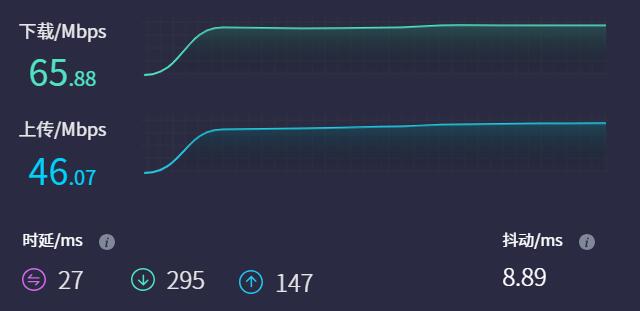
Open https://www.speedtest.cn/ to perform a speed test, and the results are as follows: | |||
http://www.mcuzone.com/wiki/0001_MPRG4/ | http://www.mcuzone.com/wiki/0001_MPRG4/MPRG4_102.jpg | ||
''''' | '''''Note: Network speed tests are affected by the network environment and testing methods. The actual speed may vary, so this test is for reference only.''''' | ||
==== 6.4.2 | ==== 6.4.2 Modification of Network Priority ==== | ||
Taking CAT4 4G as an example, in the previous section we checked the routing table, and by default, internet access is prioritized through the 4G network. | |||
If you want to prioritize the wired network for internet access, you can execute the following command: | |||
<code>sudo ip route del default && sudo route add -net default netmask 0.0.0.0 gw 192.168.8.1</code> | <code>sudo ip route del default && sudo route add -net default netmask 0.0.0.0 gw 192.168.8.1</code> | ||
Explanation of these two commands (separated by '&&'): | |||
<code>sudo ip route del default</code> | <code>sudo ip route del default</code>: Remove the default route from the routing table. | ||
<code>sudo route add -net default netmask 0.0.0.0 gw 192.168.8.1</code> | <code>sudo route add -net default netmask 0.0.0.0 gw 192.168.8.1</code>: Add the gateway of the wired network as a new default route (ensure to use the actual gateway address). | ||
After completing the execution, execute the <code>ip route</code> command to view the routing table. The current default route is the gateway of the wired network (end1 is listed first, it is the native Ethernet port of the Rock 5C.): | |||
http://www.mcuzone.com/wiki/0001_MPRG4/MPRG4_95.jpg | http://www.mcuzone.com/wiki/0001_MPRG4/MPRG4_95.jpg | ||
This way, the network will default to using the wired connection. If you need to switch back to defaulting to the 4G network, please execute the following command: | |||
<code>sudo ip route del default && sudo route add -net default netmask 0.0.0.0 gw 192.168.6.1</code> | <code>sudo ip route del default && sudo route add -net default netmask 0.0.0.0 gw 192.168.6.1</code> | ||
Or, you can restart the system. | |||
Note that 192.168.6.1 is the default gateway for the 4G module; please refer to the actual configuration. | |||
''''' | '''''Note: After a reboot, the routing table resets. To ensure the network continues to use the wired or wireless connection as the default route post-restart, you'll need to execute <code>sudo ip route del default && sudo route add -net default netmask 0.0.0.0 gw 192.168.8.1</code> again.''''' | ||
==== 6.4.3 | ==== 6.4.3 AT command operation ==== | ||
Taking the CAT4 4G as an example, use <code>lsusb</code> to view USB devices, and the red box indicates the 4G module: | |||
http://www.mcuzone.com/wiki/0001_MPRG4/MPRG4_89.jpg | http://www.mcuzone.com/wiki/0001_MPRG4/MPRG4_89.jpg | ||
Note down the ID value of the 4G module: 1286 4e3d. | |||
Use the following command to enable the ttyUSB serial port of the 4G module, where the value after echo is the ID value recorded earlier: | |||
<code>sudo modprobe option</code> | <code>sudo modprobe option</code> | ||
| 第398行: | 第594行: | ||
<code>sudo sh -c 'echo 1286 4e3d > /sys/bus/usb-serial/drivers/option1/new_id'</code> | <code>sudo sh -c 'echo 1286 4e3d > /sys/bus/usb-serial/drivers/option1/new_id'</code> | ||
After executing the above two commands, execute the following: | |||
<code>ls /dev/ttyUSB*</code> | <code>ls /dev/ttyUSB*</code> | ||
At this point, you should be able to see three devices under the dev directory: ttyUSB0, ttyUSB1, ttyUSB2. | |||
http://www.mcuzone.com/wiki/0001_MPRG4/MPRG4_96.jpg | http://www.mcuzone.com/wiki/0001_MPRG4/MPRG4_96.jpg | ||
Then, use a serial communication tool to open the specific serial port (AT command port): | |||
Install the serial port software minicom: | |||
<code>sudo apt-get install minicom</code> | <code>sudo apt-get install minicom</code> | ||
Open the AT command serial port using minicom: | |||
<code>sudo minicom -D /dev/ttyUSB1</code> | <code>sudo minicom -D /dev/ttyUSB1</code> | ||
(Note: Which serial port to use should be determined by the ability to enter and execute AT commands without garbled or erratic output after accessing that serial port.) | |||
If you need to view echo responses, type the command: <code>ate1</code>, then press Enter. You can continue to type other commands, and after pressing Enter, you will see the results. | |||
http://www.mcuzone.com/wiki/0001_MPRG4/MPRG4_97.jpg | http://www.mcuzone.com/wiki/0001_MPRG4/MPRG4_97.jpg | ||
Common AT commands: | |||
1 | |||
1) Check if the SIM card is detected: | |||
<code>at+cpin?</code> | <code>at+cpin?</code> | ||
Return ready to indicate the card has been recognized, if return error, you need to check the hardware. | |||
2 | 2) Check antenna signal quality: | ||
<code>at+csq</code> | <code>at+csq</code> | ||
eturn values between 26 and 31 indicate a good signal, with 31 representing a full signal strength; return values between 20 and 25 indicate a barely acceptable signal; return values below 20 indicate a poor signal or that the antenna might not be connected. | |||
3 | 3) Check network registration status: | ||
<code>at+cops?</code> | <code>at+cops?</code> | ||
Normally, it should return the network supporter's code: 7, where 7 represents 4G. | |||
Note: The above command <code>at+csq</code> should not include a question mark, while the other two commands require a question mark. | |||
4 | 4) View the SIM card's IMEI code: | ||
<code>at+cgsn</code> | <code>at+cgsn</code> | ||
5. | 5) Reset 4G module (Sometimes, if you reinsert the SIM card, hot swapping may not work; in such cases, you can use this reset command to reset the module.): | ||
<code>at+reset</code> | <code>at+reset</code> | ||
6 | 6) Disable radio frequency: | ||
<code>at+cfun=0</code> | <code>at+cfun=0</code> | ||
Enable radio frequency: | |||
<code>at+cfun=1</code> | <code>at+cfun=1</code> | ||
The two commands mentioned above can be used in pairs to allow the module to re-register with the network without restarting the 4G module. | |||
==== 6.4.4 | ==== 6.4.4 Modify the IP address of the 4G module ==== | ||
If the default 4G IP address assigned at the factory conflicts with the IP address being used by the user, or if there is a need to modify the IP address, you can change the 4G module's IP to directly obtain a public IP. Please execute the AT command: | |||
'''CAT4 | '''CAT4 4G:''' | ||
Execute the AT command: | |||
<code>AT+ROUTEIP=<newip></code> | <code>AT+ROUTEIP=<newip></code> | ||
Note: only addresses in the format of 192.168.x.1 are supported. If you set <code>AT+ROUTEIP=192.168.3.1</code>, the final IP address obtained will be 192.168.3.100. After making the changes, you need to power off and restart the system. | |||
Query current IP: <code>AT+ROUTEIP?</code>, it returns two values, the first one is the old IP, and the second one is the new IP. | |||
Test command: <code>AT+ROUTEIP=?</code> | |||
''' | '''Qualcomm 4G:''' | ||
Set the 4G module's IP to directly obtain a public IP. Please execute the AT command: | |||
Set the IP to public: <code>AT+GTIPPASS=1</code> | |||
Set the IP to private: <code>AT+GTIPPASS=0</code> | |||
Check whether the current IP is a public or private IP: <code>AT+GTIPPASS?</code> | |||
After modifying the IP, a power cycle reboot is required for the changes to take effect. | |||
{{Contact_Us_icon}} | {{Contact_Us_icon}} | ||
[http://wiki.mcuzone.com/index.php?title=0001_MPRG4(Designed_based_on_Raspberry_Pi_5_PCIe)&veaction=edit T] | [http://wiki.mcuzone.com/index.php?title=0001_MPRG4(Designed_based_on_Raspberry_Pi_5_PCIe)&veaction=edit T] | ||
2025年2月28日 (五) 17:35的最新版本
Keywords
Raspberry Pi 5 MPRG4 Quad-Gigabit Ethernet Expansion Board Pi OS Ubuntu OpenWrt software router switch
I. Introduction
The MPRG4 (also known as MPG4) is a Quad-Gigabit Ethernet expansion board designed specifically for the Raspberry Pi 5, utilizing the PCIe interface. This expansion board connects the RTL8111H PCIe Ethernet controller via the PCIe interface, and then extends into four Gigabit Ethernet ports through a switch chip. It can be used in the following scenarios:
1. In Raspberry Pi or Ubuntu OS, one network port connected to the upstream router, and the remaining three network ports providing network access to other nearby devices (all four network ports should be in the same subnet), it can save an additional external switch and power supply.
2. In OpenWrt OS, configure the native gigabit port of RPI5 as the WAN port, and the four extended ports as LAN ports, providing network access for up to four devices.

Note1: The four Gigabit ports have independent IP addresses but are located within the same subnet, with addresses assigned by the upstream router from its address pool. If the upstream router is not connected, Raspberry Pi or Ubuntu OS will be unable to obtain a valid IP address (they will receive an IP address in the range of 169.254.xx.xx, indicating that there is only a physical connection but no valid IP address).
Note2: In the Raspberry Pi or Ubuntu OS, if the network cable is not plugged in at startup, the system will obtain an IP address like 169.254.xx.xx after a while. At this time, even if you plug in a network cable from an upstream router, the system will not obtain a valid IP address. You need to press the reset button to acquire a valid IP address again.
The expansion board is driver-free on the official Raspberry Pi OS and OpenWrt. However, on the Ubuntu OS, you need to install the driver.
II. Hardware Resources
1. It connected via a 16-pin 0.5mm PCIe to Raspberry Pi 5.
2. Onboard RTL8111H chip, enabling PCIe to Gigabit Ethernet.
3. Four Gigabit Ethernet.
4. A PWR LED.
5. A switch reset button (Switch RST).
6. One extension power button for Raspberry Pi 5 (Raspberry Pi 5 cotians a power button, with additional reserved pinholes for extension power buttons).
7. Size: 86mm*75mm.
8. The circuit board uses an immersion gold process, is produced in a lead-free manufacturing process, and the material is UL and RoHS certified with a fire resistance rating of 94V-0.
9. Optional metal case.
10. Optional 3D-printed base to protect your desk from scratches.9.


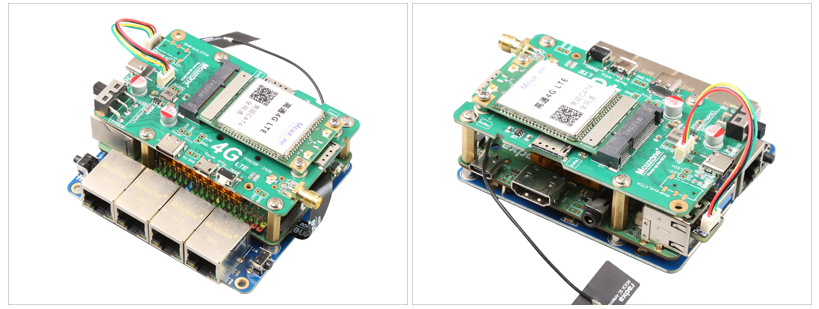
A 4G module can be installed on top of the Raspberry Pi 5 to set up a 4G router. The 4G module is an optional module.


| 4G module | Band | 4G module | Band |
|---|---|---|---|
| CAT 4G | • LTE FDD: Band 1/3/5/8
• LTE TDD: Band 34/38/39/40/41 |
NL668-EU | • LTE FDD: Band 1/3/5/7/8/20
• WCDMA: Band 1/5/8 • GSM/GPRS/EDGE: 850/900/1800MHz |
| Qualcomm 4G/GPS | • LTE FDD: Band 1/3/5/8
• LTE TDD: Band 34/38/39/40/41 • WCDMA: Band 1/8 • TD-SCDMA: Band 34/39 • EVDO/CDMA1X: BC0 • GSM/GPRS/EDGE: 900/1800MHz(OPT) |
NL668-EAU | • LTE FDD: Band 1/3/5/7/8/20/28
• LTE TDD: Band 38/40/41 • WCDMA: Band 1/5/8 • GSM/GPRS/EDGE: 850/900/1800MHz |
| NL668-AM | • LTE FDD: B2/4/5/12/13/17/66/71
• WCDMA: B2/4/5 |
III. Work with Raspberry Pi OS
Under the Raspberry Pi OS, the necessary drivers are integrated by default, so no additional driver installation is required, and you can use it directly.
The version of the Raspberry Pi OS is: 2024-07-04-raspios-bookworm-arm64.img.xz
You can download the Raspberry Pi OS in:
https://www.raspberrypi.com/software/operating-systems/#raspberry-pi-os-64-bit
3.1 View Ethernet
3.1.1 View Gigabit Ethernet
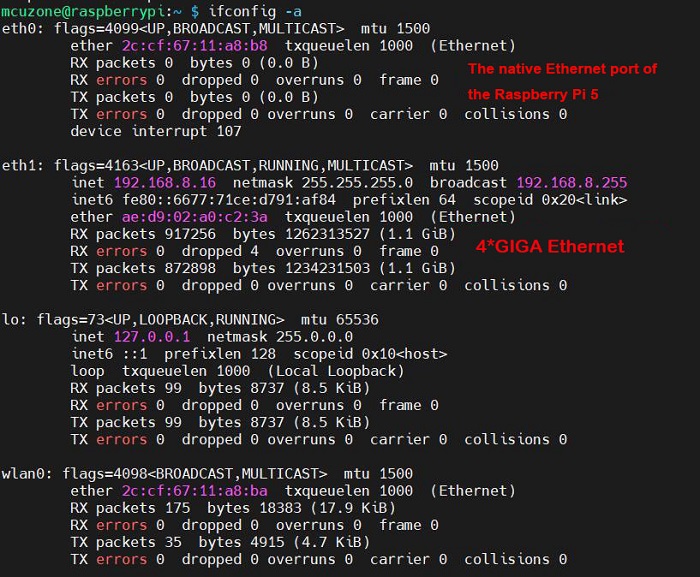
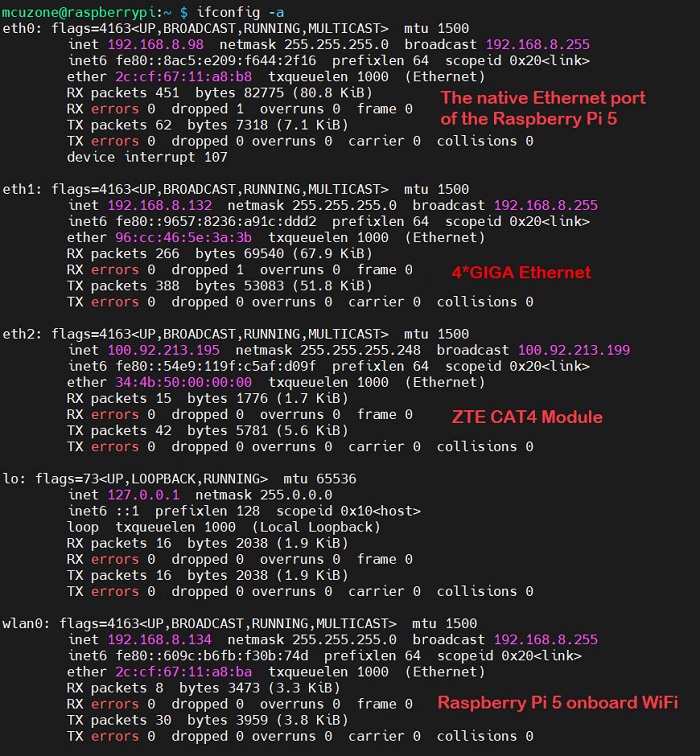
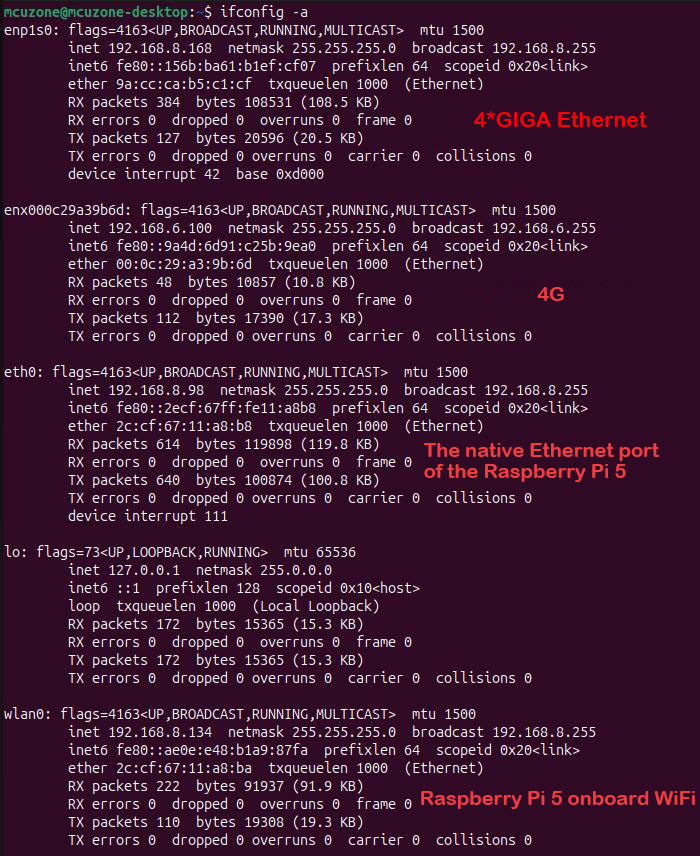
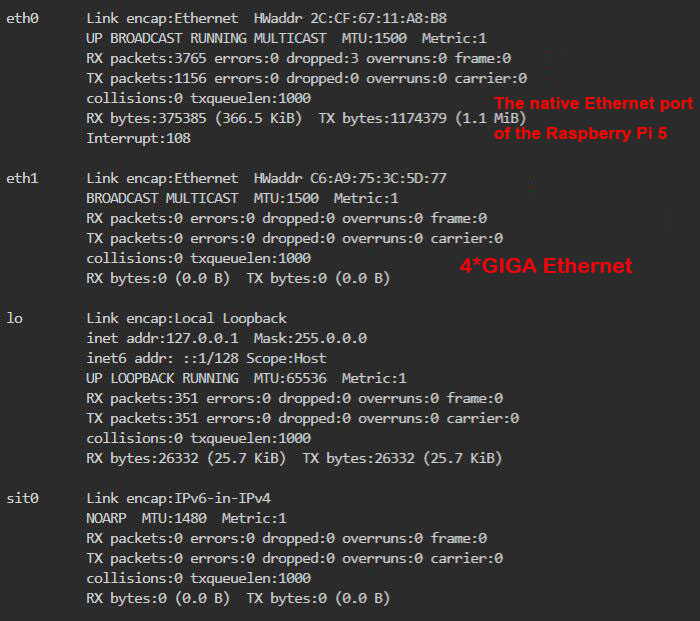
After the system starts, execute ifconfig -a, and the red box will indicate the extended RTL8111H Ethernet card:

By executing ifconfig -a, you can see that eth0 is the Ethernet port of the Raspberry Pi 5; the eth1 device is the extended RTL8111H network card (which provides four Gigabit Ethernet ports).
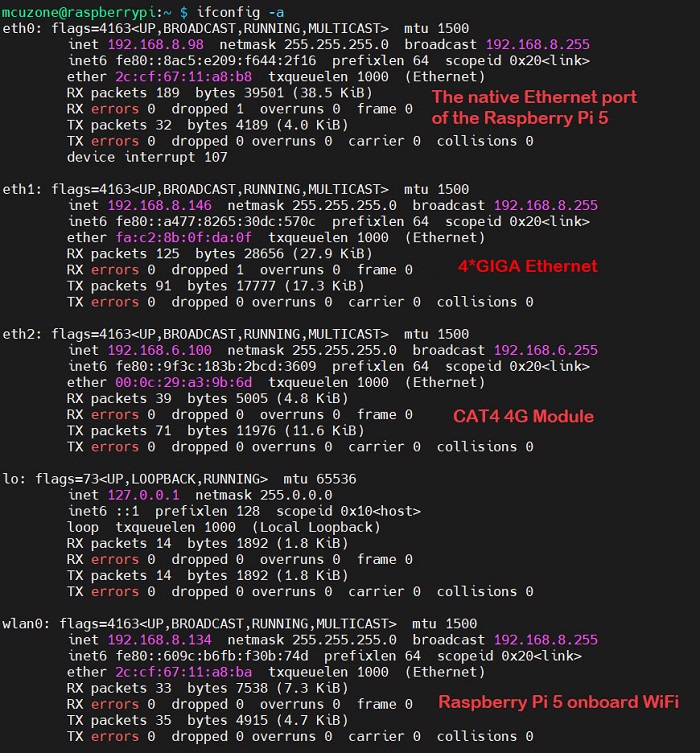
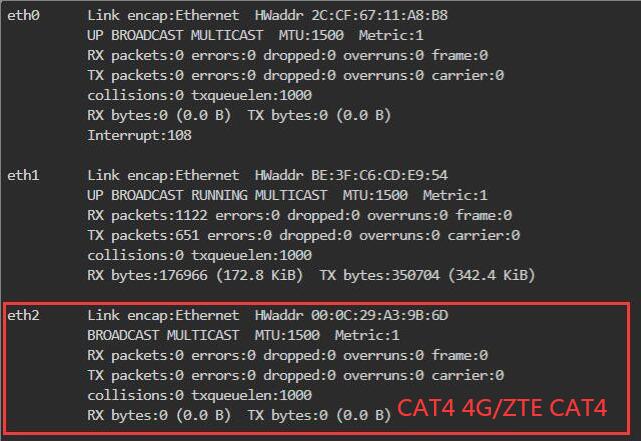
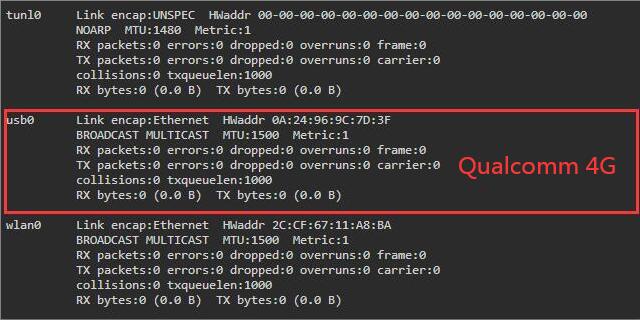
3.1.2 Test 4G LTE
If you have chosen the 4G LTE module, our 4G module is driver-free and automatically recognized in the Raspberry Pi OS.
After the system starts, execute ifconfig -a, and the following is displayed:
CAT4 4G:
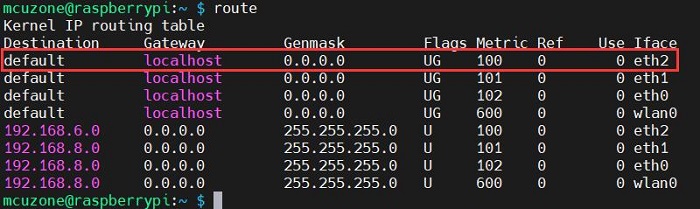
We execute route to view the routing table, and we can see that the network card "eth2" is listed first, indicating that 4G internet is being used by default at this time.
Qualcomm 4G:
We execute route to view the routing table, and we can see that the network card "usb0" is listed first, indicating that 4G internet is being used by default at this time.
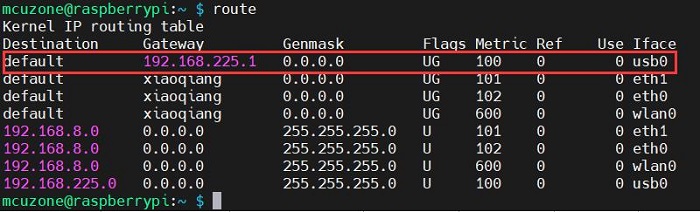
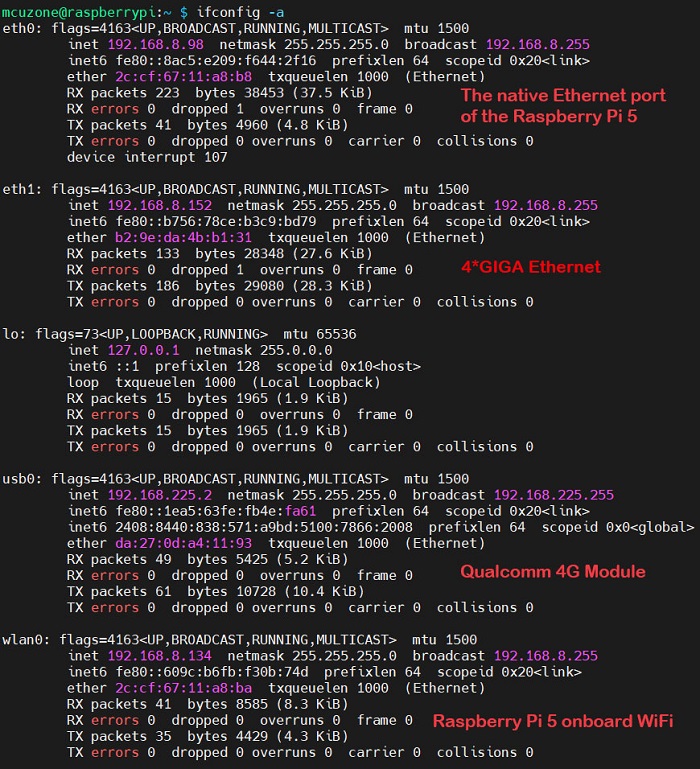
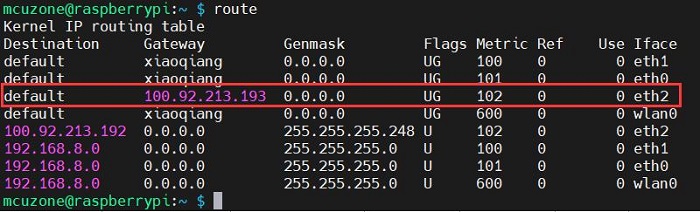
ZTE CAT4:
We execute the route and check the routing table, and we can see that eth1 is listed first, which indicates that the RTL8111H expansion network port is currently being used as the default for internet access.
If you want to prioritize the 4G network for internet access, you can execute the following command:
sudo ip route del default && sudo route add -net default netmask 0.0.0.0 gw 100.92.213.193
Explanation of these two commands (separated by '&&'):
sudo ip route del default: Remove the default route from the routing table.
sudo route add -net default netmask 0.0.0.0 gw 100.92.213.193: Add the gateway of the 4G network as a new default route (ensure to use the actual gateway address).
After completing the execution, execute the route command to view the routing table. The current default route is the gateway of the 4G network (eth2 is listed first, which is ZTE CAT4):
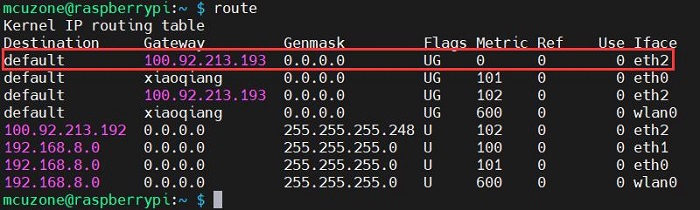
This way, the network will default to using the 4G connection. If you need to switch back to defaulting to the wired network, please execute the following command:
sudo ip route del default && sudo route add -net default netmask 0.0.0.0 gw 192.168.8.1
Or, you can restart the system.
Note that 192.168.8.1 is the default gateway for the 4G module; please refer to the actual configuration.
Note: After a reboot, the routing table resets. To ensure the network continues to use the 4G connection as the default route post-restart, you'll need to execute sudo ip route del default && sudo route add -net default netmask 0.0.0.0 gw 100.92.213.193 again.
ZTE CAT4-EU:

We execute the route and check the routing table, and we can see that eth1 is listed first, which indicates that the RTL8111H expansion network port is currently being used as the default for internet access.

If you want to prioritize the 4G network for internet access, you can execute the following command:
sudo ip route del default && sudo route add -net default netmask 0.0.0.0 gw 10.42.145.197
After completing the execution, execute the route command to view the routing table. The current default route is the gateway of the 4G network (eth2 is listed first, which is ZTE CAT4):

The rest of the operations are the same as those for the ZTE CAT4 module.
Taking CAT4 4G as an example, it defaults to using 4G for internet access. If we successfully ping both an IP address and a domain name, it indicates that the 4G module is working properly:
Open https://www.speedtest.cn/ to perform a speed test, and the results are as follows:
Note: Network speed tests are affected by the network environment and testing methods. Please refer to the actual speed, as this test is for reference only.
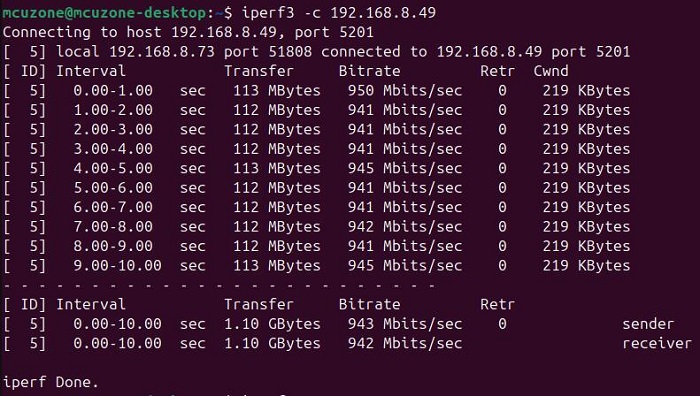
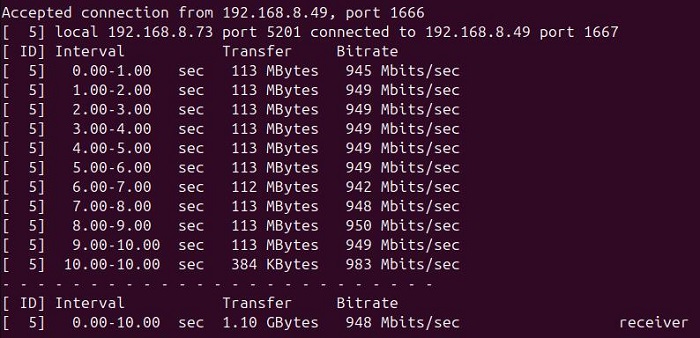
3.2 Test Ethernet
Download iperf3(Windows version):
http://www.mcuzone.com/down/Software.asp?ID=10000634
Install iperf3 on Linux:
sudo apt-get install iperf3
After installation, connect one of the four extended Gigabit Ethernet ports to the upstream router, and use iperf3 to test the speed with a PC within the same local network.
In client mode, the speed is about 942 Mbps.
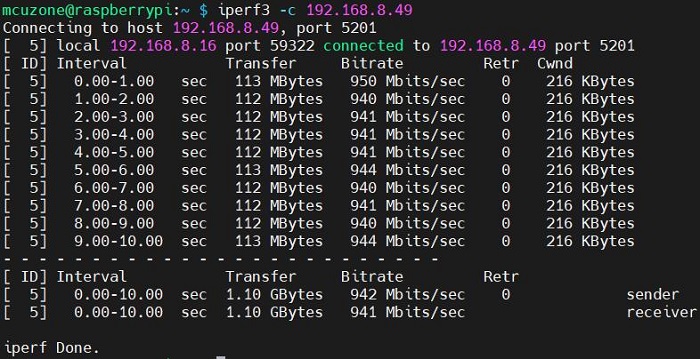
In server mode, the speed is about 948 Mbps.
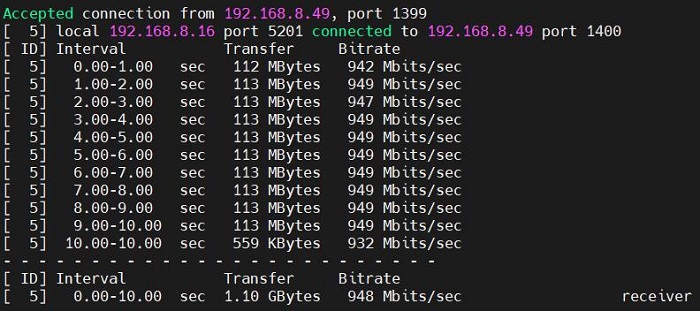
It can basically achieve gigabit speed.
Note1: Network speed tests are affected by the network environment and testing methods. Please refer to the actual speed, as this test is for reference only.
Note2: The four-port switch is a physical layer device, and is not visible in the system.
IV. Work with Ubuntu OS
The process of loading network card drivers in Ubuntu 23.10 is relatively complex and cumbersome, and it is not recommended for use. It is recommended to use Ubuntu 24.04.
The version of the Ubuntu OS is: ubuntu-24.04-preinstalled-desktop-arm64+raspi.img.xz
You can download the Ubuntu OS in:
https://ubuntu.com/download/raspberry-pi
4.1 Install drivers
On Ubuntu 24.04, you can directly download driver source code and compile it. The steps are as follows:
Connect the native Ethernet port of the Raspberry Pi 5 to the upstream router.
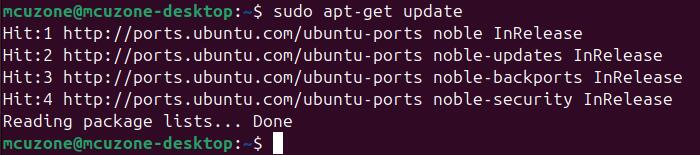
Update the system:
sudo apt-get update
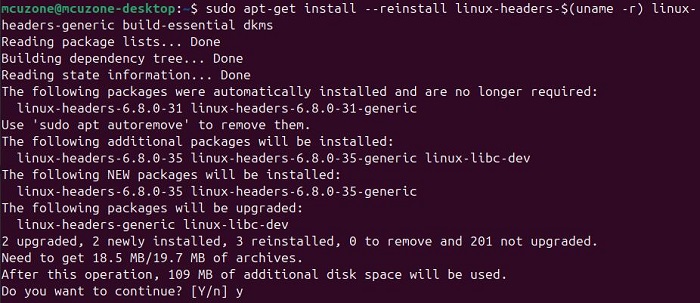
Preparing the build environment:
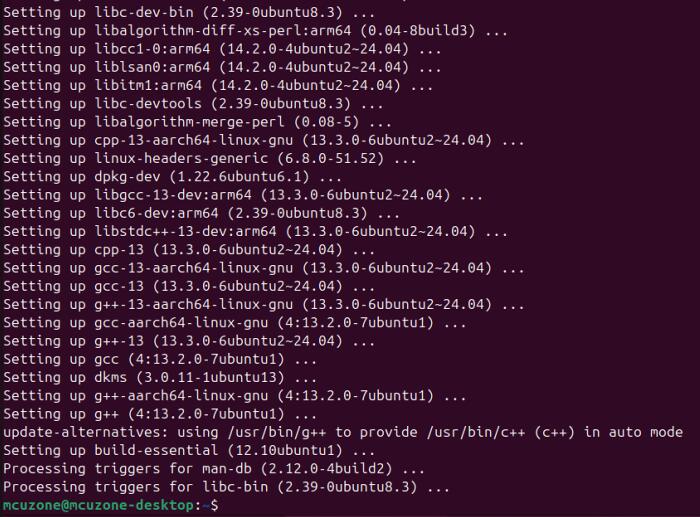
sudo apt-get install --reinstall linux-headers-$(uname -r) linux-headers-generic build-essential dkms
Download and compile driver:
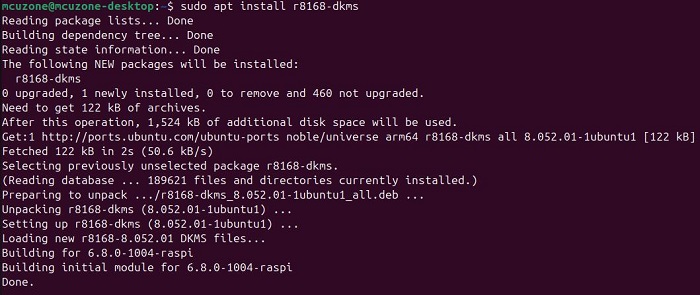
sudo apt install r8168-dkms
sudo modprobe r8168
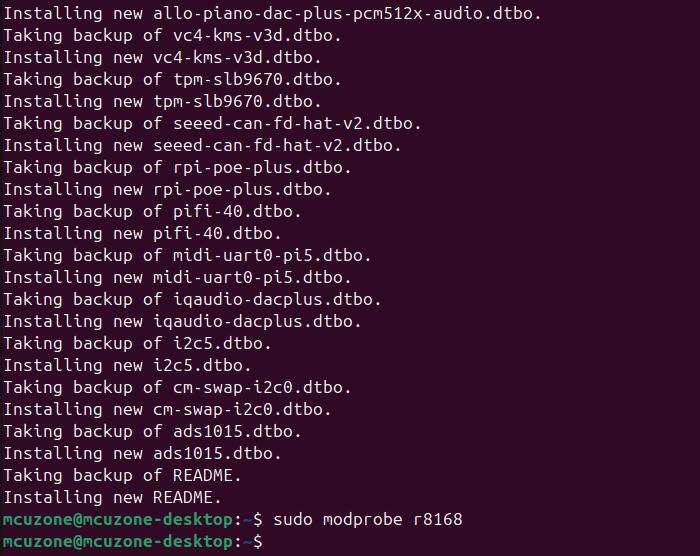
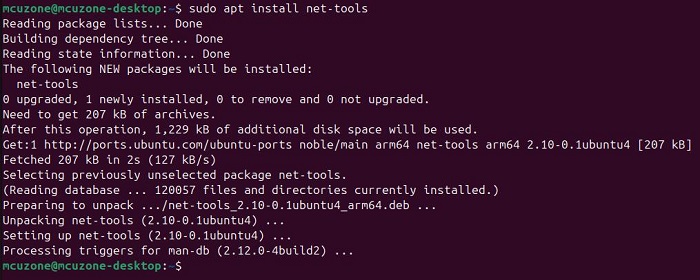
After the driver installation is complete, install the net-tools package:
After installation, you can executing ifconfig -a, you should see devices starting with "enp...", which are the four expanded Gigabit Ethernet ports. This indicates that the driver has been installed successfully.
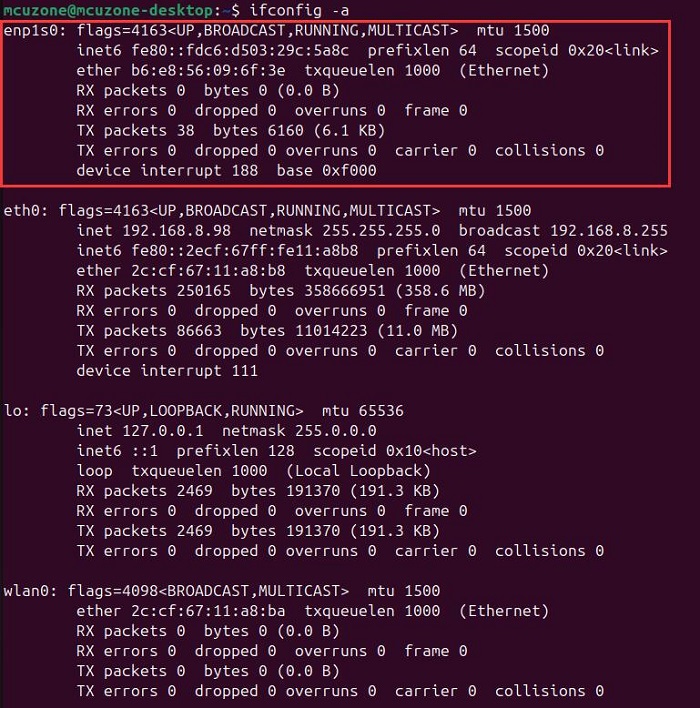
At this moment, the four extended Gigabit Ethernet ports are not connected to the upstream router, so they have not obtained IP addresses.
4.2 Test Ethernet
Install iperf3 on Linux:
sudo apt-get install iperf3
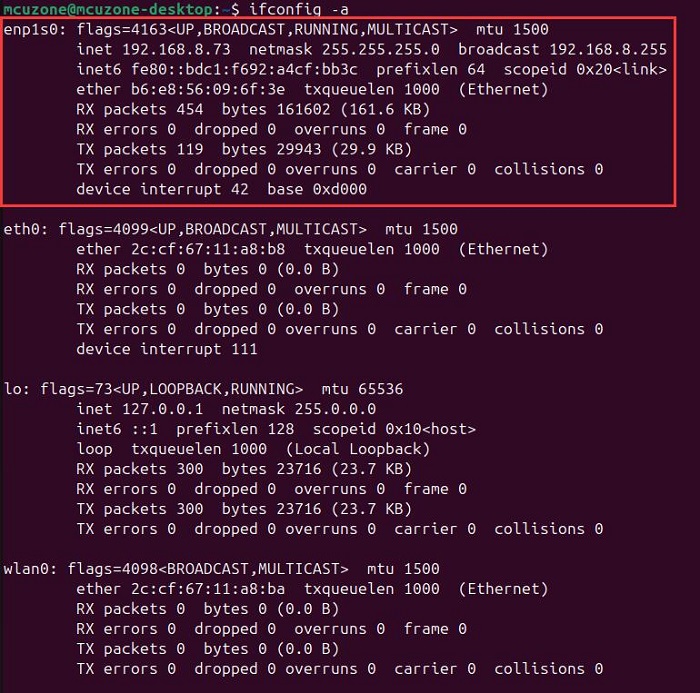
After installation, connect one of the four Gigabit Ethernet ports to the upstream router, restart the system, and run `ifconfig -a`. You should see that the "enp..." has obtained an IP address.
Use iperf3 to test the speed with a PC within the same local network.
In client mode, the speed is about 943 Mbps.
In server mode, the speed is about 948 Mbps.
It can basically achieve gigabit speed.
4.4 Test 4G LTE
If you have opted for the accompanying 4G LTE module, all our 4G modules are driver-free in the Ubuntu OS, requiring no additional drivers to be installed. The system automatically recognizes them as enx... devices. The previous chapters have already explained how to install the onboard Gigabit Ethernet driver. Now when we execute ifconfig -a, the display is as follows:
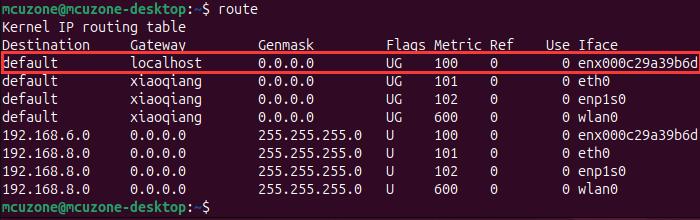
We execute route to view the routing table, and we can see that the network card starting with "enx" is listed first, indicating that 4G internet is being used by default at this time.
Taking CAT4 4G as an example, it defaults to using 4G for internet access. If we successfully ping both an IP address and a domain name, it indicates that the 4G module is working properly:
Open https://test.ustc.edu.cn/ to perform a speed test, and the results are as follows:
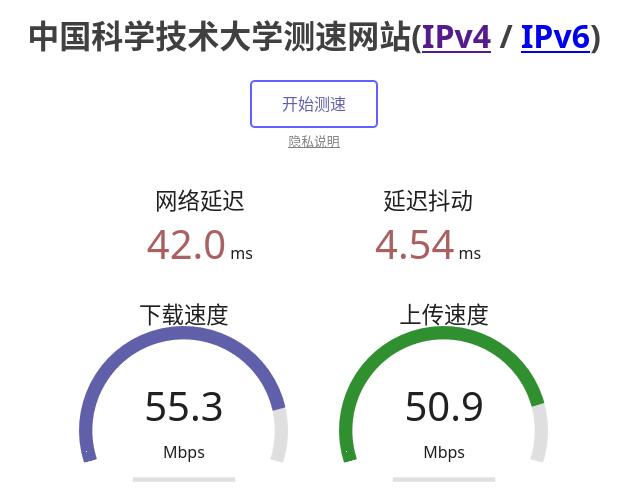
Note: Network speed tests are affected by the network environment and testing methods. Please refer to the actual speed, as this test is for reference only.
V. Work with OpenWrt
5.1 Overview
The MPRG4 board can be configured in OpenWrt as a switch with one input and four outputs. We can configure the Raspberry Pi5's Ethernet port as the WAN port, and use the four Ethernet ports on the expansion board as LAN ports, which can be used by other devices to obtain IP addresses within the same subnet.
System version: openwrt-bcm27xx-bcm2712-rpi-5-squashfs-sysupgrade-linux-6.1.100-20240805.img.gz
5.2 Preparation
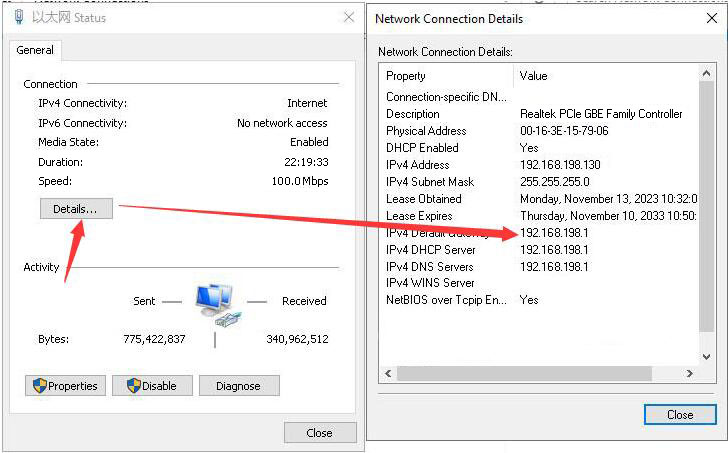
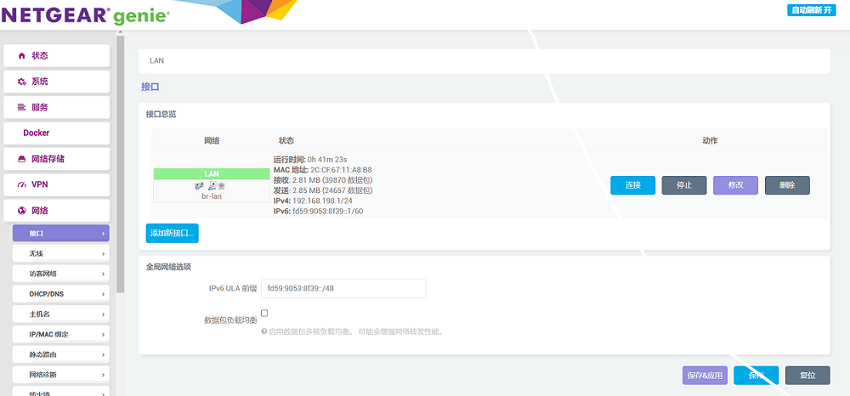
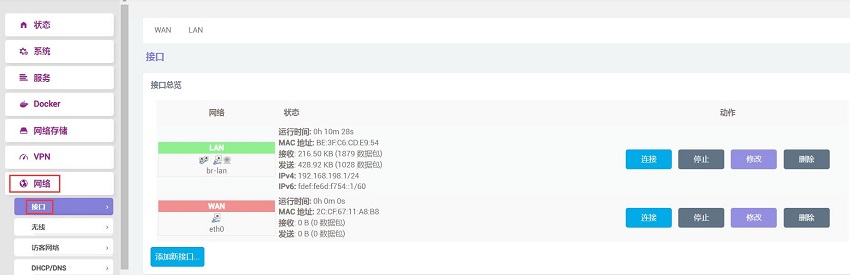
We connect the Raspberry Pi 5's built-in port to the PC's Ethernet port, then power on and start the system. Afterward, we navigate to Network and Internet in the Windows settings, and under Ethernet, we open the connected network to view the IP address of the default gateway. This address is the backend configuration page address for the OpenWrt system. As shown in the image, the address tested in this article is 192.168.198.1:
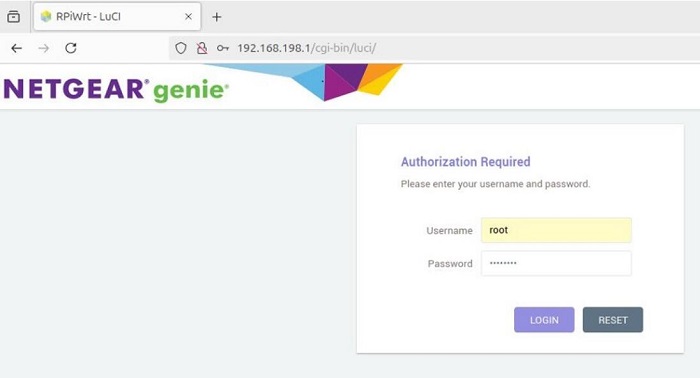
Open a web browser, enter 192.168.198.1, and access the OpenWrt system configuration page.
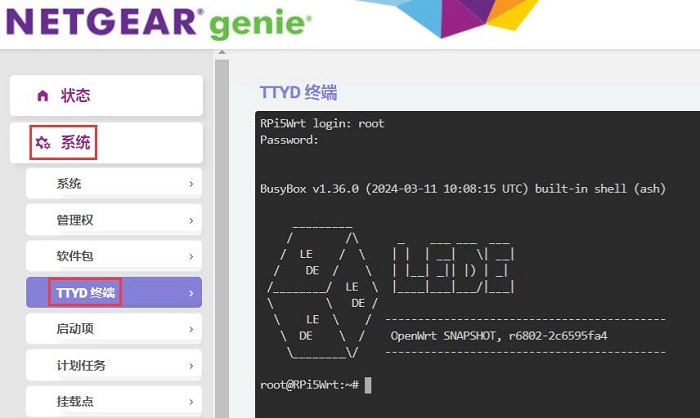
The default username is root, and the default password is password.
After logging into the OpenWrt, click on "System - TTYD Terminal", We can then access the terminal that comes with OpenWrt, and log in using the username root and the password password.
Run ifconfig -a, and you can see that the extended Gigabit Ethernet port (eth1) has been recognized:
5.3 Configure the WAN port and LAN ports
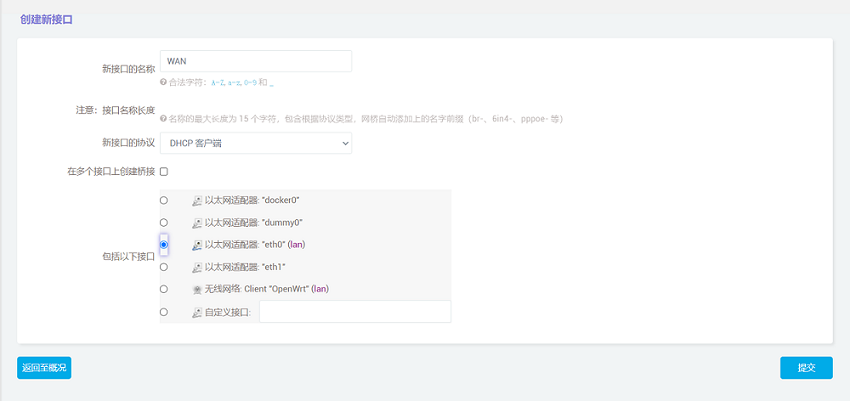
By default, the native Ethernet port (eth0) of the Raspberry Pi 5 is a LAN port. Now, we need to set the Raspberry Pi 5's native Ethernet port (eth0) as the WAN port and the extended Gigabit Ethernet port (eth1) as the LAN port. The procedure is as follows:
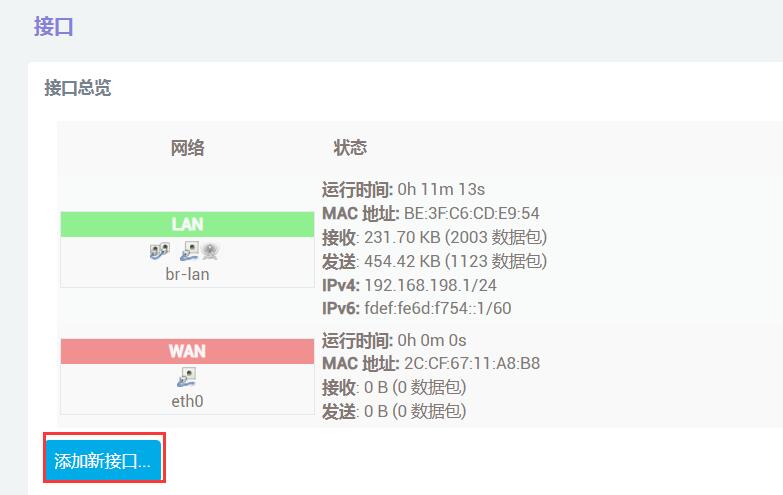
We click on "Network - Interface".
Then we click to Add a new interface, set the name and interface protocol, and set the WAN port to eth0.
Click "Submit" and then select "WAN" in the Firewall settings.
After configuration it complete, click "Save". Be careful, do not click "Save & Apply", or you will not be able to enter the system.
Click "Back" to return to the overview, then click on LAN port modification.

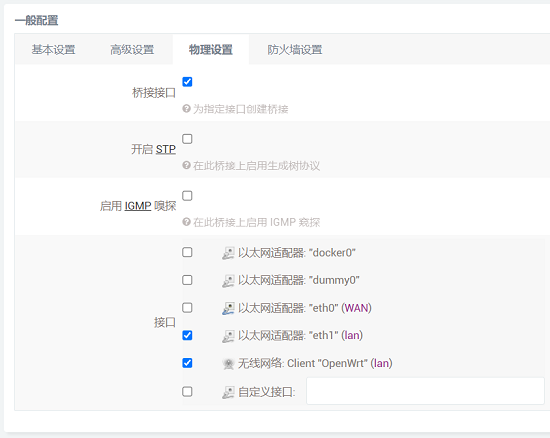
Set the interface to eth1 in the "Physical Settings".
After configuration, we click "Save & Apply". Please note that since the network settings are being changed, it will continuously display "Applying changes". This is not a malfunction, and after waiting for a while, we can proceed to the next step.
The OpenWrt is currently unavailable due to changes in the network interfaces. You need to connect the new WAN port to the upstream router, then connect the new LAN port to the downstream network devices, reboot the system, and log back into the OpenWrt.
After configuration, connect the new WAN port (the native Ethernet port on the Raspberry Pi, eth0) to the upstream router, then connect the new LAN port (the extended Gigabit Ethernet port, eth1) to downstream network devices (such as PCs, etc.). Restart the system, and then log into the OpenWrt.
5.4 Ethernet test
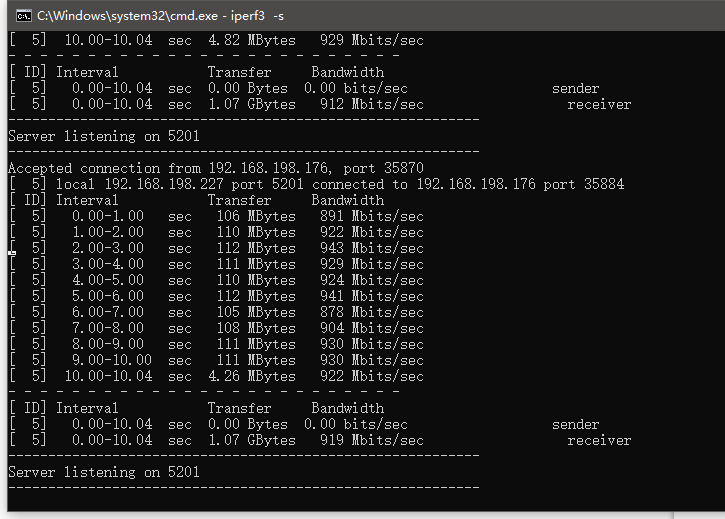
We will connect two of the four LAN ports to two PCs to simply test the network bandwidth.
Using iperf3 to test between two computers shows that the test results are normal.
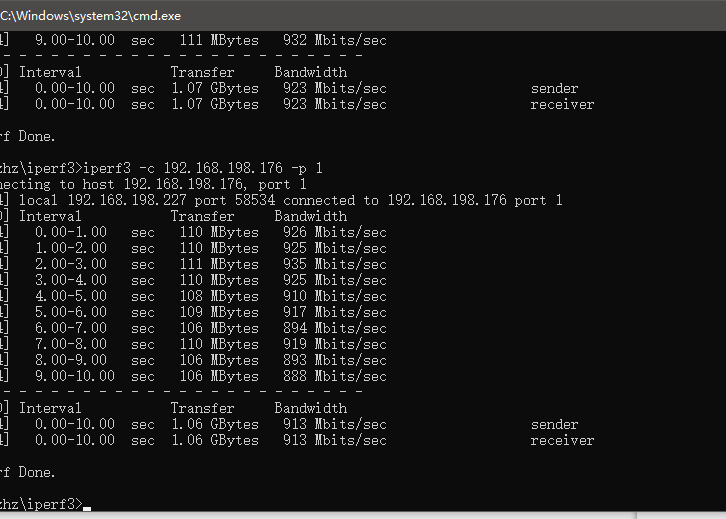
基本能达到千兆的速度。
注意:网络测速受网络环境和测试方法影响,速度请以实际为准,本测试仅供参考。
5.5 Test 4G module
如果您选配了4G LTE模块,我们的4G模组在OpenWrt系统下均免驱,自动识别。
插上4G模组(需插入SIM卡),将4个千兆网口之一与PC相连,拔掉树莓派原生网口的网线,启动并登录OpenWrt系统后,点击“系统 - TTYD终端”,我们便可进入OpenWrt自带的终端,使用用户名 root, 以及密码 password登录终端即可:
运行ifconfig -a,可见已经识别4G模组:
CAT4 4G或者ZTE CAT4(识别为eth2):
高通4G(识别为usb0):
以CAT4 4G为例,我们将4G模组设置为WAN口,步骤如下:
我们点击“网络” - “接口”:
随后我们点击“添加新接口”,设置好名称、接口协议,将WAN口设置为eth2(如果是其它4G模组,请按照实际的网络标识进行设置),“新接口的名称”可以自定义设置:
点击“提交”后在“防火墙设置”选中“WAN”。

设置完后我们点击“保存&应用”,成功后自动返回接口页面,稍等片刻,我们就能看到CAT4 4G获得了IP地址,这样我们就能通过CAT4 4G上网了:
我们在PC端测试4G网络的速度,打开测速网站进行网速测试,结果如下:
CAT4 4G:
高通4G:
ZTE CAT4:
注意:网络测速受网络环境和测试方法影响,速度请以实际为准,本测试仅供参考。
VI. Radxa Rock 5C (RK3588S2) with MPRG4
6.1 Overview
The Radxa Rock 5C is designed based on the RK3588S2, dimensions are compatible with the Raspberry Pi 5. It have one gigabit ethernet port and four USB ports, along with a PCIe interface compatible with the Raspberry Pi 5. This interface allows us to expand with various PCIe extension boards designed for the Raspberry Pi 5. In this demonstration, we are using a MRG4 board.
System version: rock-5c_bookworm_kde_b1.output.img.xz
You can download it in github:
https://github.com/radxa-build/rock-5c/releases/tag/rsdk-b1

6.2 Preparation
1. Upon system startup, the username and login password for the default account are both radxa:
2. Entering the system, find Konsole in the menu to access the terminal.
3. Execute lspci to ensure that the device information for RTL8111 is visible (the red box):
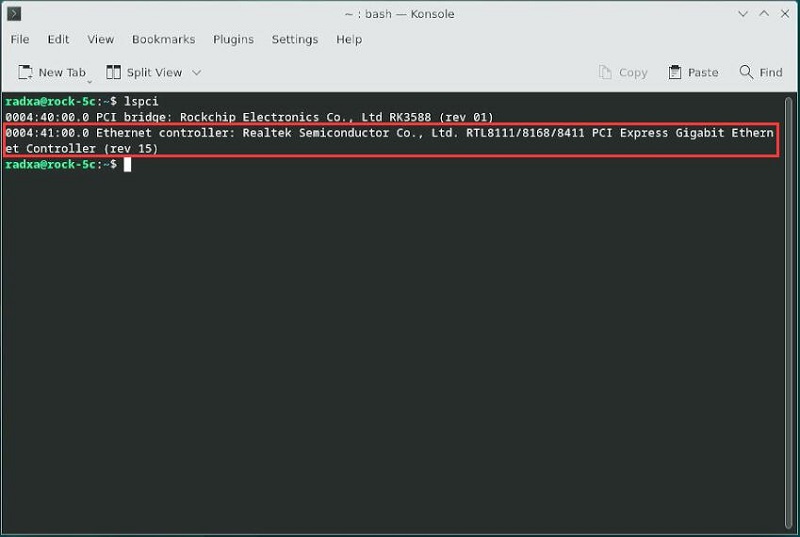
(If you cannot see it, check the reliability of the FPC connection. Note that the FPC cable has an orientation, with one side indicating that it should be connected to the RPi5 on the Rock 5C ).
4. Connect the native Gigabit Ethernet port of the Radxa Rock 5C to the upstream router, then execute:
sudo apt-get update
sudo apt-get upgrade
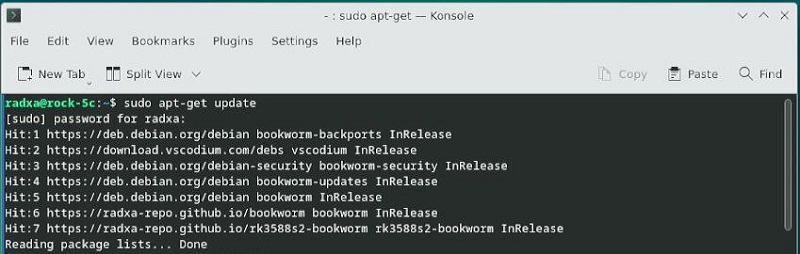

sudo apt-get install net-tools
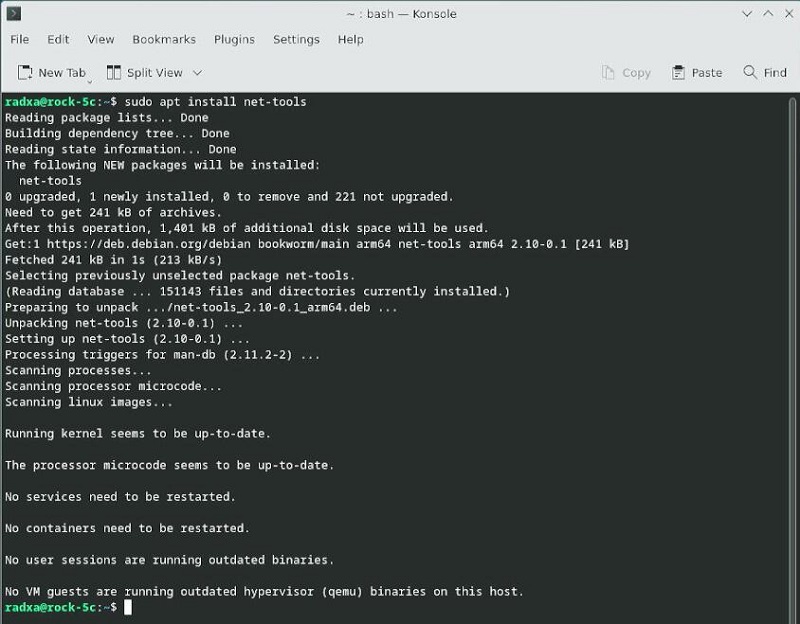
You can use the ifconfig after installing net-tools. Of course, you can also use other tools to operate the network.
6.3 Install drivers and test Ethernet
Using DKMS to install the drivers.
sudo apt-get install r8168-dkms
sudo modprobe r8168
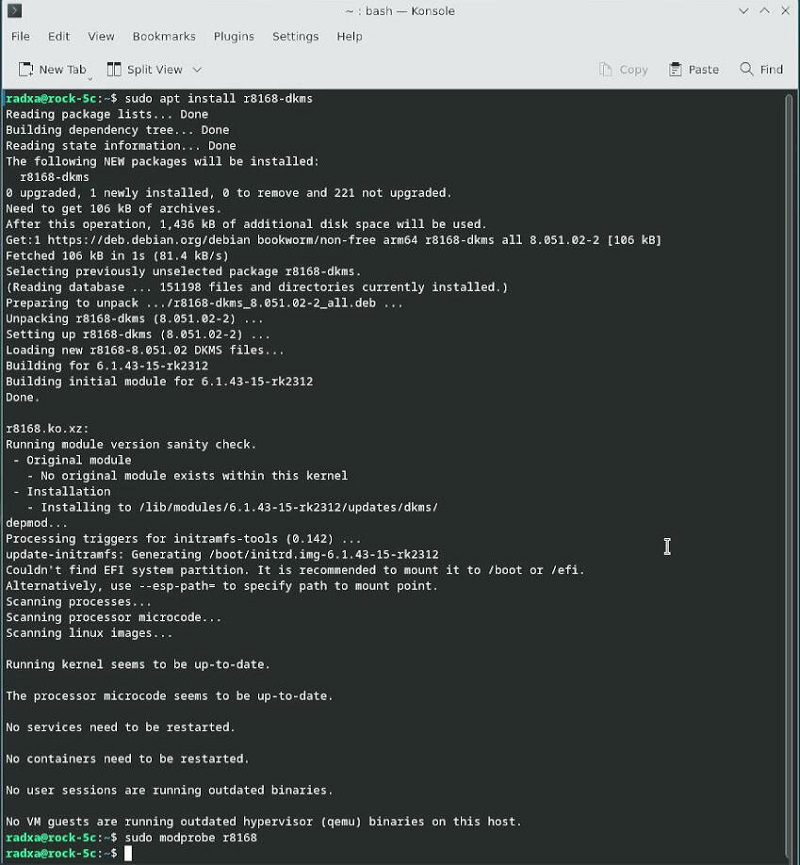
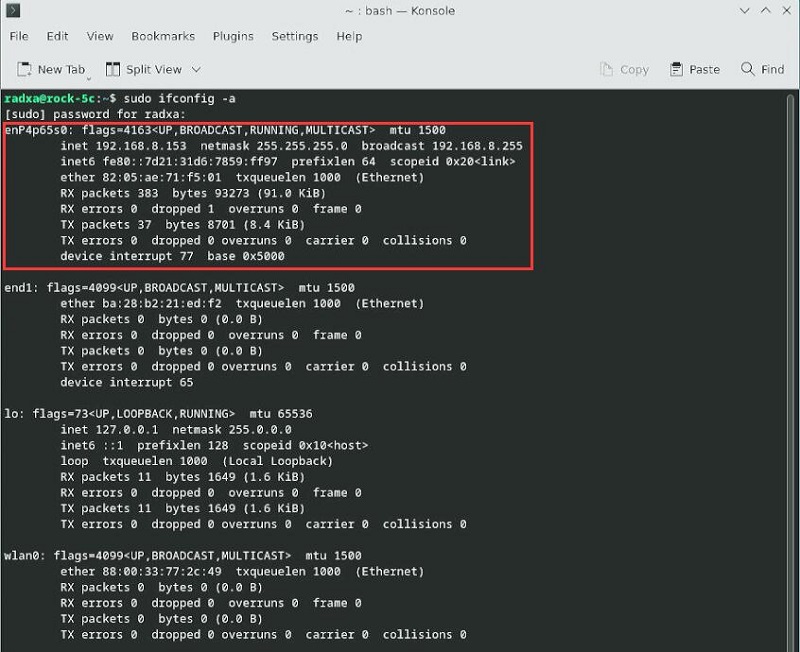
After installing the drivers, execute sudo ifconfig -a to check for network cards starting with enp, which indicates the RTL8111 network card. Note that the switch is a physical layer device and cannot be seen with ifconfig.
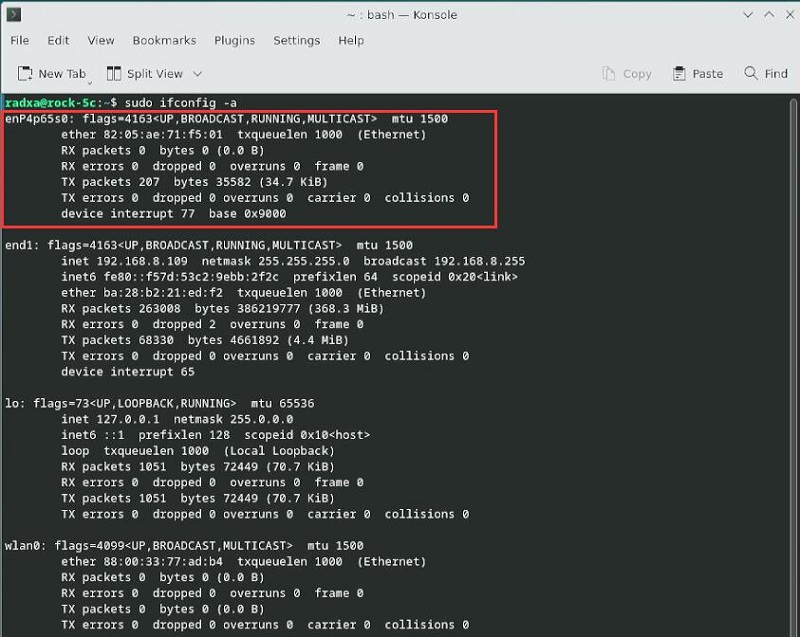
Connect one of the four extended Gigabit Ethernet ports to the upstream router, restart the system, and then execute sudo ifconfig -a. You should see that the extended Gigabit Ethernet port has correctly obtained an IP address.
Confirm network connectivity by using ping packets:
Now, the network card drivers has been successfully installed and is functioning normally.
Install iperf3 on Linux:
sudo apt-get install iperf3
After installation, connect one of the four expanded Gigabit Ethernet ports to the upstream router, restart the system, use iperf3 to test the speed with a PC within the same local network.
In client mode, the speed is about 942 Mbps.
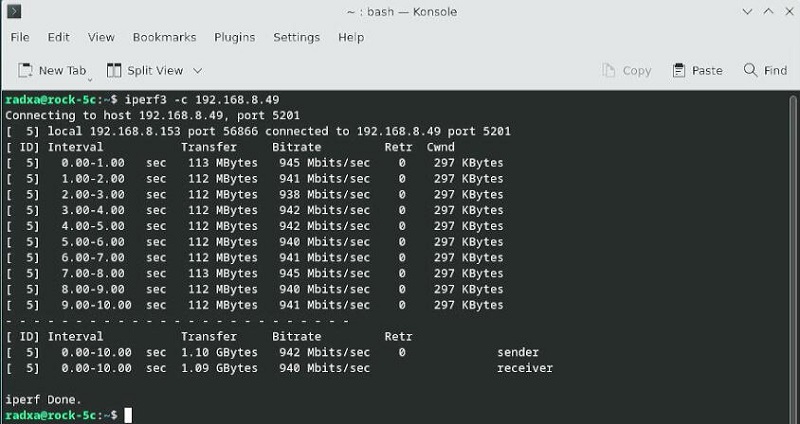
In server mode, the speed is about 947 Mbps.
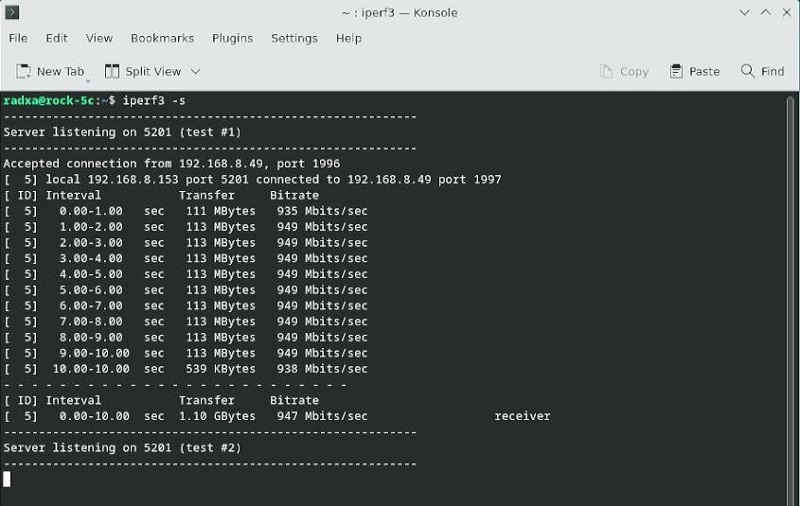
It can basically achieve gigabit speed.
Note: Network speed tests are affected by the network environment and testing methods. Please refer to the actual speed, as this test is for reference only.
6.4 Test 4G module
The 4G modules provided by our company feature driver-free, auto-dialing, system auto-recognition, and plug-and-play functionalities. The Rock 5C can be equipped with CAT4 4G and Qualcomm 4G modules, which are automatically recognized in the system as devices starting with "enx".
6.4.1 Connect to 4G network
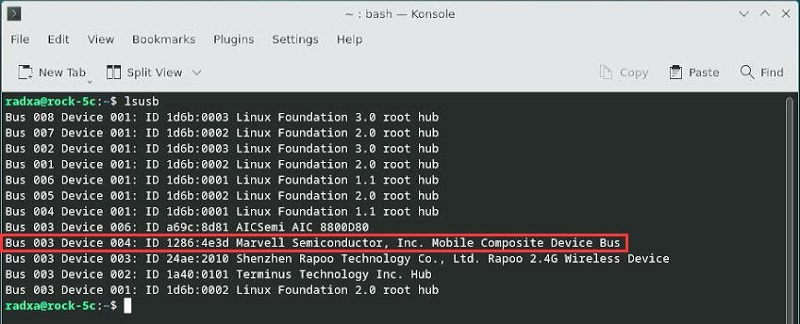
Connect the 4G module to the Rock 5C via the USB interface, start the system, and execute lsusb in the terminal. The following will be displayed, with the red box indicating the 4G module:
CAT4 4G:
Qualcomm 4G:

Below is an example using the CAT4 4G module. Connect one of the native Ethernet ports of the Rock 5C and one of the four extended Gigabit Ethernet ports to the upstream router, restart the system, and then execute sudo ifconfig -a. The display will be as follows:
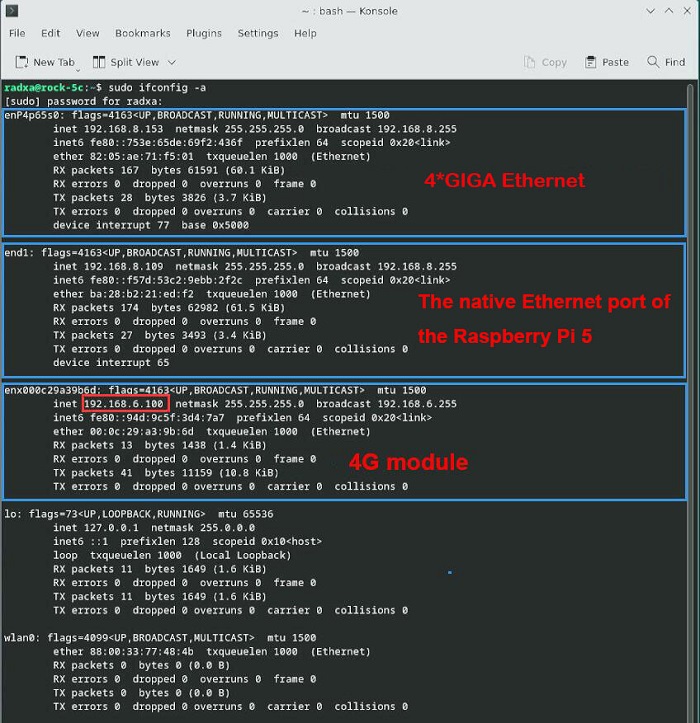
It shows that the IP address has been correctly obtained (as indicated in the red box).
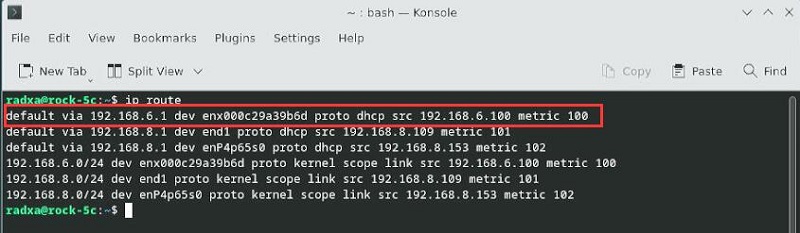
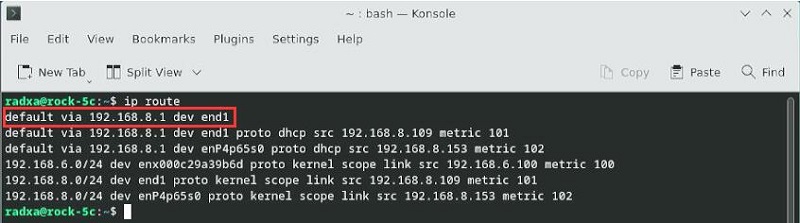
Execute ip route, and you can see that the device starting with "enx" is listed first, therefore prioritizing internet access through the 4G network.
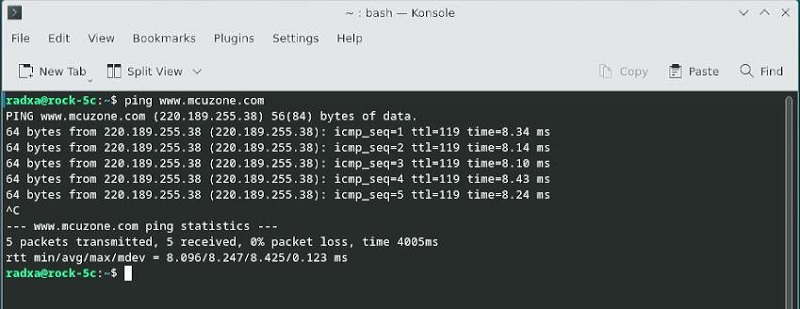
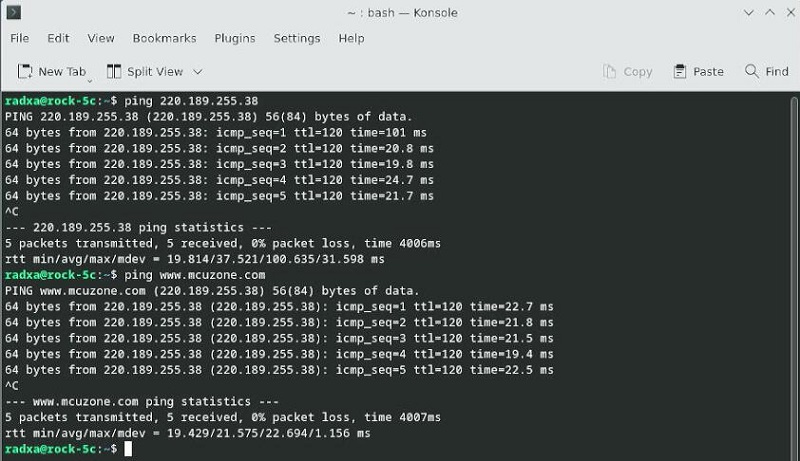
At this point, if we ping both IP addresses and domain names, and they are successful, it indicates that the 4G module is working properly:
Open https://www.speedtest.cn/ to perform a speed test, and the results are as follows:

Note: Network speed tests are affected by the network environment and testing methods. The actual speed may vary, so this test is for reference only.
6.4.2 Modification of Network Priority
Taking CAT4 4G as an example, in the previous section we checked the routing table, and by default, internet access is prioritized through the 4G network.
If you want to prioritize the wired network for internet access, you can execute the following command:
sudo ip route del default && sudo route add -net default netmask 0.0.0.0 gw 192.168.8.1
Explanation of these two commands (separated by '&&'):
sudo ip route del default: Remove the default route from the routing table.
sudo route add -net default netmask 0.0.0.0 gw 192.168.8.1: Add the gateway of the wired network as a new default route (ensure to use the actual gateway address).
After completing the execution, execute the ip route command to view the routing table. The current default route is the gateway of the wired network (end1 is listed first, it is the native Ethernet port of the Rock 5C.):
This way, the network will default to using the wired connection. If you need to switch back to defaulting to the 4G network, please execute the following command:
sudo ip route del default && sudo route add -net default netmask 0.0.0.0 gw 192.168.6.1
Or, you can restart the system.
Note that 192.168.6.1 is the default gateway for the 4G module; please refer to the actual configuration.
Note: After a reboot, the routing table resets. To ensure the network continues to use the wired or wireless connection as the default route post-restart, you'll need to execute sudo ip route del default && sudo route add -net default netmask 0.0.0.0 gw 192.168.8.1 again.
6.4.3 AT command operation
Taking the CAT4 4G as an example, use lsusb to view USB devices, and the red box indicates the 4G module:
Note down the ID value of the 4G module: 1286 4e3d.
Use the following command to enable the ttyUSB serial port of the 4G module, where the value after echo is the ID value recorded earlier:
sudo modprobe option
sudo sh -c 'echo 1286 4e3d > /sys/bus/usb-serial/drivers/option1/new_id'
After executing the above two commands, execute the following:
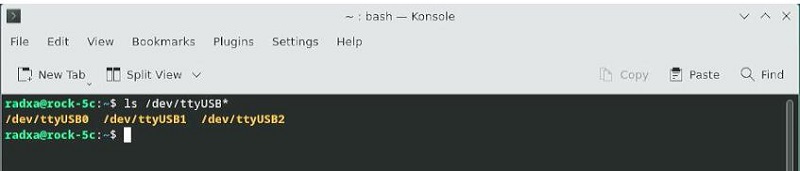
ls /dev/ttyUSB*
At this point, you should be able to see three devices under the dev directory: ttyUSB0, ttyUSB1, ttyUSB2.
Then, use a serial communication tool to open the specific serial port (AT command port):
Install the serial port software minicom:
sudo apt-get install minicom
Open the AT command serial port using minicom:
sudo minicom -D /dev/ttyUSB1
(Note: Which serial port to use should be determined by the ability to enter and execute AT commands without garbled or erratic output after accessing that serial port.)
If you need to view echo responses, type the command: ate1, then press Enter. You can continue to type other commands, and after pressing Enter, you will see the results.
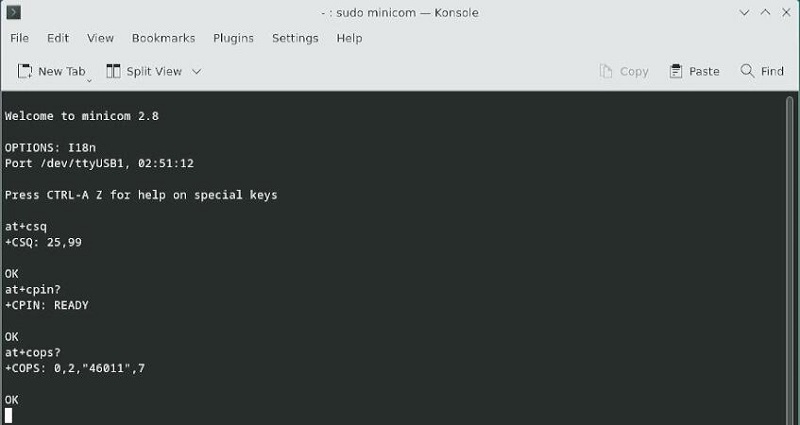
Common AT commands:
1) Check if the SIM card is detected:
at+cpin?
Return ready to indicate the card has been recognized, if return error, you need to check the hardware.
2) Check antenna signal quality:
at+csq
eturn values between 26 and 31 indicate a good signal, with 31 representing a full signal strength; return values between 20 and 25 indicate a barely acceptable signal; return values below 20 indicate a poor signal or that the antenna might not be connected.
3) Check network registration status:
at+cops?
Normally, it should return the network supporter's code: 7, where 7 represents 4G.
Note: The above command at+csq should not include a question mark, while the other two commands require a question mark.
4) View the SIM card's IMEI code:
at+cgsn
5) Reset 4G module (Sometimes, if you reinsert the SIM card, hot swapping may not work; in such cases, you can use this reset command to reset the module.):
at+reset
6) Disable radio frequency:
at+cfun=0
Enable radio frequency:
at+cfun=1
The two commands mentioned above can be used in pairs to allow the module to re-register with the network without restarting the 4G module.
6.4.4 Modify the IP address of the 4G module
If the default 4G IP address assigned at the factory conflicts with the IP address being used by the user, or if there is a need to modify the IP address, you can change the 4G module's IP to directly obtain a public IP. Please execute the AT command:
CAT4 4G:
Execute the AT command:
AT+ROUTEIP=<newip>
Note: only addresses in the format of 192.168.x.1 are supported. If you set AT+ROUTEIP=192.168.3.1, the final IP address obtained will be 192.168.3.100. After making the changes, you need to power off and restart the system.
Query current IP: AT+ROUTEIP?, it returns two values, the first one is the old IP, and the second one is the new IP.
Test command: AT+ROUTEIP=?
Qualcomm 4G:
Set the 4G module's IP to directly obtain a public IP. Please execute the AT command:
Set the IP to public: AT+GTIPPASS=1
Set the IP to private: AT+GTIPPASS=0
Check whether the current IP is a public or private IP: AT+GTIPPASS?
After modifying the IP, a power cycle reboot is required for the changes to take effect.
Contact Us


 QQ:8204136
Email: mcuzone@vip.qq.com
Tel: +86(0)13957118045
If there are any omissions, errors, or infringements on this page, please contact us through the above methods. Thank you!
Copyright 2004-2025 Wildchip