3001 TEMP AND RH EN:修订间差异
(创建页面,内容为“== '''关键词''' == 树莓派、 Raspberry Pi、树莓派5、Raspberry Pi 5、CM4、USB转串口、SHT20、STM32F030、CH340G、温湿度采集 == '''一、简介''' == 树莓派是一个通用的创客平台,不少创客在使用树莓派的时候需要一些温湿度数据,但是市面上的一些平价温湿度模块(如DHT2x)的精度和一致性实在太差,为此我们设计了一款性价比适中,精度较高的温湿度模块。我们在…”) |
无编辑摘要 |
||
| (未显示同一用户的1个中间版本) | |||
| 第1行: | 第1行: | ||
[[3001 TEMP AND RH(树莓派专用温湿度模块)|切换语言为中文]] | |||
== ''' | == '''Keywords''' == | ||
Raspberry Pi, Raspberry Pi 5, CM4, USB to serial, SHT20, STM32F030, CH340G, Temperature and humidity collection | |||
== ''' | == '''I. Introduction''' == | ||
The Raspberry Pi is a versatile maker platform, and many makers require temperature and humidity data when using the Raspberry Pi. However, the accuracy and consistency of some affordable temperature and humidity modules on the market (such as the DHT2x series) are often quite poor. So we have designed a temperature and humidity module that offers better precision at a reasonable cost. We have set up a microcontroller on the module to read temperature and humidity data, which sends data to the main controller via a TTL serial port or through a USB-to-serial adapter. The temperature and humidity sensor used is the SHT20 from Sensirion, with a typical humidity accuracy of ±3%RH and a typical temperature accuracy of ±0.3°C. We have conducted consistency tests, and in the same environment, the temperature difference among five modules is within 0.3°C, and the humidity difference is within 3%RH. The entire module can be powered and communicated with through a USB-C interface, or it can be powered via pin connectors. The module can measure the temperature and humidity near the Raspberry Pi or can be placed in the target environment for measurement using a USB-C cable up to 2 meters long. | |||
== '''II. Hardware Resources''' == | |||
1. The main controller uses STM32F030 to collect temperature and humidity data, which sends data to the host computer via a TTL serial port or a USB serial port. | |||
2. The USB interface uses the popular USB Type-C connector, which is utilized for both power supply and USB-to-serial communication. | |||
3. The USB-to-serial conversion chip used is the CH340G. After more than a decade of development, Nanjing Qinheng's USB-to-serial chips have become quite mature, with good stability and cost-effectiveness. | |||
4. The temperature and humidity sensor chip used is the SHT20, with a typical humidity accuracy of ±3%RH and a typical temperature accuracy of ±0.3°C. | |||
5. Reserve TTL serial ports/SWD interfaces/extra GPIO pins. | |||
6. Solder a button for switching the output of data from the TTL serial port to the USB-to-serial port. Reserve a position for an unsoldered button. | |||
8. | 7. A user LED, which is off by default and lights up after power-on. Users can modify it for other indicator purposes. | ||
8. Size: 40*55mm, perfectly matching the dimensions of the Raspberry Pi CM4's core board; M2.5 mounting holes. | |||
http://www.mcuzone.com/wiki/3001_TEMP_AND_RH/3001_TEMP_AND_RH_12.jpg | http://www.mcuzone.com/wiki/3001_TEMP_AND_RH/3001_TEMP_AND_RH_12.jpg | ||
== ''' | == '''III. Test in Raspberry Pi OS''' == | ||
Hardware Platform: We use the Raspberry Pi CM4's core board paired with our expansion board for testing. The operation methods for other Raspberry Pi models such as the 5/4B/3/Zero series are the same. Please refer to the following picture for hardware connections:http://www.mcuzone.com/wiki/3001_TEMP_AND_RH/3001_TEMP_AND_RH_10.jpg | |||
We use the official Raspberry Pi OS for test. 版本为2024-07-04-raspios-bookworm-arm64.img.xz | |||
The Raspberry Pi OS used in this document is: 2024-07-04-raspios-bookworm-arm64.img.xz(Raspberry Pi OS with desktop). | |||
You can download the Raspberry Pi OS in: | |||
https://www.raspberrypi.com/software/operating-systems/#raspberry-pi-os-64-bit | |||
In the Raspberry Pi system, We use a serial port tool to read the temperature and humidity data in the Raspberry Pi system. | |||
Execute the following command in the terminal to install the serial port tool CuteCom: | |||
<code>sudo apt install cutecom</code> | <code>sudo apt install cutecom</code> | ||
| 第41行: | 第45行: | ||
http://www.mcuzone.com/wiki/3001_TEMP_AND_RH/3001_TEMP_AND_RH_04.jpg | http://www.mcuzone.com/wiki/3001_TEMP_AND_RH/3001_TEMP_AND_RH_04.jpg | ||
After installation, click on the Raspberry Pi logo in the upper left corner, go to System Tools, and click on the CuteCom icon: | |||
http://www.mcuzone.com/wiki/3001_TEMP_AND_RH/3001_TEMP_AND_RH_05.jpg | http://www.mcuzone.com/wiki/3001_TEMP_AND_RH/3001_TEMP_AND_RH_05.jpg | ||
After opening, the software automatically detects the serial port number ttyUSB0 of the temperature and humidity module. The default serial port parameters of 115200@8-N-1 can be used: | |||
http://www.mcuzone.com/wiki/3001_TEMP_AND_RH/3001_TEMP_AND_RH_06.jpg | http://www.mcuzone.com/wiki/3001_TEMP_AND_RH/3001_TEMP_AND_RH_06.jpg | ||
Click "Open" to open the serial port; the output box below will then display the current temperature and humidity data: | |||
http://www.mcuzone.com/wiki/3001_TEMP_AND_RH/3001_TEMP_AND_RH_07.jpg | http://www.mcuzone.com/wiki/3001_TEMP_AND_RH/3001_TEMP_AND_RH_07.jpg | ||
★ | ★ The board reserves I2C interface, which can be used to connect OLED display. If you have the requirement, you can write your own application to display the temperature and humidity information on the LCD screen. | ||
== ''' | == '''IV. . Test in Windows''' == | ||
Windows | Under Windows 10, this module is recognized as a USB-to-serial converter. You need to install the CH340 driver first. The driver download link is: | ||
http://www.mcuzone.com/down/Software.asp?ID=10000607 | http://www.mcuzone.com/down/Software.asp?ID=10000607 | ||
After installing the driver, use a USB A-C cable to connect the temperature and humidity module to the USB-A port on the computer, and the module will start automatically. | |||
After a successful connection, we can see a USB-to-serial port (COM6 in this example) in the Device Manager: | |||
http://www.mcuzone.com/wiki/3001_TEMP_AND_RH/3001_TEMP_AND_RH_01.jpg | http://www.mcuzone.com/wiki/3001_TEMP_AND_RH/3001_TEMP_AND_RH_01.jpg | ||
Next, download the temperature and humidity measurement software: | |||
http://www.mcuzone.com/wiki/3001_TEMP_AND_RH/THTB.zip | http://www.mcuzone.com/wiki/3001_TEMP_AND_RH/THTB.zip | ||
Unzip the compressed file, run TH TB.exe, open the software, and it will automatically detect the USB-to-serial port. Then click "Open Serial Port" to display the current temperature and humidity: | |||
http://www.mcuzone.com/wiki/3001_TEMP_AND_RH/3001_TEMP_AND_RH_03.jpg | http://www.mcuzone.com/wiki/3001_TEMP_AND_RH/3001_TEMP_AND_RH_03.jpg | ||
| 第76行: | 第80行: | ||
http://www.mcuzone.com/wiki/3001_TEMP_AND_RH/3001_TEMP_AND_RH_02.jpg | http://www.mcuzone.com/wiki/3001_TEMP_AND_RH/3001_TEMP_AND_RH_02.jpg | ||
{{ | {{Contact_Us_icon}} | ||
2024年10月18日 (五) 17:32的最新版本
Keywords
Raspberry Pi, Raspberry Pi 5, CM4, USB to serial, SHT20, STM32F030, CH340G, Temperature and humidity collection
I. Introduction
The Raspberry Pi is a versatile maker platform, and many makers require temperature and humidity data when using the Raspberry Pi. However, the accuracy and consistency of some affordable temperature and humidity modules on the market (such as the DHT2x series) are often quite poor. So we have designed a temperature and humidity module that offers better precision at a reasonable cost. We have set up a microcontroller on the module to read temperature and humidity data, which sends data to the main controller via a TTL serial port or through a USB-to-serial adapter. The temperature and humidity sensor used is the SHT20 from Sensirion, with a typical humidity accuracy of ±3%RH and a typical temperature accuracy of ±0.3°C. We have conducted consistency tests, and in the same environment, the temperature difference among five modules is within 0.3°C, and the humidity difference is within 3%RH. The entire module can be powered and communicated with through a USB-C interface, or it can be powered via pin connectors. The module can measure the temperature and humidity near the Raspberry Pi or can be placed in the target environment for measurement using a USB-C cable up to 2 meters long.
II. Hardware Resources
1. The main controller uses STM32F030 to collect temperature and humidity data, which sends data to the host computer via a TTL serial port or a USB serial port.
2. The USB interface uses the popular USB Type-C connector, which is utilized for both power supply and USB-to-serial communication.
3. The USB-to-serial conversion chip used is the CH340G. After more than a decade of development, Nanjing Qinheng's USB-to-serial chips have become quite mature, with good stability and cost-effectiveness.
4. The temperature and humidity sensor chip used is the SHT20, with a typical humidity accuracy of ±3%RH and a typical temperature accuracy of ±0.3°C.
5. Reserve TTL serial ports/SWD interfaces/extra GPIO pins.
6. Solder a button for switching the output of data from the TTL serial port to the USB-to-serial port. Reserve a position for an unsoldered button.
7. A user LED, which is off by default and lights up after power-on. Users can modify it for other indicator purposes.
8. Size: 40*55mm, perfectly matching the dimensions of the Raspberry Pi CM4's core board; M2.5 mounting holes.

III. Test in Raspberry Pi OS
Hardware Platform: We use the Raspberry Pi CM4's core board paired with our expansion board for testing. The operation methods for other Raspberry Pi models such as the 5/4B/3/Zero series are the same. Please refer to the following picture for hardware connections: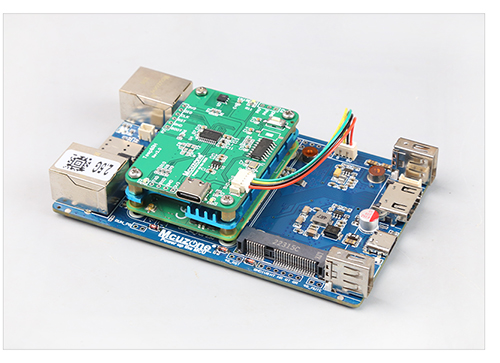
We use the official Raspberry Pi OS for test. 版本为2024-07-04-raspios-bookworm-arm64.img.xz
The Raspberry Pi OS used in this document is: 2024-07-04-raspios-bookworm-arm64.img.xz(Raspberry Pi OS with desktop).
You can download the Raspberry Pi OS in:
https://www.raspberrypi.com/software/operating-systems/#raspberry-pi-os-64-bit
In the Raspberry Pi system, We use a serial port tool to read the temperature and humidity data in the Raspberry Pi system.
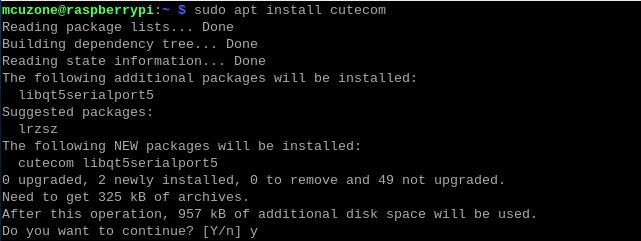
Execute the following command in the terminal to install the serial port tool CuteCom:
sudo apt install cutecom
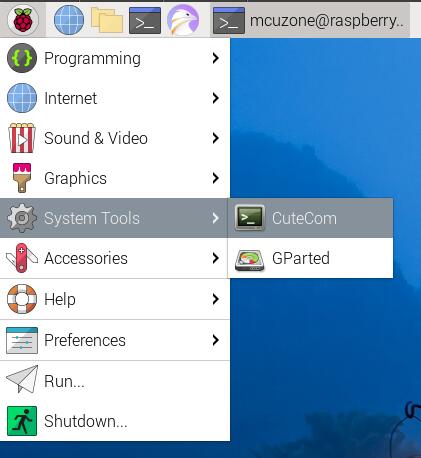
After installation, click on the Raspberry Pi logo in the upper left corner, go to System Tools, and click on the CuteCom icon:
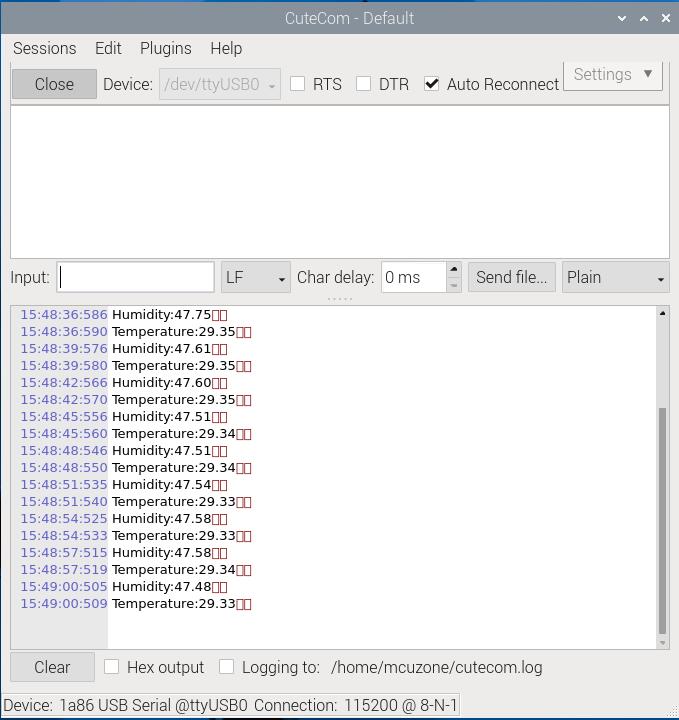
After opening, the software automatically detects the serial port number ttyUSB0 of the temperature and humidity module. The default serial port parameters of 115200@8-N-1 can be used:
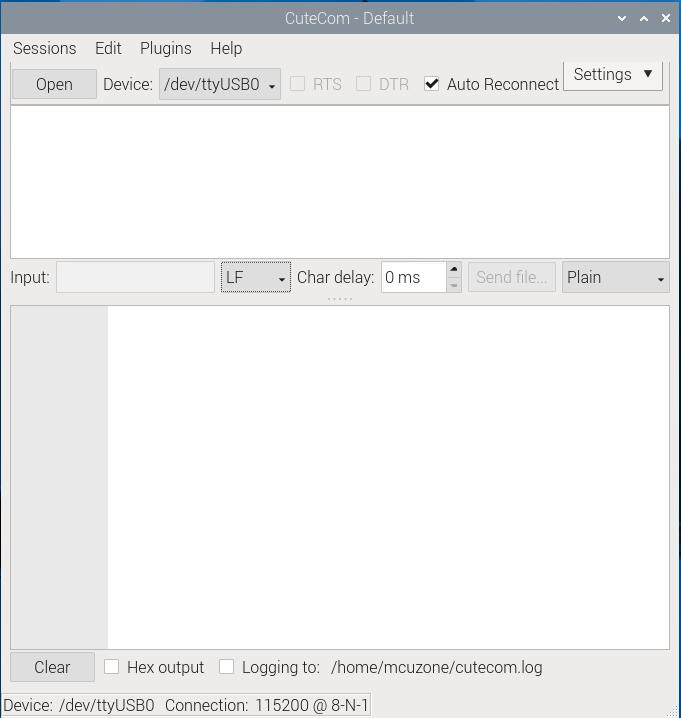
Click "Open" to open the serial port; the output box below will then display the current temperature and humidity data:
★ The board reserves I2C interface, which can be used to connect OLED display. If you have the requirement, you can write your own application to display the temperature and humidity information on the LCD screen.
IV. . Test in Windows
Under Windows 10, this module is recognized as a USB-to-serial converter. You need to install the CH340 driver first. The driver download link is:
http://www.mcuzone.com/down/Software.asp?ID=10000607
After installing the driver, use a USB A-C cable to connect the temperature and humidity module to the USB-A port on the computer, and the module will start automatically.
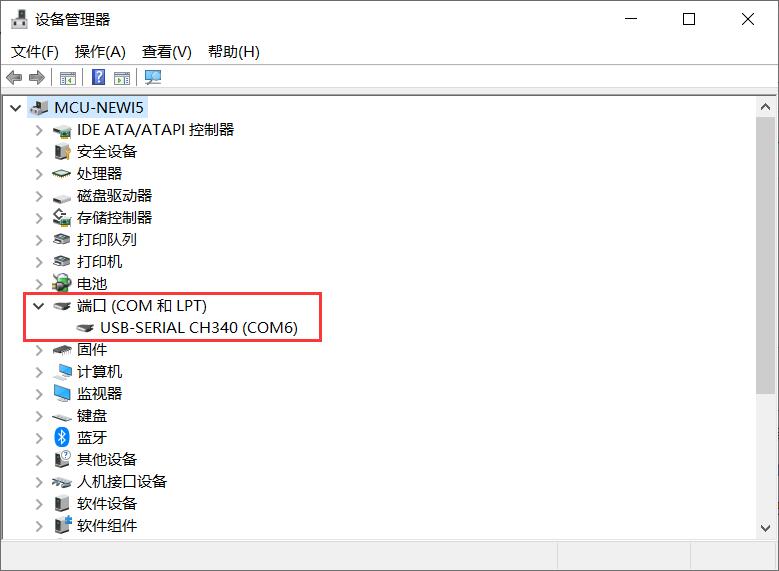
After a successful connection, we can see a USB-to-serial port (COM6 in this example) in the Device Manager:
Next, download the temperature and humidity measurement software:
http://www.mcuzone.com/wiki/3001_TEMP_AND_RH/THTB.zip
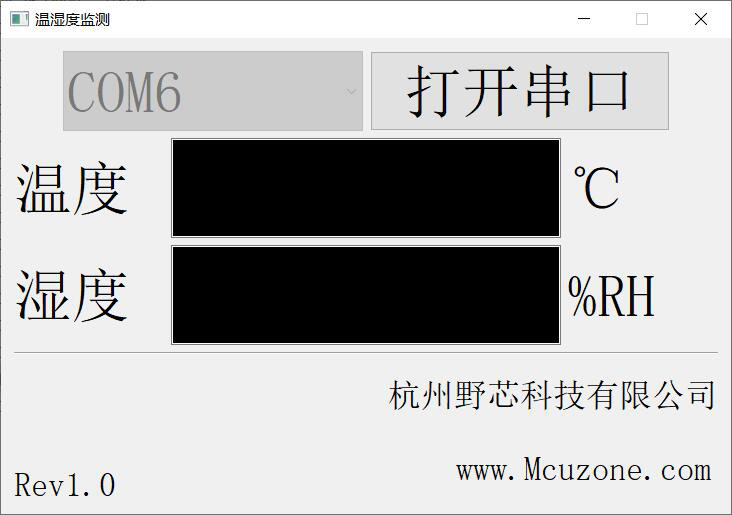
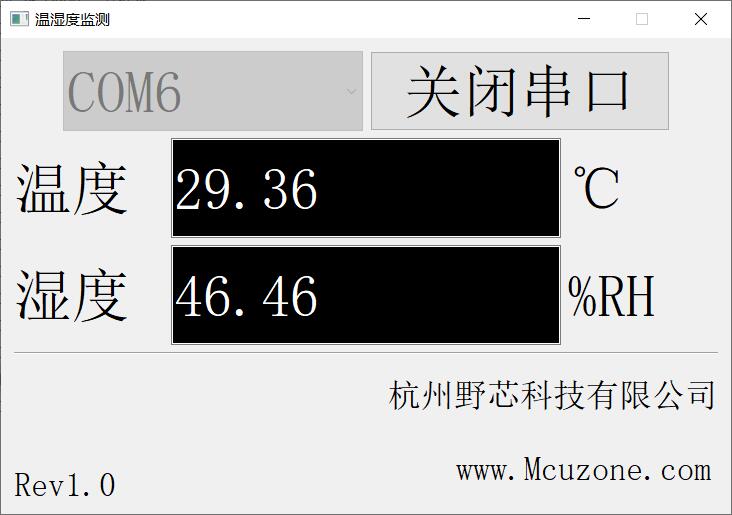
Unzip the compressed file, run TH TB.exe, open the software, and it will automatically detect the USB-to-serial port. Then click "Open Serial Port" to display the current temperature and humidity:
Contact Us
Email: mcuzone@vip.qq.com
Tel: +86(0)13957118045
If there are any omissions, errors, or infringements on this page, please contact us through the above methods. Thank you!
Copyright 2004-2024 Wildchip


 QQ:8204136